
As the days grow shorter and winter nights settle in, there’s a quiet magic in transforming ordinary spaces into glowing wonderlands. One of the most enchanting ways to do this is by projecting delicate snowflake patterns across walls, ceilings, and windows using nothing more than string lights and hand-cut stencils. This low-cost, high-impact project brings a cinematic quality to home decor, evoking the stillness of a snowfall without stepping outside. Whether you're preparing for the holidays, creating a cozy reading nook, or designing an immersive seasonal display, this technique offers endless creative flexibility.
The principle behind these projections is simple: light passes through a shaped opening (the stencil), casting a magnified shadow or silhouette onto a nearby surface. When combined with the flicker of warm LED string lights, the result mimics drifting snowflakes—soft, dynamic, and full of movement. With thoughtful material choices and precise execution, you can turn any room into a winter dreamscape.
Selecting the Right Materials
The success of your snowflake projection hinges on choosing components that work together efficiently. Not all string lights or stencil materials will produce crisp, defined shapes. Understanding the role each element plays ensures optimal results.
String Lights: Opt for mini LED fairy lights with a warm white tone (2700K–3000K). These emit a soft, inviting glow that enhances the ethereal effect without washing out the projections. Avoid cool white or multicolor strands unless you're aiming for a modern or playful aesthetic. Ensure the bulbs are closely spaced—ideally 4 to 6 inches apart—to create overlapping points of light that improve projection density. Battery-powered options offer greater placement flexibility, especially near windows or on shelves where outlets are scarce.
Stencil Material: Use stiff, opaque paper or thin cardboard. Black cardstock works exceptionally well because it absorbs stray light, preventing bleed-through that blurs edges. Avoid flimsy paper or translucent materials like vellum. For durability, consider laser-cut acrylic templates if you plan to reuse them annually.
Projection Surface: Light-colored, matte walls or ceilings yield the clearest projections. Glossy surfaces scatter light and reduce contrast. White or off-white textures allow the snowflake details to stand out. If your wall is dark, hang a large sheet or poster board as a temporary screen.
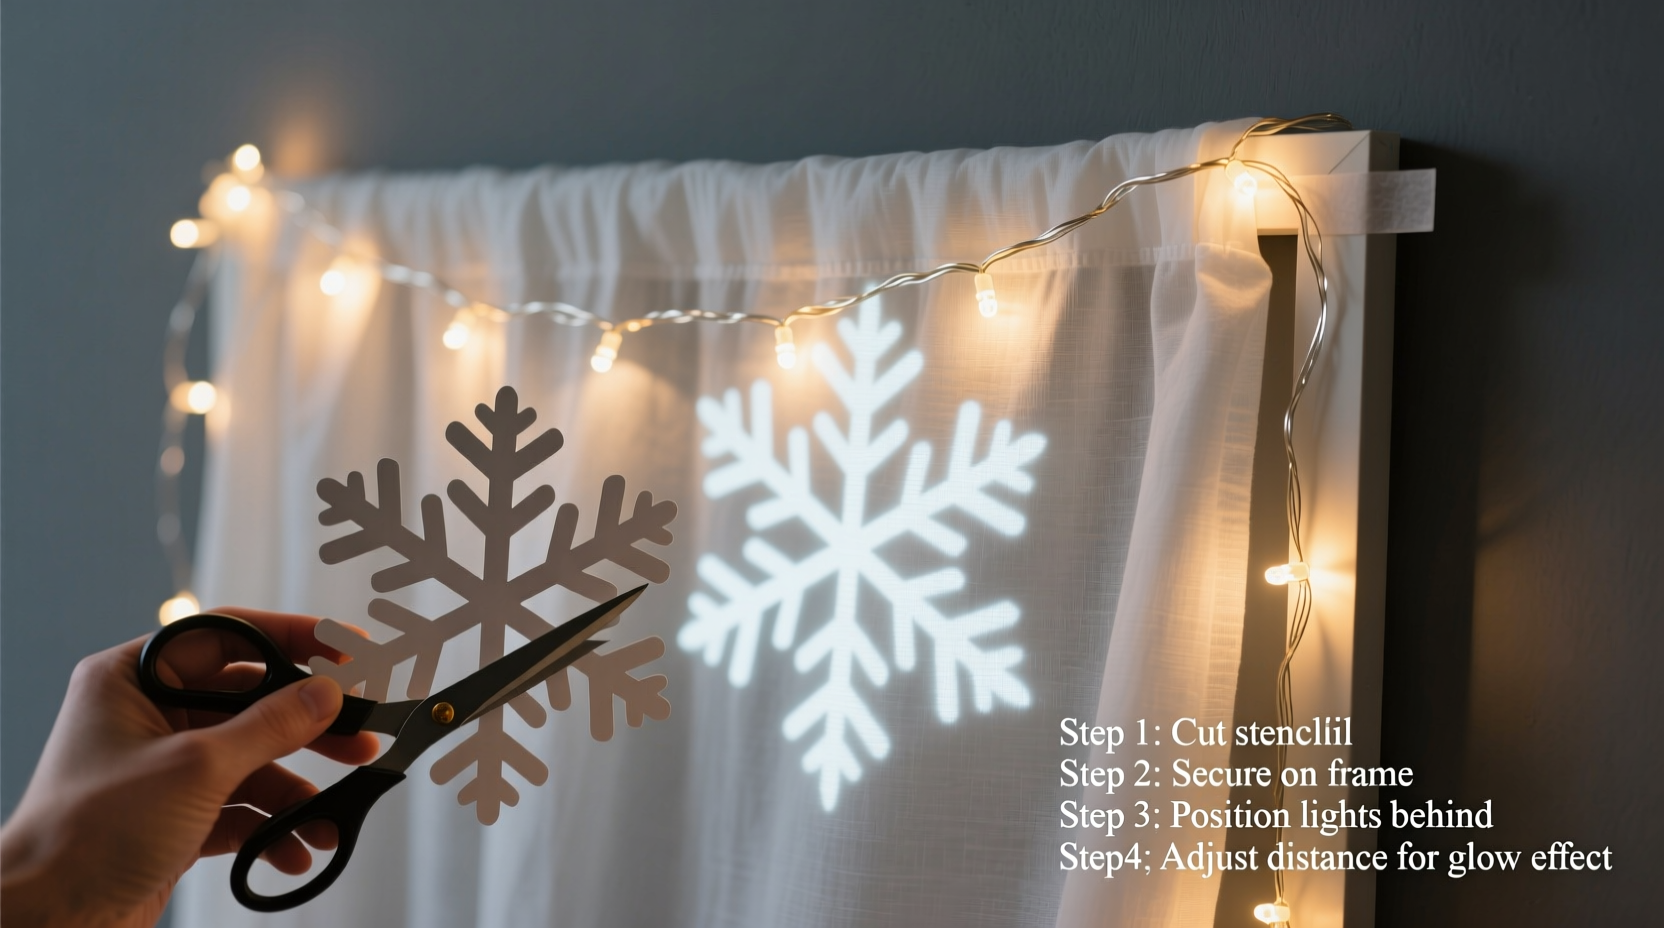
Designing and Cutting Snowflake Stencils
Snowflakes are naturally symmetrical, typically exhibiting six-fold radial symmetry. Recreating this pattern requires precision but doesn’t demand advanced artistic skills. Start with a square piece of black cardstock—6x6 inches is ideal for most indoor setups.
- Fold the square diagonally to form a triangle.
- Fold it again into a smaller triangle.
- Divide the final edge into three equal sections and fold one-third inward, then the other third over it, forming a cone-like shape with a 60-degree tip.
- Cut small shapes—triangles, curves, diamonds—along the folded edges.
- Unfold carefully to reveal your unique snowflake.
For sharper projections, avoid overly intricate cuts. Thin connecting bridges between outer arms may break during handling. Instead, focus on bold negative spaces that maintain structural integrity. You can also print pre-designed snowflake templates and trace them onto cardstock for consistent sizing.
If you're creating multiple stencils, assign different complexity levels—one simple, one medium, one detailed—to layer effects later. Store finished stencils flat in a protective sleeve to prevent warping.
Setting Up the Projection System
Positioning is everything. The distance between the light source, stencil, and wall determines size, sharpness, and brightness of the projected image. Follow this step-by-step guide for reliable results:
- Mount the stencil: Tape the snowflake cutout directly onto the glass or plastic cover of a small cardboard box (like a shoebox). Cut one side open to allow airflow and easy access to the lights.
- Insert the lights: Coil the string lights loosely inside the box, ensuring bulbs press gently against the stencil-covered side. Do not overcrowd—bulbs should align with the cut-out areas without blocking them.
- Seal gaps: Use black electrical tape to close any openings around the stencil to prevent light leakage that could blur the projection.
- Place the projector: Position the box 12 to 24 inches from the target wall. Start closer for larger, softer flakes; move farther for smaller, crisper ones.
- Aim downward for ceiling projections: Tilt the box upward slightly to cast patterns onto the ceiling, ideal for bedtime ambiance.
For multi-directional displays, build several units and place them on different shelves or window sills. Rotate stencil orientation occasionally to vary the falling-snow effect.
| Distance (inches) | Projection Size | Clarity | Best Use Case |
|---|---|---|---|
| 6–12 | Large (12–18\") | Soft, diffused | Dreamy bedroom ceiling |
| 12–24 | Medium (8–12\") | Sharp detail | Wall art, photo backdrops |
| 24+ | Small (4–8\") | Very sharp | Dense window displays |
Enhancing the Effect with Layered Displays
A single snowflake projection is charming, but combining multiple units creates a dynamic, immersive environment. Layering introduces depth and variation, mimicking natural snowfall more convincingly.
Use stencils of varying sizes and intricacy. Place larger, simpler flakes in front (closer to the wall) and smaller, detailed ones farther back. This mimics how real snowflakes fall at different speeds and distances. You can also mix projection colors by using amber, blue-tinted, or color-changing LEDs in separate boxes—though warm white remains the most atmospheric for traditional winter scenes.
For a kinetic effect, attach stencils to slow-moving motors or rotating platforms. A repurposed record player turntable or even a battery-operated lazy Susan can spin a light box gradually, making snowflakes appear to swirl. Alternatively, suspend lightweight stencils on clear fishing line in front of stationary lights; subtle air currents will cause natural motion.
“Light projection isn’t just about illumination—it’s about storytelling. A well-placed shadow can evoke memory, mood, and seasonality.” — Lena Torres, Environmental Lighting Designer
Real-World Application: A Cozy Winter Reading Nook
Sarah, a librarian in Vermont, transformed a corner of her living room into a winter reading retreat using this technique. She built three projector boxes with handmade stencils from recycled cereal boxes painted black. Placing them on a floating shelf beneath a sloped ceiling, she aimed the lights upward. Each evening, after dusk, the ceiling came alive with gently shifting snowflakes. She added a fourth unit with a slow-rotating base made from a cake stand motor, creating the illusion of wind-blown crystals.
Visitors often pause, looking up in quiet awe. Children describe it as “sleeping under a snow globe.” Sarah changes the stencils monthly—starting with simple stars in December, evolving into complex fractals by February. Her project proves that minimal materials, when thoughtfully arranged, can generate profound emotional impact.
Troubleshooting Common Issues
Even well-executed setups can encounter problems. Here’s how to resolve frequent challenges:
- Faint or invisible projections: Increase darkness in the room. Turn off overhead lights and close blinds to eliminate external light pollution.
- Blurry edges: Ensure the stencil lies perfectly flat against the light source. Warped cardstock or loose taping causes diffusion.
- Uneven brightness: Rearrange the string lights so bulbs align with major cut-outs. Replace dead LEDs before assembly.
- Overheating: Use only LED lights, which remain cool. Never use incandescent bulbs inside enclosed boxes.
- Static shadows: Introduce slight movement—a fan on low, hanging mobiles, or manual repositioning every few hours.
FAQ
Can I use rechargeable string lights?
Yes, rechargeable LED string lights work perfectly and reduce battery waste. Just ensure they provide consistent brightness throughout their charge cycle.
Are these safe to leave on overnight?
LED-based setups generate negligible heat and are generally safe for extended use. However, never leave any electrical device unattended for long periods. Use timers to automate shut-off after 4–6 hours.
Can I make moving projections without motors?
Absolutely. Hang the entire projector box from flexible wire or monofilament line and give it a gentle push. The resulting sway creates fluid motion. Alternatively, place it near a heating vent where rising air induces subtle vibration.
Checklist: Building Your First Glowing Snowflake Projector
- ☐ Gather materials: black cardstock, LED string lights, small cardboard box, tape, scissors
- ☐ Design and cut at least one snowflake stencil using folding method
- ☐ Attach stencil securely over one face of the box
- ☐ Insert lights, ensuring bulbs contact the stencil area
- ☐ Seal gaps with black tape to prevent light bleed
- ☐ Test in a darkened room at 12-inch distance
- ☐ Adjust position and bulb placement for clarity
- ☐ Add motion (optional): fan, rotation, or suspension
- ☐ Deploy in desired location—wall, ceiling, or window
- ☐ Enjoy and refine based on visual feedback
Conclusion
Creating glowing snowflake projections is more than a craft—it’s an act of intentional wonder. In a world saturated with digital effects, there’s deep satisfaction in generating beauty through simple physics and handmade effort. This project invites participation, experimentation, and personalization. It costs little, stores easily, and delivers disproportionate joy.
Start small: one box, one stencil, one quiet corner transformed. Then expand—add layers, motion, sound. Share the idea with children, neighbors, community centers. Imagine libraries bathed in silent snowfall, classrooms where science meets art, porches that welcome visitors with celestial patterns. The technique is humble, but its potential is expansive.


 浙公网安备
33010002000092号
浙公网安备
33010002000092号 浙B2-20120091-4
Comments
No comments yet. Why don't you start the discussion?