
Over time, even the best headphones lose their edge. Dust builds up in the earcups, padding compresses, cables fray, and audio quality degrades—leaving once-vibrant sound flat and lifeless. But before you replace them, consider this: most issues can be reversed. With a few household items and some careful attention, you can restore your aging headphones to near-original performance. This guide walks through proven methods to revive sound quality, improve comfort, and extend lifespan—all without spending on a new pair.
Clean the Drivers to Restore Clarity
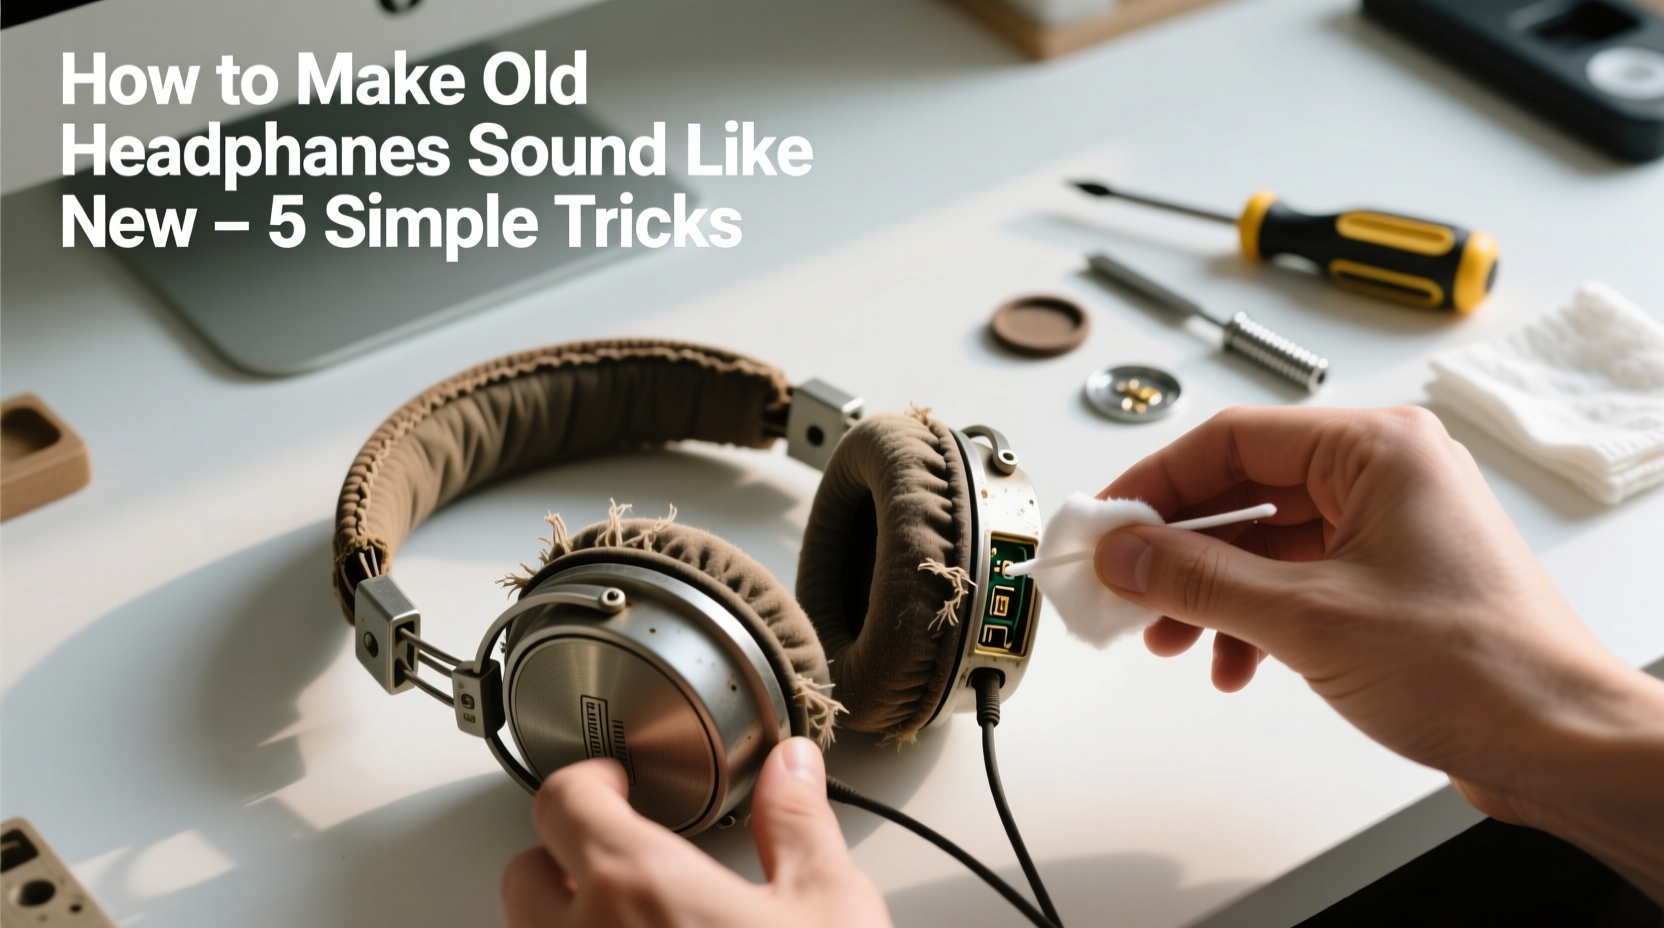
The tiny speaker units inside your headphones, known as drivers, are responsible for producing sound. When dust, earwax, or debris clogs the mesh grilles or diaphragm, high frequencies become muffled, and overall clarity suffers. Cleaning them properly can dramatically improve audio fidelity.
Use a soft-bristled toothbrush or a clean makeup brush to gently sweep away surface dust from the outer mesh. For deeper buildup, dampen a cotton swab with isopropyl alcohol (70% concentration) and lightly wipe around the edges of the grille. Avoid pressing into the driver itself—this delicate component can be damaged by moisture or pressure.
For over-ear models, remove the ear pads if possible. This gives direct access to the driver housing and allows for more thorough cleaning. If pads aren’t removable, angle the swab carefully to avoid pushing debris further in. After cleaning, let the area air-dry completely before use.
Revive Worn Ear Pads for Better Comfort and Sound
Ear pads play a crucial role in both comfort and acoustic performance. As foam degrades or leatherette cracks, seal integrity weakens—leading to sound leakage and reduced bass response. Replacing or refurbishing pads can instantly enhance the listening experience.
If the pads are still intact but feel stiff or cracked, try conditioning them. For synthetic leather pads, apply a small amount of vinyl conditioner with a microfiber cloth. Buff gently to restore flexibility. Foam pads can’t be repaired, but they’re often replaceable. Many third-party manufacturers offer affordable replacements that snap on easily.
Upgrading to memory foam or velour pads not only improves comfort but also enhances passive noise isolation. A better seal means more accurate sound reproduction and stronger bass presence—two hallmarks of “like-new” performance.
“Replacing worn ear pads is one of the most cost-effective upgrades you can make. It restores acoustic coupling and brings back the immersive quality users miss.” — Daniel Reyes, Audio Technician at SoundCare Labs
Fix Cable Issues That Degrade Signal Quality
Frayed wires or loose connections are common culprits behind crackling sounds, mono output, or intermittent audio. These issues don’t always mean the headphones are beyond repair—they often stem from localized damage near the plug or strain relief point.
Inspect the cable thoroughly, especially where it connects to the jack and the earcup. If you notice exposed wires or kinks, reinforcement or replacement may be needed. For minor fraying, wrap the area with heat-shrink tubing or electrical tape to prevent further damage. However, this is a temporary fix.
A permanent solution involves soldering a new cable. Many premium headphones use detachable or modular cables, making swaps easy. Check the manufacturer’s website or online retailers for compatible replacements. If your model isn’t modular, consider visiting a repair shop or learning basic soldering techniques. Re-cabling not only eliminates static but also ensures consistent signal transmission across both channels.
Step-by-Step: Replace a Headphone Cable
- Identify the correct replacement cable for your model.
- Unscrew or gently pry open the earcup housing (if necessary).
- Desolder the old cable from the driver terminals using a low-wattage iron.
- Solder the new cable, matching wire colors (typically left, right, ground).
- Reassemble the housing and test audio output on both sides.
Optimize Fit and Seal for Improved Acoustics
Even perfectly cleaned drivers won’t perform well if the headphones don’t sit flush against your ears. Poor fit leads to sound leakage, weak bass, and listener fatigue. Adjusting the headband and ensuring proper seal can transform audio quality.
Plastic headbands can lose tension over time, causing the cups to sit loosely. To restore grip, gently bend the headband outward slightly. Do this incrementally to avoid snapping the material. For metal-reinforced bands, warm the plastic sections with a hairdryer for 15–20 seconds to increase flexibility before adjusting.
Position the earcups so they fully enclose your ears without pressing painfully. A tight but comfortable seal enhances passive noise isolation and allows drivers to operate efficiently. Test the fit by playing music with deep bass—if you hear thumping through the room, the seal needs improvement.
| Issue | Diagnosis | Solution |
|---|---|---|
| Muffled highs | Dust in driver grille | Clean with dry brush or alcohol-swabbed cotton |
| Weak bass | Poor ear seal or degraded pads | Replace pads or adjust fit |
| Crackling audio | Frayed cable or loose connection | Reinforce or replace cable |
| One-sided sound | Broken wire or disconnected terminal | Solder new cable or repair joint |
| Distorted volume | Dirty audio jack or oxidized contacts | Clean jack with contact cleaner and swab |
Enhance Sound with Software and EQ Tweaks
Hardware fixes go a long way, but software adjustments can fine-tune the final result. Even if your headphones are physically restored, age-related driver wear might leave them sounding slightly dull or imbalanced. Equalization (EQ) can compensate for these shifts.
Most operating systems include built-in audio enhancement tools. On Windows, use the “Enhancements” tab in Sound Settings. On macOS, try the built-in EQ in Music app preferences. Mobile users can download apps like PowerAMP or Equalizer+ to customize frequency response.
Start with a neutral preset and boost frequencies based on what’s missing. If bass feels thin, add +3dB at 60–100Hz. If vocals lack presence, gently increase 2–4kHz. Avoid over-amplifying any range, as this can cause distortion or listener fatigue.
For advanced tuning, use measurement-based EQ tools like AutoEQ (available on GitHub). By selecting your headphone model, you can generate a correction profile that flattens the frequency response, bringing aged gear closer to studio accuracy.
Mini Case Study: Reviving 5-Year-Old Over-Ear Headphones
Mark had owned a pair of mid-tier over-ear headphones for five years. Initially praised for their rich bass and clear mids, they’d deteriorated into crackling audio and weak soundstage. He was ready to replace them until he tried a systematic refresh.
He started by removing the ear pads and cleaning the drivers with a soft brush and alcohol swabs. The left cup revealed a thick layer of dust blocking the grille—after cleaning, stereo balance improved noticeably. Next, he replaced the hardened leatherette pads with memory foam ones, which restored a snug seal.
The cable showed fraying near the plug. Instead of taping it, Mark ordered a compatible replacement cable online for $12 and swapped it out using a precision screwdriver and soldering iron. Finally, he applied an EQ profile tailored to his model using an Android equalizer app.
The result? Clearer highs, tighter bass, and no more dropouts. “They sound almost as good as when I bought them,” Mark said. “And I saved $150.”
Prevent Future Degradation with Smart Habits
Maintenance doesn’t end after a cleanup. Preventative care ensures your headphones stay in peak condition longer. Simple daily habits can delay wear and preserve sound quality.
- Always store headphones in a case or on a stand—never toss them into a bag unprotected.
- Wipe down ear pads weekly with a disinfectant wipe (alcohol-free for leather).
- Coil cables loosely and avoid wrapping them tightly around devices.
- Disconnect them from sources when not in use to reduce electrical stress.
- Keep them away from extreme temperatures and humidity, which degrade adhesives and foam.
“The difference between a three-year lifespan and a seven-year one often comes down to storage and routine cleaning.” — Lena Torres, Consumer Electronics Repair Specialist
Checklist: Restore Your Headphones in 6 Steps
- Remove ear pads (if possible) and inspect for wear.
- Clean driver grilles with a dry brush or alcohol-dampened swab.
- Condition or replace degraded ear pads.
- Inspect cable for frays, especially near connectors.
- Repair or replace damaged cables using soldering or modular parts.
- Apply EQ settings to fine-tune frequency balance.
FAQ
Can I clean my headphones with hand sanitizer?
No. Hand sanitizers contain alcohol and other additives that can dry out leather, discolor plastics, and damage adhesives. Use isopropyl alcohol (70%) sparingly on non-porous surfaces only, and never on drivers.
Why do my headphones sound worse over time?
Several factors contribute: dust buildup on drivers, compression of ear pad foam, cable degradation, and minor physical damage from improper storage. Most of these are reversible with cleaning and maintenance.
Are wireless headphones easier to maintain than wired ones?
Wireless models eliminate cable wear but introduce battery degradation. They’re harder to repair internally, so surface cleaning and protective cases become even more critical. Wired headphones typically offer more repairability and longevity with DIY fixes.
Conclusion
Headphones don’t have to be disposable. With targeted cleaning, thoughtful repairs, and smart tuning, you can breathe new life into old gear. The crisp highs, deep bass, and immersive sound you once enjoyed are likely just a few simple steps away. Whether it’s a $50 pair or a high-end audiophile set, restoration saves money, reduces e-waste, and preserves sentimental value. Don’t discard—revive. Your favorite headphones deserve a second act.


 浙公网安备
33010002000092号
浙公网安备
33010002000092号 浙B2-20120091-4
Comments
No comments yet. Why don't you start the discussion?