
In a world increasingly aware of environmental impact and personal wellness, small changes can lead to meaningful results. One such change is replacing disposable cotton rounds with homemade reusable makeup remover pads. These simple swaps not only reduce landfill waste but also offer a gentler touch on sensitive skin. Unlike conventional wipes that may contain bleach or synthetic fibers, DIY reusable pads let you choose soft, breathable fabrics like organic cotton, bamboo, or flannel—materials known for their comfort and sustainability.
Making your own pads is surprisingly easy, cost-effective, and customizable. Whether you’re new to sewing or have been crafting for years, this project requires minimal tools and materials. Once completed, these pads can be washed and reused hundreds of times, saving you money over time while aligning with a zero-waste lifestyle. Beyond the environmental benefits, many users report softer skin and fewer irritations after switching from abrasive disposables to gentle, washable alternatives.
Why Switch to Reusable Makeup Remover Pads?
The average person uses between 300 and 500 cotton rounds annually. Multiply that by millions of consumers, and the environmental toll becomes clear. Most disposable pads are made from non-organic cotton grown with heavy pesticide use and processed with chlorine bleach. After a single use, they end up in landfills or clog drainage systems if flushed.
Reusable pads eliminate this cycle. They last for years with proper care and significantly cut down household waste. Additionally, because they’re made from natural, unbleached fabrics, they're less likely to cause allergic reactions or micro-abrasions on delicate facial skin. Dermatologists often recommend soft textiles for people with conditions like rosacea or eczema, where harsh textures can trigger flare-ups.
“Switching to reusable pads isn’t just about sustainability—it’s a skincare upgrade. The right fabric removes makeup gently without stripping moisture.” — Dr. Lena Patel, Board-Certified Dermatologist
Choosing the Right Fabric for Softness and Absorbency
The performance of your makeup remover pads depends largely on the fabric choice. You want something absorbent enough to hold toner or micellar water, yet soft enough not to irritate the skin. Not all fabrics meet both criteria, so it's important to select wisely.
Natural fibers are ideal. Here’s a breakdown of top options:
| Fabric Type | Softness Level | Absorbency | Best For |
|---|---|---|---|
| Bamboo Fleece | ★★★★★ | High | Sensitive skin, oily makeup removal |
| Organic Cotton Flannel | ★★★★☆ | Medium-High | Everyday use, light cleansing |
| Terry Cloth (Cotton) | ★★★☆☆ | Very High | Heavy-duty removal, waterproof lining side |
| Velour (Cotton or Bamboo Blend) | ★★★★★ | Medium | Luxury feel, dry wiping or light liquids |
| Microfiber (Recycled) | ★★★☆☆ | High | Non-natural option; effective but may pill |
Bamboo blends stand out due to their natural antibacterial properties and silky texture. However, ensure any bamboo fabric is mechanically processed (not chemically treated) to retain its eco-friendly benefits. Avoid synthetic fleece unless it’s recycled, as petroleum-based materials shed microplastics during washing.
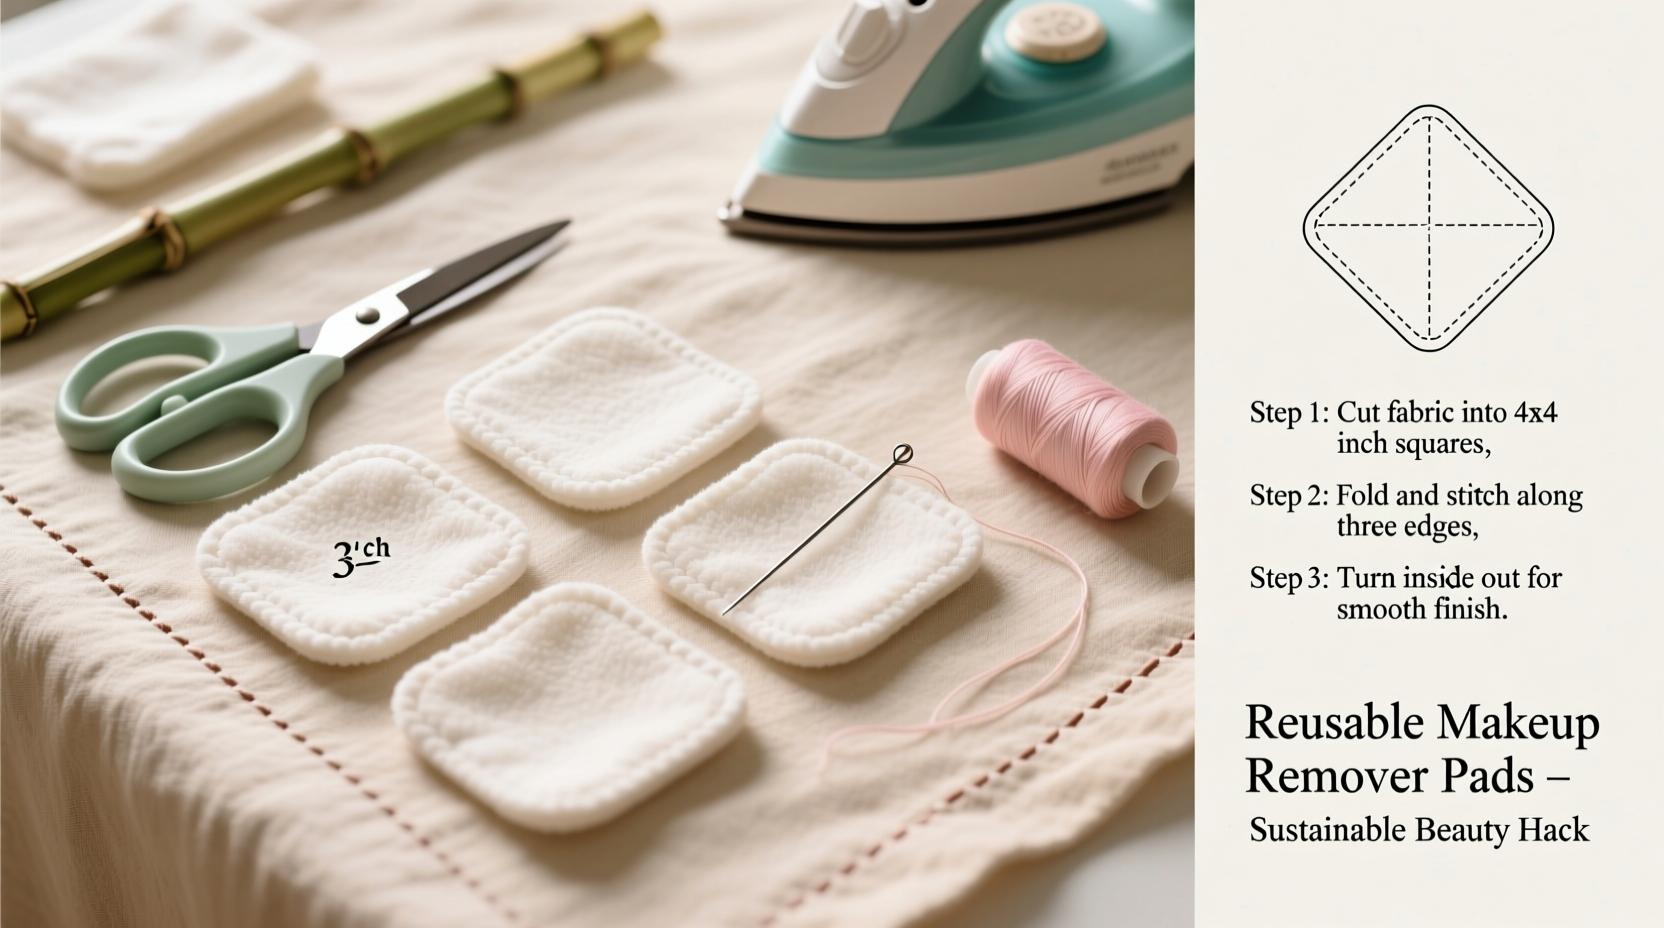
Step-by-Step Guide to Making Reusable Makeup Pads
You don’t need advanced sewing skills to create high-quality pads. With basic supplies and an hour of time, you can make a full set at home. Below is a detailed guide suitable for beginners.
- Gather Supplies
- Soft fabric (cotton flannel, bamboo fleece, or velour)
- Scissors or rotary cutter
- Ruler or cutting mat
- Pins or clips
- Sewing machine or needle for hand stitching
- Thread (preferably cotton or polyester)
- Chalk or fabric marker
- Cut the Fabric
Decide on pad size. A standard diameter is 3 inches (7.6 cm), large enough to cover fingertips but small enough for precision. Use a circular object like a jar lid or template to trace consistent circles. Cut two layers per pad—one top layer and one backing. For extra absorbency, cut a third middle layer from terry cloth.
- Layer and Pin
Place the top and bottom pieces together with the “right” sides facing inward. If using a middle absorbent layer, sandwich it between the outer fabrics. Pin around the edge to prevent shifting during sewing.
- Sew the Edges
Using a sewing machine, stitch around the perimeter with a ¼-inch seam allowance. Leave a 1.5-inch gap unsewn for turning. If hand-sewing, use a backstitch for durability. Keep stitches close together to prevent fraying.
- Turn and Press
Flip the pad right-side out through the opening. Use a chopstick or pointed tool to push out the edges gently. Iron flat to smooth seams and prepare for final stitching.
- Topstitch (Optional but Recommended)
Sew around the entire edge again, about ⅛ inch from the border. This closes the gap and gives a polished finish while reinforcing the structure. Topstitching also prevents layers from bunching after repeated washes.
- Repeat and Batch-Make
Make 8–12 pads at once to build a rotation set. Having multiple allows one batch to be in use while others are being laundered.
No-Sew Option for Beginners
If you don’t own a sewing machine, consider fabric glue or iron-on bonding tape. Cut two identical circles, apply adhesive to the edge of one, press the second on top, and clamp under a heavy book until dry. While less durable than sewn versions, glued pads still last 20–30 uses with careful handling.
Washing and Care Tips for Longevity
Proper maintenance ensures your pads remain hygienic and functional for over a year. Since they come into contact with oils, makeup, and skincare products, regular cleaning is essential.
- After each use, rinse pads under cool water to remove residue.
- Store used pads in a small mesh laundry bag or ventilated container—not sealed plastic, which promotes mildew.
- Wash every 3–5 uses in cold or warm water with mild detergent. Avoid fabric softeners, which coat fibers and reduce absorbency.
- Tumble dry on low or air-dry flat to preserve elasticity and shape.
- Replace pads when fraying occurs or after 6–12 months of frequent use.
Dos and Don'ts of Pad Maintenance
| Do | Don't |
|---|---|
| Use fragrance-free detergent | Use bleach or strong chemicals |
| Wash with similar soft fabrics (e.g., underwear, baby clothes) | Wash with towels or jeans (causes pilling) |
| Inspect for loose threads weekly | Ignore signs of mold or persistent smell |
| Rotate pads to extend life | Leave damp pads bunched in a drawer |
Real-Life Example: How Sarah Reduced Her Beauty Waste
Sarah, a 32-year-old graphic designer from Portland, used to go through three packs of cotton rounds monthly. After learning about microplastic pollution linked to disposable wipes, she decided to try making her own reusable pads. Using leftover bamboo fabric from a failed pillow project, she followed an online tutorial and created ten circular pads in an afternoon.
At first, she was skeptical about effectiveness. But after soaking one in micellar water, she found it removed waterproof mascara just as well as disposables—without leaving lint behind. She now rotates six pads weekly, washing them with her delicates. Over 10 months, she estimates avoiding over 300 single-use rounds. “It feels good knowing I’m not contributing to waste,” she says. “Plus, my skin stopped reacting to whatever chemicals were in those bleached pads.”
Checklist: Make Your First Set Today
- ☐ Choose soft, absorbent fabric (bamboo, flannel, or velour)
- ☐ Cut 8–12 pairs of 3-inch circles
- ☐ Layer and pin pieces with right sides together
- ☐ Sew around edges, leaving a small gap
- ☐ Turn right-side out and press flat
- ☐ Topstitch closed for durability
- ☐ Wash before first use to remove residues
- ☐ Store clean pads in a breathable container
Frequently Asked Questions
Can I use these pads with oil-based cleansers?
Yes. Natural fiber pads work well with oil-based cleansers like jojoba or olive oil. Just be sure to wash them promptly to prevent oil buildup, which can turn rancid over time. Washing within 24 hours is ideal.
Are reusable pads sanitary?
When cleaned properly, yes. Regular washing removes bacteria and cosmetic residues. For added safety, sanitize occasionally by soaking in a mix of water and white vinegar (1:4 ratio) for 15 minutes before laundering.
How many pads do I need to start?
A set of 8–12 allows for daily use with rotation. Fewer means washing every few days; more lets you go longer between laundry cycles. Adjust based on your routine.
Final Thoughts and Call to Action
Creating your own reusable makeup remover pads is more than a craft project—it’s a step toward mindful consumption and better self-care. With soft, thoughtfully chosen fabrics, you protect both your skin and the planet. The initial effort pays off in long-term savings, reduced clutter, and peace of mind knowing exactly what touches your face each night.
These pads represent a growing movement: conscious beauty. It’s not about perfection, but progress. Start small. Make one pad today. Then another. Soon, you’ll have a sustainable system that feels as good as it looks.


 浙公网安备
33010002000092号
浙公网安备
33010002000092号 浙B2-20120091-4
Comments
No comments yet. Why don't you start the discussion?