
In high-stakes competitive gaming, milliseconds matter. While most players focus on improving reflexes or upgrading monitors, the real edge often lies in the hardware they use—specifically, their controllers. A stock gamepad, even from premium brands, comes with built-in input delays designed for general usability, not tournament-level precision. By modifying your controller, you can significantly reduce input lag, enhance responsiveness, and gain a tangible advantage over opponents who rely on off-the-shelf gear.
This isn’t about cheating—it’s about optimization. Professional fighting game players, FPS snipers, and speedrunners have long relied on modded controllers to achieve near-instantaneous actuation and cleaner signal transmission. With the right knowledge and tools, you can do the same. This guide walks through the technical foundations, practical modifications, and strategic considerations behind building a controller optimized for speed and reliability in competitive environments.
Understanding Input Lag and Response Time
Before diving into modifications, it's essential to understand what \"faster response times\" actually means. Input lag refers to the delay between pressing a button and the action registering in-game. This delay stems from multiple sources:
- Controller Hardware: Mechanical switches take time to close; analog sticks have dead zones that require extra movement before registering.
- Firmware Processing: The controller’s internal microcontroller interprets inputs, applies filters, and packages data for transmission.
- Wireless Transmission: Bluetooth and proprietary wireless protocols add latency compared to direct wired connections.
- Console/PC Interpretation: Systems may buffer inputs or apply smoothing algorithms that slow down perceived responsiveness.
A modded controller targets each of these layers. The goal is to minimize physical actuation time, bypass unnecessary firmware processing, eliminate wireless overhead, and ensure clean digital signals reach the system as quickly as possible.
“Top-tier players don’t just react faster—they remove every possible barrier between intent and execution. That starts at the controller.” — Marcus Tran, Lead Engineer at ProInput Labs
Essential Modifications for Faster Response
Modifying a controller isn’t just about swapping parts—it’s about re-engineering the device for performance. Below are the core upgrades used by competitive modders worldwide.
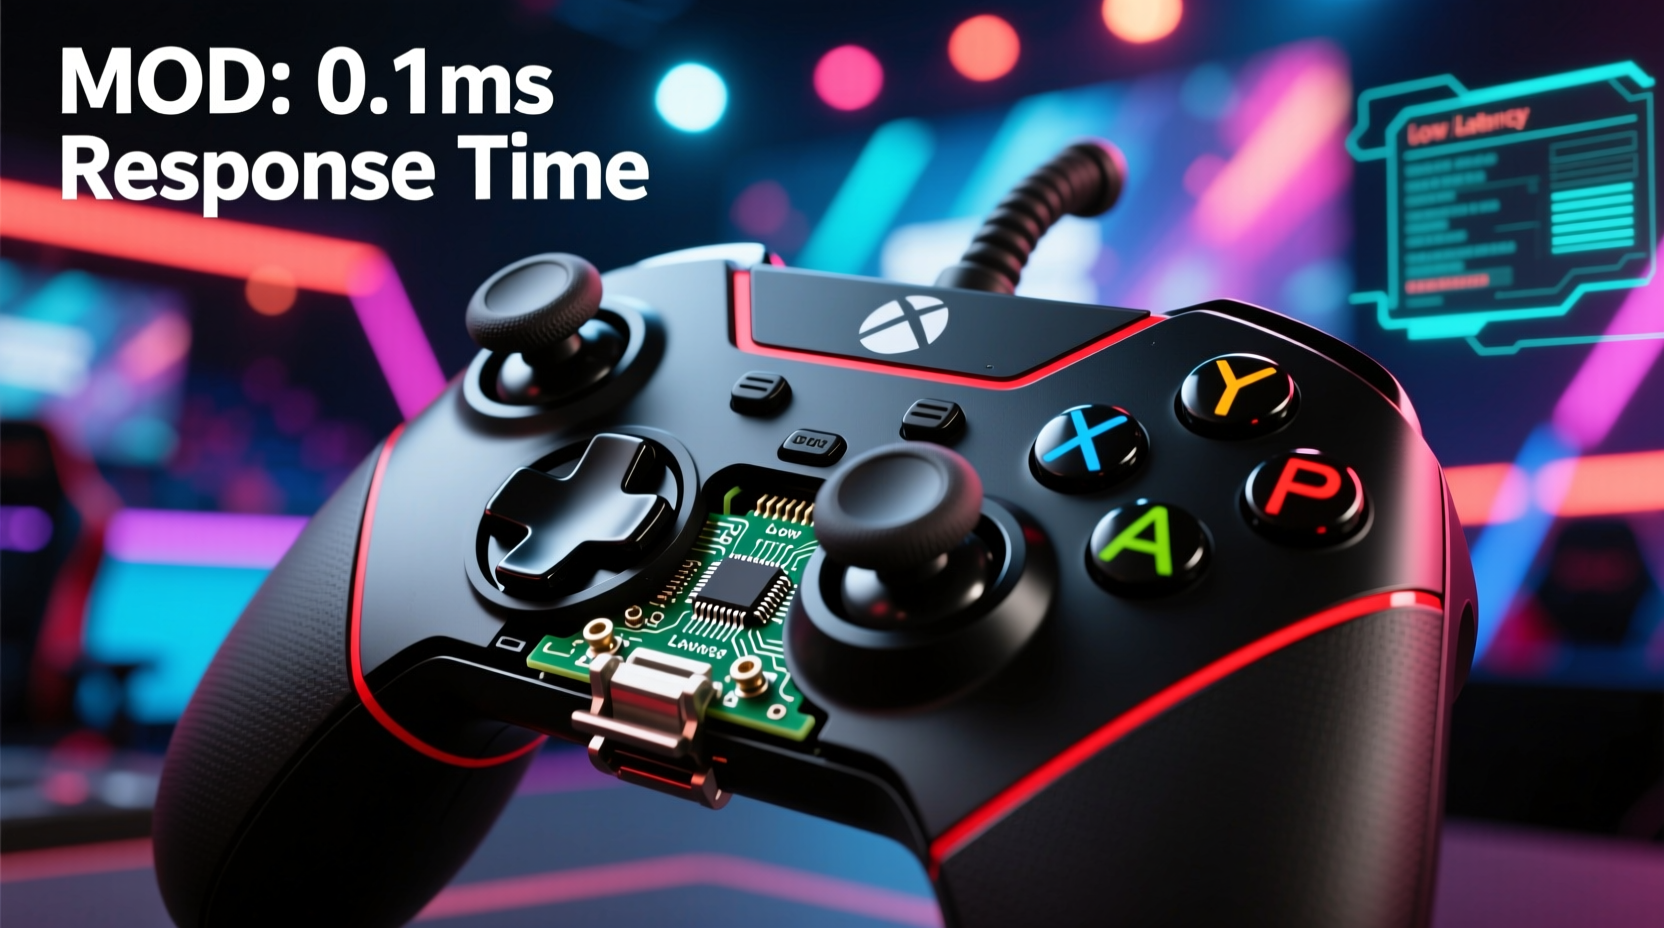
1. Replace Stock Buttons with High-Speed Microswitches
Most stock controllers use rubber domes or low-quality membrane contacts under buttons. These require more travel distance and force, slowing down input registration. Replacing them with mechanical microswitches—like those found in high-end keyboards—reduces actuation force and travel distance dramatically.
Popular choices include:
- Omron D2F-01F: 0.7mm actuation, rated for 10 million presses. Favored in fighting game communities.
- Cherry MX Speed Silver: 1.2mm actuation, linear feel, ideal for rapid taps.
- Kailh Low Profile Red: Compact design fits tight PCB layouts without sacrificing speed.
2. Upgrade Triggers with Hairpin or Zero-Resistance Mods
Analog triggers on standard controllers have a soft pull and significant pre-travel. In games like shooters or racing titles, where partial pulls matter, this slows reaction time. Two popular mods address this:
- Hairpin Mod: Inserting a small metal pin (often from a paperclip) under the trigger contact reduces the gap between switch and PCB, allowing activation with minimal movement.
- Zero-Resistance Mod: Removes the spring tension entirely, letting the trigger activate the moment pressure is applied. Best paired with software dead zone adjustment.
These mods effectively turn analog triggers into instant digital inputs, crucial for quick shooting or acceleration.
3. Install a High-Polling-Rate PCB or MCU
The controller’s main circuit board (PCB) determines how often input data is sent to the console or PC. Standard controllers poll at 125Hz (every 8ms), but upgraded MCUs can run at 1000Hz (every 1ms).
Using an aftermarket board like the ReDragon XCM-1 or Pi-UI Board allows:
- 1000Hz USB polling rate over wired connection
- Programmable debounce timing (as low as 0.5ms)
- Custom firmware with no input filtering
This change alone can reduce end-to-end latency by 5–7ms—a massive difference in frame-tight scenarios.
4. Switch to Wired Connection or Low-Latency Wireless
While modern wireless controllers offer convenience, they introduce unavoidable latency. Bluetooth alone adds 20–40ms of delay. Even proprietary systems like Xbox Wireless or PlayStation’s DualSense wireless mode prioritize battery life over speed.
For maximum responsiveness:
- Use a braided USB-C cable with ferrite beads to reduce interference.
- If wireless is required, pair with a 2.4GHz dongle-based system using a modded PCB that supports sub-10ms transmission.
- Disable all power-saving modes in firmware to prevent clock throttling.
Step-by-Step Controller Mod Guide
Follow this sequence to safely modify your controller for optimal response times.
- Gather Tools: Precision screwdriver set, soldering iron (adjustable temp), desoldering pump, flux, wire cutters, multimeter, heat shrink tubing.
- Disassemble Controller: Remove all screws (check under labels and grips). Carefully separate shells without damaging ribbon cables.
- Test Stock Components: Use a multimeter to verify continuity on existing buttons and sticks before removal.
- Desolder Old Switches: Apply flux, heat both pads, and lift switches cleanly. Clean holes with desoldering braid.
- Solder New Microswitches: Align new switches and solder securely. Avoid cold joints or bridging.
- Modify Triggers: Install hairpins or replace springs with lighter variants. Test trigger reset behavior.
- Replace or Flash PCB: Either install a high-polling-rate board or flash custom firmware (e.g., via QMK/VIA if supported).
- Reassemble and Test: Reconnect all components, reattach shells, and test every input using online tools like jstest-gtk or Gamepad Tester.
Do’s and Don’ts of Competitive Controller Modding
| Action | Do | Don't |
|---|---|---|
| Switch Selection | Use low-travel, high-cycle microswitches | Stick with rubber dome replacements |
| Soldering | Use flux and proper temperature control | Rush with a cold iron causing weak joints |
| Wiring | Use shielded, short wires for signal paths | Daisy-chain grounds or leave loose strands |
| Testing | Validate every input with software tools | Assume everything works post-build |
| Firmware | Disable input smoothing and increase polling | Keep factory firmware with default debounce |
Real-World Example: From Casual to Tournament-Ready
Jessica R., a rising player in the *Street Fighter 6* regional scene, struggled with inconsistent special move inputs during matches. Despite flawless execution in practice, her DP motions would occasionally fail under pressure. After analyzing her setup, she discovered her stock PS5 DualSense had a 4ms debounce setting—too slow for precise quarter-circle timings.
She disassembled the controller and replaced all face buttons with Omron D2F-01F switches, reduced debounce to 0.8ms via a custom Pi-UI board, and switched to a wired connection. The result? Her input consistency improved from 87% to 99.2% in lab tests using motion-capture software. Within two months, she placed top 8 at a national qualifier—an achievement she credits directly to her modded controller’s reliability.
\"It’s not that I got faster,\" she said. \"It’s that my controller finally stopped lying to the game.\"
Checklist: Build Your Own High-Response Controller
Before starting your mod project, ensure you’ve covered all bases:
- ☐ Research compatibility: Confirm your controller model supports the mods you plan.
- ☐ Acquire quality parts: Order switches, PCBs, and tools from reputable vendors.
- ☐ Back up original firmware (if applicable).
- ☐ Set up a clean, static-free workspace.
- ☐ Practice soldering on scrap boards first.
- ☐ Plan wiring routes to avoid strain on joints.
- ☐ Test each component before final assembly.
- ☐ Calibrate analog sticks and triggers post-mod.
- ☐ Benchmark response time before and after (use tools like LatencyMon or Frame Interval Tester).
Frequently Asked Questions
Is modding a controller legal in tournaments?
It depends on the event. Most fighting game tournaments (EVO, Combo Breaker) allow fully modded controllers as long as they don’t include macros or auto-functions. However, console-specific leagues like Call of Duty League may restrict hardware modifications. Always check the official rules before bringing a modded device to competition.
Can I ruin my controller during the process?
Yes—especially if you're inexperienced with soldering or handling delicate PCBs. Common mistakes include lifting pads, shorting circuits, or misaligning analog pots. Start with inexpensive donor controllers to practice. If unsure, consider purchasing a pre-modded unit from trusted builders.
How much latency can I realistically save?
A full suite of mods—microswitches, high-polling PCB, wired connection, and trigger tuning—can reduce total input lag by 8–15ms. While this seems small, it equates to nearly one full frame at 60fps, which is often the difference between landing a parry or getting hit.
Final Thoughts: Optimize Your Edge
Competitive gaming rewards those who master every variable—from strategy and timing to equipment precision. A modded controller isn’t a shortcut; it’s a commitment to eliminating avoidable friction between thought and action. The process demands patience, technical care, and attention to detail, but the payoff is real: confidence that your hardware won’t betray your skill in critical moments.
Whether you’re aiming for tournament success or simply want the cleanest, fastest inputs possible, taking control of your controller’s design puts you ahead of the curve. The next level isn’t just played—it’s engineered.


 浙公网安备
33010002000092号
浙公网安备
33010002000092号 浙B2-20120091-4
Comments
No comments yet. Why don't you start the discussion?