
A cluttered makeup drawer is more than just an eyesore—it’s a daily obstacle. When products are buried under one another or scattered across the surface, getting ready becomes frustrating and time-consuming. For those with limited space, every inch counts. The good news: even the smallest drawer can be transformed into a functional, efficient beauty station with the right approach. This guide walks through proven strategies to declutter, categorize, and optimize your makeup storage so that everything you need is visible, accessible, and neatly contained.
Step 1: Empty and Evaluate Your Collection
The first step in organizing any space is to remove everything and assess what you actually own. Pull out all items from your makeup drawer—foundation, lipsticks, brushes, palettes, tools, and anything else tucked inside. Lay them on a clean surface where you can see each piece clearly.
This process often reveals duplicates, expired products, or items you haven’t used in months. Be honest about what serves your routine. If a product hasn’t been touched in over a year, consider donating it (if unopened), recycling packaging responsibly, or discarding it safely.
Evaluating also helps identify which categories dominate your collection. Do you have 15 lipsticks but only two eyeshadows? Are travel-sized items taking up valuable real estate? Understanding usage patterns ensures your organization system supports your habits, not fights against them.
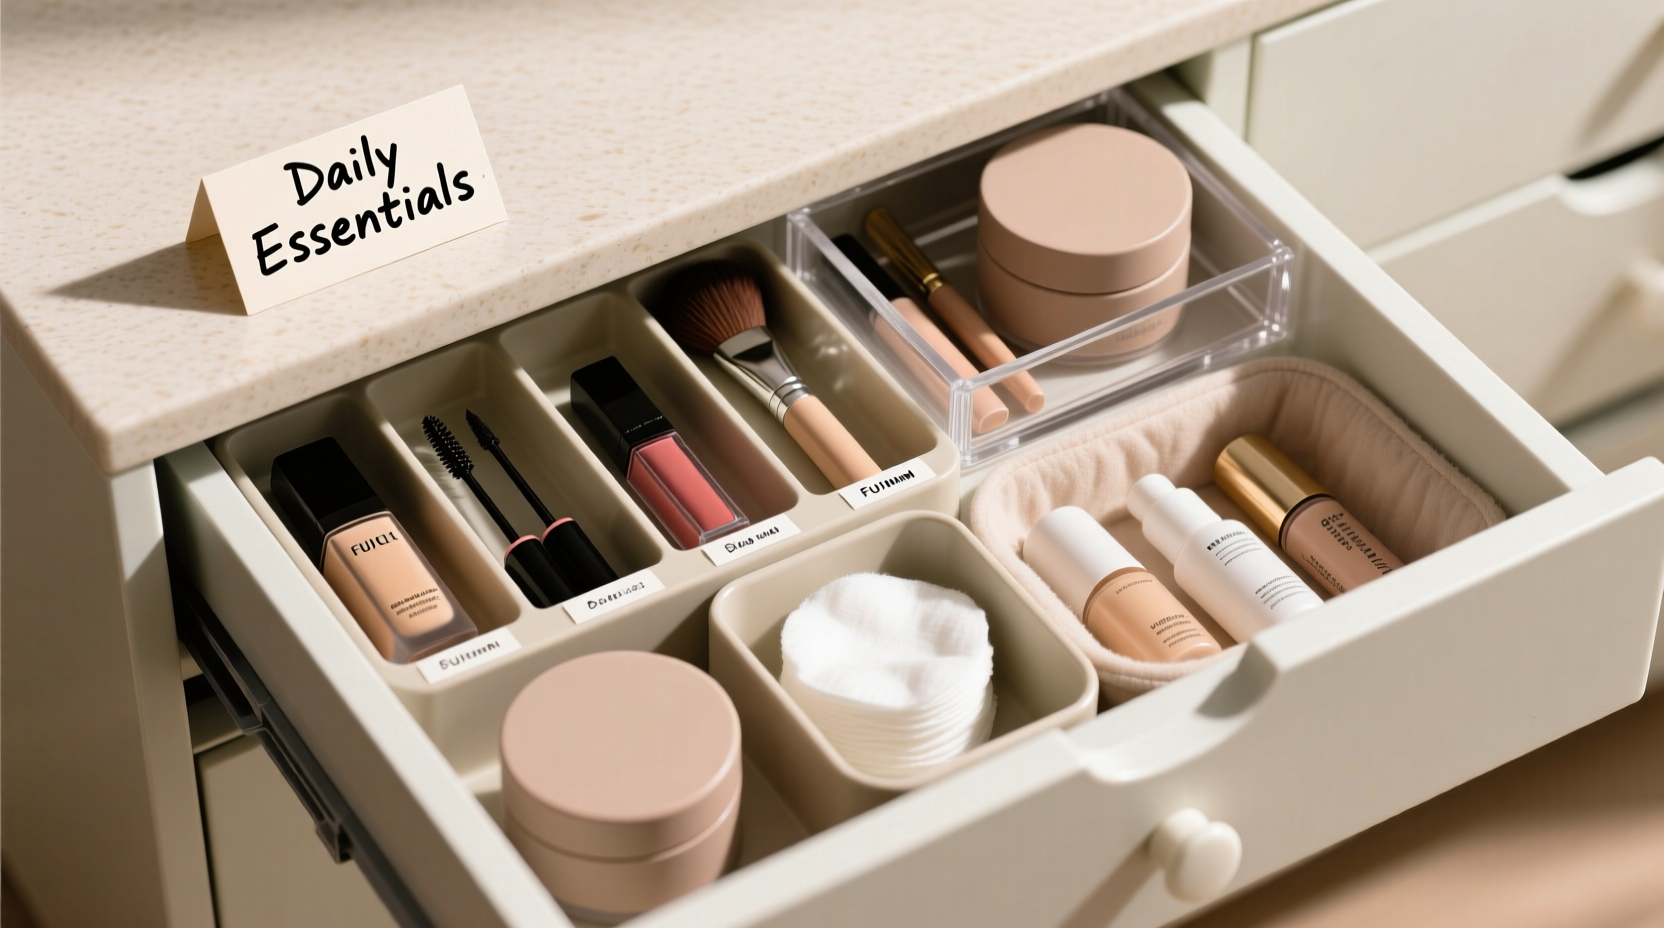
Step 2: Categorize by Frequency and Function
Once you’ve narrowed down your essentials, group them into logical categories based on both function and frequency of use. Common groupings include:
- Daily essentials: Foundation, concealer, mascara, brow pencil, lip balm
- Color cosmetics: Blush, bronzer, highlighter, eyeshadow palettes
- Lips: Lipsticks, glosses, liners
- Tools: Brushes, sponges, tweezers, lash curlers
- Skincare prep: Primers, setting sprays, facial mists
- Sundries: Cotton swabs, pads, disposable applicators
Within these groups, further separate high-use items from occasional ones. Daily wear products should occupy prime, front-and-center positions. Special occasion or seasonal items—like bold red lipstick or glitter shadow—can go toward the back or in labeled compartments.
“Organization isn’t just about neatness—it’s about designing your space to reflect how you live.” — Lena Park, Professional Organizer & Lifestyle Designer
Step 3: Choose the Right Organizers for Small Spaces
Not all organizers are created equal—especially when dealing with compact drawers. The goal is vertical efficiency and accessibility without overcrowding. Consider these types of organizers tailored for tight spaces:
| Organizer Type | Best For | Space-Saving Benefit |
|---|---|---|
| Acrylic dividers | Lipsticks, pencils, brushes | Stackable, transparent, customizable layouts |
| Drawer inserts with compartments | Palettes, compacts, bottles | Prevents shifting, maximizes flat surface use |
| Vertical slot trays | Foundation bottles, concealers, skincare vials | Holds upright, reduces footprint |
| Rotating carousels (mini) | Frequently used items | 360° access in minimal area |
| Magnetic strips (with adhesive hooks) | Brushes, metal-tipped tools | Uses side walls or undersides—adds storage without floor space |
When selecting containers, prioritize transparency and modularity. Clear acrylic lets you see contents at a glance, reducing rummaging. Modular trays allow reconfiguration as your collection evolves. Avoid oversized containers—even if they look stylish, they waste space if half-empty.
Step 4: Optimize Layout Using Zoning Techniques
Efficient drawers follow a zoning principle similar to kitchens: “work zones” placed where they’re most needed. Apply this logic by mapping out your drawer into three functional areas:
- Front Zone (Daily Use): Reserve the easiest-to-reach front third for products applied every day. Keep foundations, concealers, mascaras, and favorite lip colors here.
- Middle Zone (Frequent Rotation): Store secondary favorites—blushes, eyeliners, eyebrow gels—that change weekly or seasonally.
- Back Zone (Occasional/Spare): Place backups, gift sets, or holiday-specific items toward the rear. These shouldn’t block access to daily essentials.
To maintain order, assign one container per category. For example, use a narrow acrylic tray exclusively for lip products. Another shallow box holds all brushes. This prevents cross-category clutter and makes refilling easier.
If your drawer has depth, consider tiered shelving. A small riser lifts shorter items like eyeliner pens so they’re visible behind taller bottles. Alternatively, angle items slightly forward using folded cardboard or foam strips to improve visibility.
Real Example: Transforming a Crowded Nightstand Drawer
Sophie, a nurse working night shifts, struggled with a 9x6-inch drawer crammed with makeup, hair clips, and hand creams. She spent mornings digging for her tinted moisturizer while knocking over perfume bottles. After following the zoning method:
- She cleared out expired samples and consolidated duplicates.
- Used a compartmentalized acrylic tray for daily bases and concealers (front zone).
- Added a slim vertical slot organizer for lipsticks (middle zone).
- Mounted a mini adhesive hook inside the drawer lid to hang her favorite brush.
- Placed spare cotton rounds in a lidded tin at the back.
The result? Her morning routine dropped from 12 minutes to under 6. Everything had a place, and nothing shifted during frequent opening and closing.
Step 5: Maintain the System Long-Term
An organized drawer won’t stay that way without maintenance. Habits matter more than perfection. Implement simple routines to preserve clarity and accessibility:
- Return items immediately after use—don’t toss them back loosely.
- Wipe spills promptly to avoid stickiness and bacterial buildup.
- Reassess contents every 3 months; discard dried-out or unused products.
- Label compartments if sharing the space with others (e.g., partner’s grooming tools).
Also, resist the urge to overbuy. Before adding new items, ask: “Do I have space for this? Does it replace something better?” Impulse purchases disrupt carefully planned systems.
Checklist: How to Organize Your Small Makeup Drawer
Follow this concise action plan to achieve a streamlined, functional drawer:
- Remove everything from the drawer.
- Discard expired, broken, or unused items.
- Group remaining products into categories (e.g., lips, eyes, tools).
- Select appropriately sized organizers for each category.
- Assign zones: front for daily use, back for spares.
- Place items upright and facing forward for visibility.
- Use labels or color-coding if helpful.
- Install wall-mounted or hanging accessories if space allows.
- Wipe down the drawer before replacing items.
- Commit to returning each item to its designated spot daily.
FAQ: Common Questions About Small Makeup Drawer Organization
Can I organize a shallow drawer effectively?
Absolutely. Shallow drawers benefit most from flat, low-profile organizers. Use divided trays, magnetic tool strips, or stackable bins no taller than 1.5 inches. Prioritize horizontal arrangement over stacking to prevent instability.
What should I do if my drawer doesn’t have enough room for all my makeup?
Downsize your collection to core essentials. Store overflow items elsewhere—such as a bathroom cabinet, vanity shelf, or travel case. Rotate seasonal pieces in and out monthly. Remember: accessibility trumps quantity.
Are there eco-friendly organizing options?
Yes. Look for organizers made from recycled acrylic, bamboo, or FSC-certified wood. Repurposed glass jars, ceramic dishes, or silicone molds also make sustainable, stylish containers. Avoid single-use plastic inserts that degrade quickly.
Final Thoughts: Design for Simplicity and Speed
Organizing a small makeup drawer isn’t about fitting in more—it’s about making less work harder. When every product has a purpose and a place, your routine becomes smoother, faster, and more enjoyable. The ideal drawer doesn’t just look tidy; it functions like a well-oiled toolkit, supporting your self-care ritual rather than complicating it.
Start today. Take ten minutes to empty, sort, and reconfigure. You don’t need expensive upgrades—just intention and consistency. Over time, this small act of order compounds into greater confidence, reduced stress, and a more mindful relationship with your beauty routine.


 浙公网安备
33010002000092号
浙公网安备
33010002000092号 浙B2-20120091-4
Comments
No comments yet. Why don't you start the discussion?