
Most homes now have a growing collection of electronic devices—laptops, phones, tablets, gaming consoles, smart home gadgets—and each comes with its own cable. Over time, these cords accumulate in drawers, creating a tangled mess that’s frustrating to navigate. The solution isn’t just more storage; it’s smarter organization. By sorting cables both by device and by length within a single drawer, you can transform chaos into clarity. This guide walks through a proven system to categorize, label, store, and maintain your cables so they’re always ready when needed.
Why Cable Clutter Matters
Cable clutter isn’t just unsightly—it reduces efficiency, increases stress, and can damage cords over time. Tangled wires are harder to untangle, prone to fraying, and often lead to duplicated purchases because you can’t find what you already own. A well-organized drawer eliminates these issues. More importantly, organizing by both device type and cable length ensures you grab the right cord quickly, whether it’s a short USB-C charger for your phone or a long HDMI cable for your TV setup.
“Cable management is not about perfection—it’s about predictability. When every cord has a place and purpose, you save time and reduce digital fatigue.” — Jordan Lee, Tech Lifestyle Organizer
Step-by-Step: Organizing Cables by Device and Length
A single-drawer cable system works best when built methodically. Follow this six-phase process to create an intuitive, lasting solution.
Phase 1: Empty and Audit Your Drawer
Start by removing everything from the drawer. Lay all cables out on a clean surface. Sort them into two piles: “Keep” and “Discard.” Discard any cables that are frayed, non-functional, or obsolete (e.g., old iPod dock connectors). Be ruthless—every unused cord adds clutter.
For the keep pile, identify each cable by device type:
- Phone chargers (USB-A, USB-C, Lightning)
- Laptop power adapters and charging bricks
- Tablet cables
- HDMI, DisplayPort, Ethernet
- Aux/audio cables
- Smartwatch and wearable bands
- Camera and peripheral cords
Phase 2: Measure and Group by Length
Once sorted by device, measure each cable from end to end. Use a soft measuring tape or ruler. Record lengths in inches or centimeters. Then, group them into three standard categories:
| Length Category | Measurement Range | Ideal For |
|---|---|---|
| Short | 12–36 inches (30–90 cm) | Travel, bedside use, desktop peripherals |
| Medium | 48–72 inches (120–180 cm) | Living room setups, office desks, under-desk routing |
| Long | 96+ inches (240+ cm) | Home theater systems, distant outlets, extension needs |
This tiered approach prevents overuse of long cables where short ones suffice, reducing tangling and excess slack.
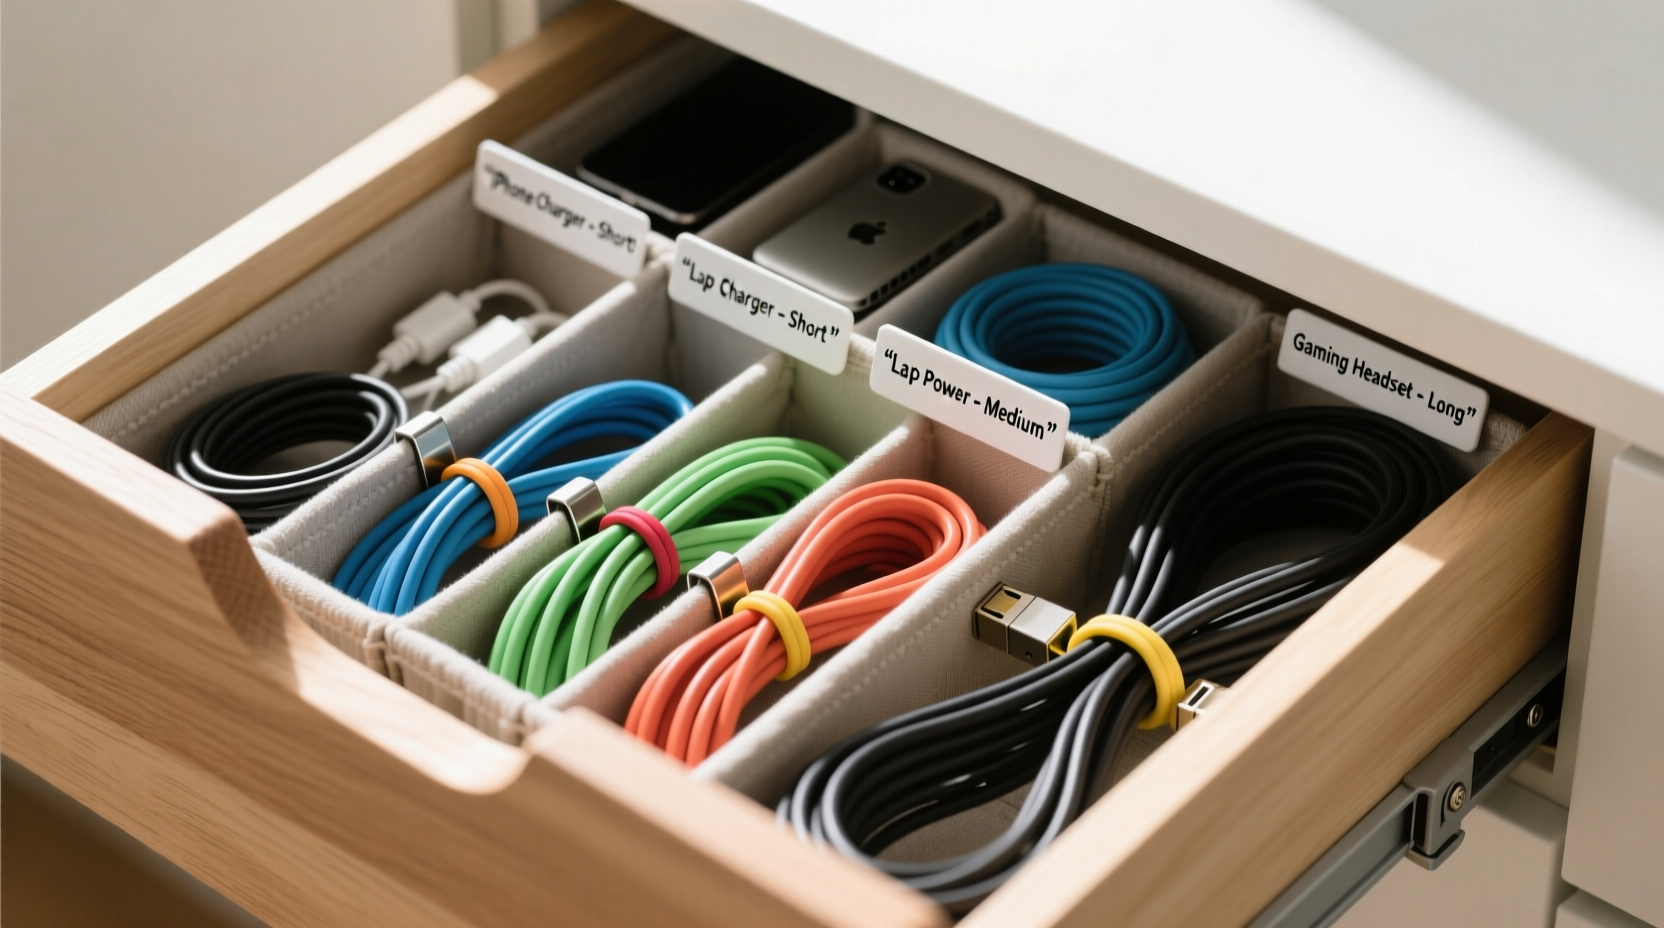
Phase 3: Label Every Cable
Labeling is the cornerstone of sustainable organization. Without labels, even neatly stored cables become unidentifiable within weeks. Use consistent labeling methods:
- Color-coded tags: Assign colors by device (e.g., blue for laptops, red for phones).
- Heat-shrink labels: Durable, permanent text sleeves that slide over connectors.
- Masking tape + marker: Low-cost temporary option—replace quarterly.
- Pre-printed cable tags: Reusable plastic tags with writeable surfaces.
Include both device type and length on the label. Example: “iPhone – 3ft” or “HDMI – 6ft.”
Phase 4: Choose the Right Drawer Divider System
Not all drawer organizers work for cables. Standard cutlery trays lack depth and flexibility. Instead, opt for modular solutions:
- Adjustable acrylic dividers: Let you customize compartment size per cable group.
- Felt roll-up organizers: Ideal for travel but usable in drawers for small cables.
- DIY cardboard partitions: Cut cereal boxes to size for a zero-cost fix.
- Magnetic cable trays: Stick inside metal drawers for flexible positioning.
Design your layout like a grid. Dedicate vertical columns to device types and horizontal rows to length tiers. For example:
| Short (≤3ft) | Medium (4–6ft) | Long (≥8ft) | |
|---|---|---|---|
| Phone Chargers | Lightning, USB-C | Spare travel bricks | N/A |
| Laptop | Adapter only | Standard charging cable | Extended reach model |
| TV & Audio | Aux, micro-HDMI | HDMI, optical audio | Long HDMI, Ethernet |
This matrix makes retrieval instant—you know exactly which cell holds your 6-foot HDMI cable.
Phase 5: Coil and Store Properly
How you coil a cable affects its lifespan and ease of use. Avoid wrapping tightly around your hand—that causes internal wire strain. Instead, use the “over-under” method:
- Hold one end in your left hand.
- Loop the cable alternately over and under your fingers.
- After each loop, reverse direction—this prevents twisting.
- Secure with a reusable tie: Velcro strap, waxed cord, or silicone band.
Store coiled cables vertically in compartments so ends stay accessible. Never stack heavy items on top—this crushes connectors.
Phase 6: Maintain the System Monthly
Organization fades without maintenance. Schedule a 10-minute monthly review:
- Return misplaced cables to their slots.
- Test aging cords for wear.
- Update labels if new devices are added.
- Remove duplicates or broken items.
This habit keeps the system functional long-term.
Real-Life Example: Sarah’s Home Office Transformation
Sarah, a freelance graphic designer, had a deep kitchen drawer filled with over 20 cables. Her workspace relied on multiple monitors, tablets, and client devices, but she wasted 10–15 minutes daily searching for the right HDMI or charging cable. After following the above steps, she reorganized her drawer using an adjustable acrylic organizer from a home goods store.
She labeled each cable with heat-shrink tags indicating device and length, then arranged them in a 3x3 grid: rows for phone, laptop, and peripherals; columns for short, medium, and long. She added a small Velcro strap dispenser in one corner to bundle cords neatly.
The result? Sarah reduced her cable search time to under 10 seconds. She also discovered three working cables she’d forgotten she owned, avoiding a $40 replacement cost. Six months later, the system remains intact thanks to her biweekly reset routine.
Common Mistakes to Avoid
Even well-intentioned efforts fail when common pitfalls aren’t addressed. Steer clear of these errors:
- Using zip ties permanently: They’re hard to remove and can damage insulation.
- Ignoring cable weight: Heavy power bricks should be stored flat, not hanging by the cord.
- Skipping labels: Memory fades—don’t rely on recognizing cables by sight.
- Overpacking compartments: Tight spaces make retrieval difficult and increase friction damage.
- Organizing only by length: Without device grouping, you still waste time filtering through irrelevant cords.
“Organization fails when it prioritizes aesthetics over function. A drawer may look tidy, but if you can’t find a 5-foot USB-C cable in under 10 seconds, it’s not optimized.” — Maria Tran, Digital Workspace Consultant
Checklist: Build Your Cable Drawer in 7 Actions
Follow this concise checklist to implement the system efficiently:
- Empty the drawer and discard damaged or obsolete cables.
- Sort remaining cables by device category (phone, laptop, audio, etc.).
- Measure each cable and assign it to Short, Medium, or Long.
- Label each cable clearly with device type and length.
- Select a modular drawer organizer with adjustable compartments.
- Arrange cables in a grid: devices as rows, lengths as columns.
- Coil using the over-under method and secure with reusable ties.
Complete this list in one session (allow 60–90 minutes), and your drawer will remain functional for years with minimal upkeep.
FAQ: Common Questions About Cable Organization
Can I use this system for non-electronic cords like headphone wires or lamp extensions?
Absolutely. The same principles apply. Just add new categories (e.g., “Audio,” “Lighting”) to your grid. Use smaller compartments for thin cords to prevent nesting.
What if my drawer is too shallow for upright coils?
Use flat felt pouches or magnetic cable wraps to lay cables side-by-side. Alternatively, install a pull-out tray under a desk or shelf instead of using a traditional drawer.
How do I handle charging bricks that don’t fit in compartments?
Dedicate a lower-depth section of the drawer for adapters. Store them flat and attach their corresponding cables with matching labels. Consider wall-mounted USB hubs to reduce reliance on bulky bricks.
Conclusion: Turn Chaos Into Control
A single drawer can hold all your cables without becoming a black hole of tangles. The key is combining device-based categorization with length-based sorting—two filters that make retrieval fast and logical. With the right tools, labeling, and structure, you create a system that works automatically, not one that requires constant effort. Stop wasting time untangling knots or buying replacements you already own. Implement this method today, and enjoy a streamlined, stress-free tech environment.


 浙公网安备
33010002000092号
浙公网安备
33010002000092号 浙B2-20120091-4
Comments
No comments yet. Why don't you start the discussion?