
A cluttered desk with tangled cables is more than just an eyesore—it’s a productivity killer. When you're running two, three, or even four monitors, the number of power cords, video cables, USB extensions, and adapters multiplies quickly. Without a clear system, what starts as a temporary mess can become a permanent headache: difficult troubleshooting, accidental disconnections, and inefficient workflow. The good news is that with the right approach, organizing your multi-monitor setup doesn’t have to be complicated. This guide provides actionable methods, tools, and real-world-tested techniques to keep your cables neat, accessible, and efficient.
Assess Your Cable Needs and Layout
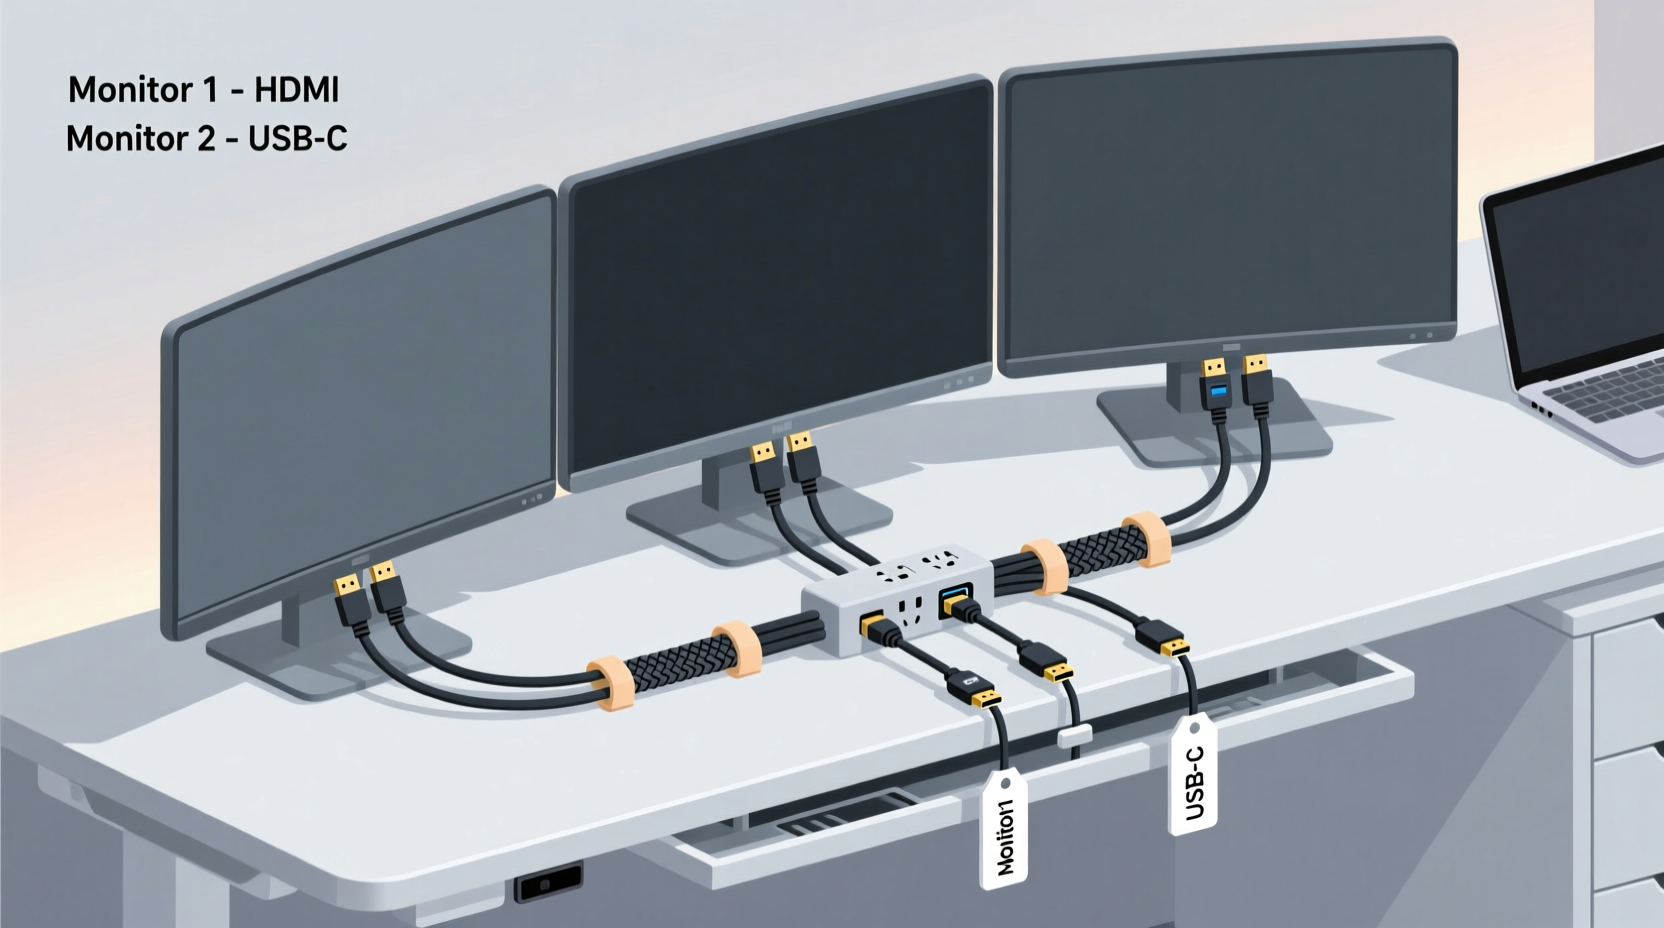
Before reaching for cable ties or buying new accessories, take time to map out your current and future monitor setup. Start by identifying each component:
- Number of monitors and their input types (HDMI, DisplayPort, USB-C, etc.)
- Source devices (laptop, desktop, docking station)
- Power requirements (wall outlets, surge protectors, power strips)
- Peripheral connections (keyboard, mouse, webcam, external drives)
Sketch a rough layout of your desk and note where each monitor sits in relation to your computer and power sources. This helps determine optimal cable lengths—avoiding both excess slack and strain. Too long? You’ll have loops and tangles. Too short? You risk pulling connectors loose when adjusting monitors.
Choose the Right Cables and Adapters
Not all cables are created equal. Investing in high-quality, appropriately sized cables reduces signal loss, improves durability, and simplifies management. For example, flat cables take up less space behind your desk and bend more easily around corners than round ones. Braided cables resist fraying and look more professional.
Consider upgrading to active cables or fiber optic variants for longer runs (over 6 feet), especially with 4K or high-refresh-rate displays. These maintain signal integrity better than passive cables over distance.
“Cable quality directly impacts display performance. A poorly shielded HDMI cable can cause flickering or intermittent disconnects, often mistaken for hardware failure.” — Jordan Lee, AV Systems Engineer at TechFlow Solutions
If your monitors support USB-C with DisplayPort Alt Mode, consolidate video, power, and data into a single connection from a compatible laptop. This dramatically reduces cable count and simplifies docking.
Implement a Step-by-Step Cable Management System
Efficient organization follows a logical sequence. Follow this six-step process to transform chaos into order:
- Unplug everything – Start fresh. Label each cable with masking tape and a marker before disconnecting.
- Group by function – Separate video cables, power cords, USB hubs, and audio lines.
- Measure and trim (if possible) – While you shouldn’t cut most cables, modular extension systems allow custom lengths. Otherwise, use retractable sleeves for slack management.
- Route along natural paths – Use the back edge of your desk, grommets, or adhesive raceways to direct cables downward or toward the wall.
- Bundle strategically – Use hook-and-loop straps every 6–8 inches to group similar cables without over-tightening.
- Secure and conceal – Attach bundles to desk legs, baseboards, or under-desk trays using clips or adhesive mounts.
For wall-mounted monitors, install surface-mounted conduit channels to hide cables inside a painted or neutral-colored track. This creates a clean, built-in appearance.
Mini Case Study: Remote Worker Transforms Home Office
Sarah, a freelance graphic designer in Portland, struggled with tripping over cords and frequent monitor dropouts on her triple-display setup. After mapping her configuration, she replaced five tangled HDMI cables with three flat, 6-foot DisplayPort cables and added a powered USB hub near her keyboard. She routed all cables through an under-desk raceway and labeled each end with colored tags. The result? Setup time dropped from 15 minutes to under 3, and she reported a noticeable reduction in visual stress and distraction. “It feels like I gained mental space just by cleaning up the physical one,” she said.
Essential Tools and Accessories for Long-Term Order
The right tools make maintenance easier and results last longer. Here’s a checklist of recommended items:
- Hook-and-loop (velcro) straps – Reusable, non-damaging, adjustable
- Cable sleeves or spiral wrap – Bundle multiple cables neatly
- Adhesive cable clips – Route cords along edges or walls
- Under-desk cable tray – Keeps power strips and hubs off the floor
- Label maker or color-coded tags – Identify cables at a glance
- Raceway kits – Conceal cables running from desk to wall outlet
- Docking station with single-cable solution – Reduces clutter significantly
For standing desks, use stretch-friendly solutions like expandable braided sleeves or coiled cords that accommodate vertical movement without strain. Avoid zip ties unless they’re releasable; standard plastic ties can damage insulation and make future changes difficult.
Do’s and Don’ts of Multi-Monitor Cable Management
| Do’s | Don’ts |
|---|---|
| Use consistent bundling direction (e.g., left to right) | Cross power and data cables unnecessarily |
| Leave slight slack near connectors to prevent strain | Over-tighten bundles, which can compress wires |
| Label both ends of each cable | Hide unlabeled cables behind furniture permanently |
| Separate high-voltage power cords from signal cables | Run HDMI and power cables parallel for long distances (risk of interference) |
| Test connections before finalizing bundles | Ignore ventilation needs around power strips and docks |
Maintain Accessibility and Future-Proof Your Setup
An organized system should remain functional, not just look tidy. Design with access in mind. For instance, avoid sealing all cables into a closed conduit unless you rarely change configurations. Instead, use open trays or semi-covered channels that allow quick inspection and modification.
To future-proof your setup:
- Choose monitors with daisy-chaining capability (via DisplayPort MST)
- Invest in a docking station with spare ports
- Keep a small inventory of spare cables and adapters labeled and stored nearby
- Document your setup with photos or a simple diagram saved digitally
When adding a new monitor, refer to your documentation instead of guessing which port it connects to. This saves time and prevents incorrect plug-ins that could damage equipment.
Frequently Asked Questions
How do I prevent cable clutter behind my desk?
Use a combination of under-desk trays, adhesive clips, and cable sleeves to route and contain wires. Keep power strips mounted underneath the desk surface and aligned with monitor bases. Regularly audit your setup every few months to remove unused cables.
Can too many cables affect monitor performance?
Yes—especially if low-quality or damaged cables are used, or if power and data lines run too close together for long stretches. Electromagnetic interference from unshielded power cords can disrupt video signals, causing flickering or ghosting. Maintain separation between power and signal cables whenever possible.
What’s the best way to label cables?
Use a handheld label maker for durability, or apply colored heat-shrink tubing on both ends. If using tape, opt for vinyl electrical tape—it lasts longer and resists peeling. Always label both ends immediately after testing connections.
Conclusion: Turn Chaos Into Clarity
Organizing cables for multiple monitors isn’t a one-time fix—it’s an ongoing practice of intentionality and maintenance. By assessing your needs, selecting quality components, and applying structured management techniques, you create a workspace that supports focus, efficiency, and longevity. A clean cable setup reduces frustration, enhances safety, and reflects a professional mindset. Whether you’re working from home, managing a trading desk, or editing video across four screens, taking control of your cables is one of the most impactful upgrades you can make—with no new hardware required.


 浙公网安备
33010002000092号
浙公网安备
33010002000092号 浙B2-20120091-4
Comments
No comments yet. Why don't you start the discussion?