
A clean desk is more than just a visual upgrade—it’s a productivity booster, stress reducer, and daily win in an otherwise chaotic world. But no matter how neatly you arrange your monitor, keyboard, or notebook, tangled cords creeping across the floor or dangling behind your desk can ruin the illusion of order. The typical fix? A plastic cable box. Unfortunately, most of these look like afterthoughts—bulky, unattractive, and often harder to manage than the mess they’re meant to hide.
The good news: organizing cables doesn’t require hiding them in eyesore containers. With thoughtful planning and a few clever tools, you can achieve a sleek, professional-looking workspace that stays functional and beautiful. This guide explores practical, box-free strategies that prioritize both aesthetics and accessibility—because great cable management shouldn’t mean sacrificing convenience.
Why Avoid Cable Boxes?
Cable boxes may seem like the go-to solution, but they come with hidden downsides:
- Accessibility issues: Once cables are stuffed inside, identifying or unplugging one becomes a guessing game.
- Poor airflow: Bundled electronics generate heat; enclosing them in a sealed container increases the risk of overheating.
- Limited scalability: As you add new devices, the box fills up fast, leading to bulging lids or forced overflows.
- Visual clutter: Even when closed, many cable boxes are bulky and industrial-looking, clashing with modern or minimalist interiors.
Instead of masking the problem, it’s better to address it directly—with organization systems that keep cables visible, labeled, and easy to adjust.
Step-by-Step: Building a Box-Free Cable System
Follow this five-phase approach to transform your desk setup without relying on bulky enclosures.
- Assess and Audit
Unplug your desk setup (safely) and lay out every cable. Label each one with a removable tag or piece of tape indicating its purpose (e.g., “Monitor Power,” “Laptop Charger”). Discard frayed, obsolete, or unused cords. - Group by Function
Cluster cables into logical groups: power (AC adapters, surge protectors), data (USB, Ethernet), and audio/video (HDMI, DisplayPort). This makes routing easier later. - Choose a Routing Strategy
Decide whether cables will run behind, under, or beside your desk. Wall-mounted desks benefit from vertical back-channel routing; freestanding desks may use floor-based raceways. - Select Organizers
Pick tools that suit your space: adhesive clips, under-desk trays, magnetic cable holders, or modular rails. Prioritize materials that match your decor—brushed metal, wood-finish, or neutral-toned plastics. - Install and Test
Secure cables step by step, leaving slack where needed. Plug everything back in and test functionality. Adjust as necessary.
This method ensures every decision is intentional—not just reactive.
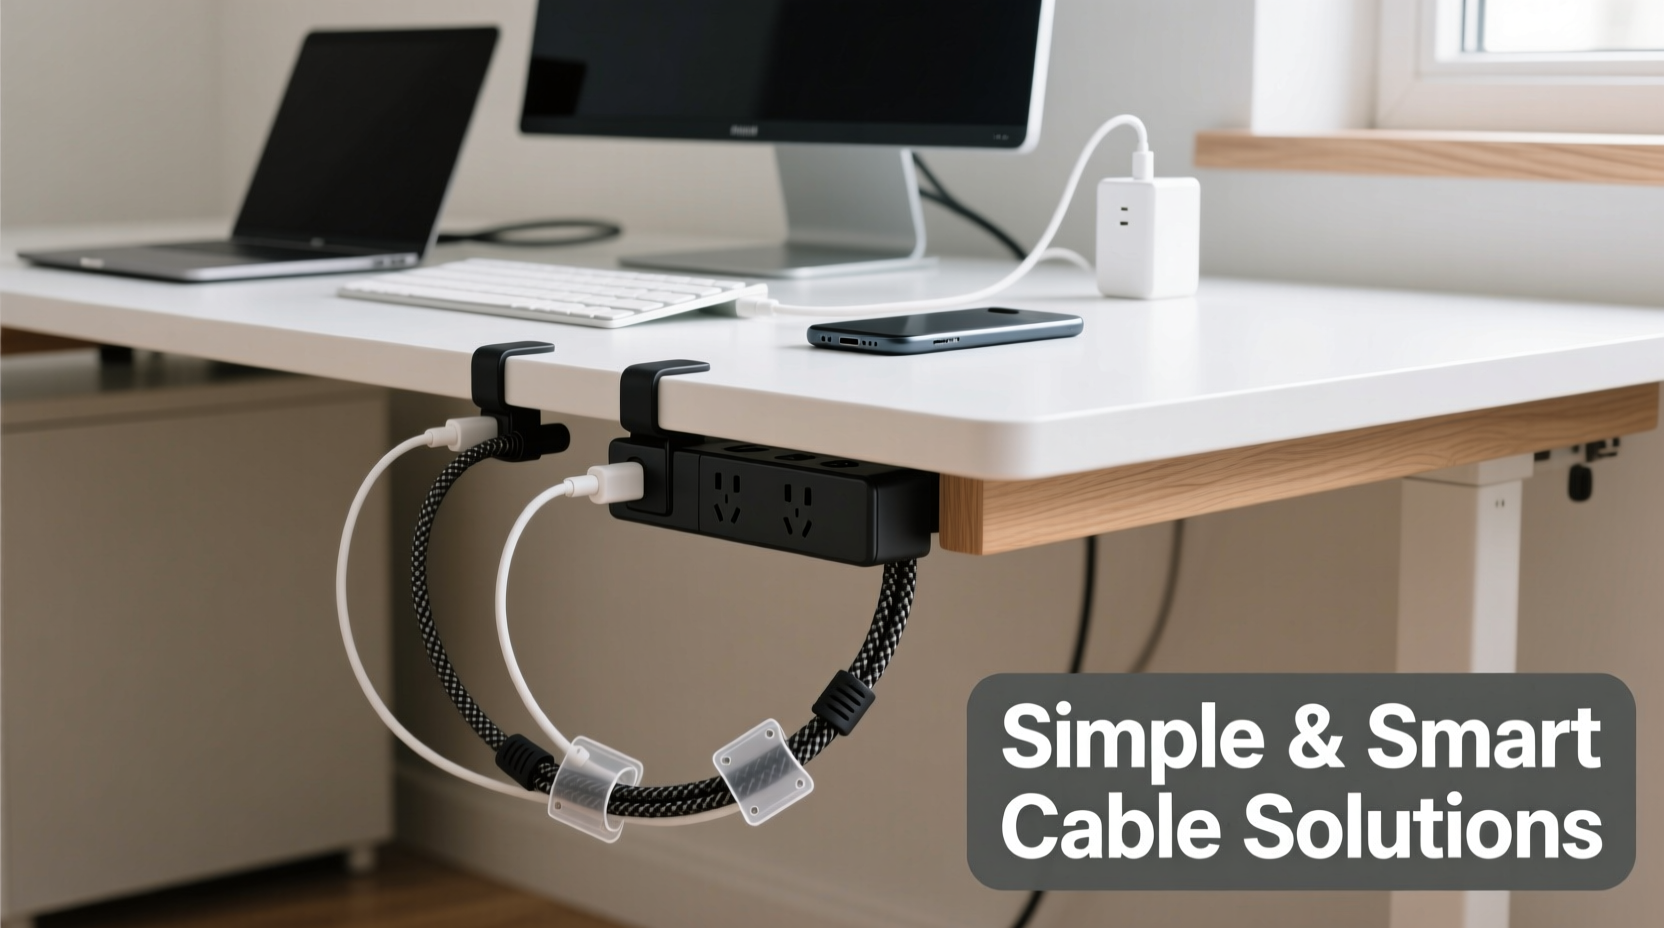
Smart Tools That Replace Cable Boxes
You don’t need a box to contain chaos. These alternatives offer cleaner looks and better access:
Adhesive Cable Clips
Small, low-profile plastic or silicone clips stick directly to your desk surface, wall, or monitor stand. They hold individual cables in place without bulk. Ideal for short runs from laptop to charger or USB hub.
Under-Desk Cable Trays
Mounted beneath the desktop, these trays catch loose cords and prevent them from dangling. Unlike boxes, they allow full visibility and ventilation. Choose slatted designs for airflow or enclosed versions if you prefer concealment without compression.
Magnetic Cable Holders
For metal desks or near appliances, magnetic organizers snap into place and hold charging cables securely. Some double as phone stands or accessory docks.
Cable Raceways
These flat, rectangular channels mount along baseboards or desk legs, guiding multiple cables along a single path. Paintable models blend seamlessly into walls. Great for routing cords from desk to outlet.
Modular Rail Systems
Popular in modern workspaces, these aluminum or steel rails attach to the back of your desk and integrate power strips, USB hubs, and cable guides. Brands like IKEA’s UPPDATERA or LoctekMotion offer sleek, customizable options.
| Solution | Best For | Visibility | Installation |
|---|---|---|---|
| Adhesive Clips | Minimalist setups, single cables | High – cables remain visible | Peel-and-stick, tool-free |
| Under-Desk Tray | Buried tangles, multi-device users | Medium – hides underside | Screws or clamps required |
| Magnetic Holder | Metal surfaces, frequent charging | High – only secures ends | Attach and go |
| Raceway | Floor-to-desk routing | Low – fully enclosed | Mounts with screws or adhesive |
| Modular Rail | Integrated tech desks | Medium – organized but exposed | Requires mounting hardware |
Real Example: From Cluttered to Clean in One Evening
Julia, a freelance graphic designer working from her home office, struggled with a jungle of cords behind her dual-monitor setup. Her desk sat against the wall, with power strips buried under stacks of books and cables snaking across the floor. Every time she plugged in her tablet or moved her chair, something disconnected.
She decided to eliminate the cable box she’d been using—it was overflowing and blocked airflow to her router. Instead, she followed the step-by-step process outlined above:
- She labeled all 11 cords using colored tape.
- Discarded three old chargers and two broken HDMI cables.
- Installed a white plastic raceway along the baseboard from her desk to the outlet.
- Mounted an under-desk tray to hold her power strip and USB hub.
- Used adhesive clips to route monitor cables down the back of her desk.
The result? A tidy, accessible system that took less than two hours to build. Now, she can quickly identify and swap cables without crawling under the desk. More importantly, her workspace feels lighter and more professional—especially during client video calls.
“Good cable management isn’t about hiding wires—it’s about designing flow. When cords follow logic, not chance, your whole workspace functions better.” — David Lin, Workspace Ergonomics Consultant
Dos and Don’ts of Cable Organization
Avoid common pitfalls with this quick-reference guide:
| Do | Don’t |
|---|---|
| Use color-coded labels or tags for each cable | Wrap cables too tightly—this damages internal wiring |
| Leave 6–12 inches of slack for adjustments | Run power and data cables parallel for long distances (causes interference) |
| Group related cables with velcro or fabric sleeves | Place heavy objects on top of bundled cords |
| Route high-heat devices (like power bricks) in open air | Use duct tape or staples to secure cables |
| Check connections monthly for wear or looseness | Ignore manufacturer spacing recommendations for ventilation |
DIY Solutions for Renters and Minimalists
If you can’t drill holes or invest in premium gear, try these budget-friendly hacks:
- Velcro Cable Wraps: Cut old Velcro strips into smaller pieces and attach them under the desk with removable adhesive pads.
- Jars and Cups: Place a small mason jar under the desk to hold coiled charging cables. Keeps them off the floor and within reach.
- Fabric Sleeves: Use braided neoprene sleeves to bundle multiple cords into one neat line. Available in various colors to match your theme.
- Command Hooks: Hang lightweight cords along the side of your desk using damage-free hooks. Ideal for headphones or lamp cords.
- Bookends as Dividers: Place a small decorative bookend behind your monitor to separate power cables from data lines.
These solutions respect rental agreements and won’t leave marks when removed—perfect for temporary or shared spaces.
Checklist: Your Cable Cleanup Plan
Print or save this checklist to stay on track:
- Unplug and inspect all cables
- Label each cord by device or function
- Remove damaged or unnecessary cables
- Group cables by type (power, data, audio/video)
- Choose a routing path (behind, under, or beside desk)
- Select appropriate organizers (clips, trays, raceways)
- Install hardware securely and safely
- Route cables with gentle bends and slack
- Test all connections post-installation
- Schedule a monthly check-in to maintain order
FAQ
Can I organize cables without drilling holes?
Yes. Use adhesive-backed clips, under-desk trays with clamp mounts, or free-standing raceways. Products like 3M Command Strips offer strong hold without permanent damage.
How do I prevent cables from slipping out of clips?
Choose clips with a spring-loaded gate or rubber lining. Alternatively, loop the cable through the clip rather than laying it on top. For heavier cords, use a combination of clip and velcro strap.
What’s the best way to label cables?
Use printable vinyl labels, heat-shrink tubing, or colored rubber bands. Write clearly with abbreviations like “MBP” for MacBook Pro or “EXT HDD” for external hard drive. Avoid masking tape—it leaves residue.
Final Thoughts: Design With Cables in Mind
The goal isn’t to eliminate cables—most of us still rely on wired connections for stability and speed. Instead, aim to integrate them thoughtfully into your workspace design. When cables are managed well, they become invisible not because they’re hidden, but because they’re predictable, orderly, and out of the way.
By skipping the ugly box and opting for smarter, more adaptable solutions, you gain more than a clean desk. You gain control. You reduce frustration. You create a space that supports focus, creativity, and calm.


 浙公网安备
33010002000092号
浙公网安备
33010002000092号 浙B2-20120091-4
Comments
No comments yet. Why don't you start the discussion?