
Every home has that one drawer—a tangled jungle of charging cables, headphone cords, power adapters, and forgotten USB lines. It's the kind of mess that makes finding the right charger feel like an archaeological dig. Instead of buying expensive organizers or plastic trays, you can reclaim order using everyday household items and simple DIY techniques. With just a few minutes and minimal cost, you can transform chaos into clarity. This guide walks through proven, budget-friendly strategies to organize cords and chargers in a drawer, helping you maintain a tidy space without spending a fortune.
Why Cord Clutter Is More Than Just Annoying
Cable clutter isn’t just unsightly—it’s inefficient and potentially damaging. Tangled cords can fray, reducing their lifespan and creating safety hazards. Constantly yanking cables from a knotted heap stresses connectors and ports. Moreover, disorganization leads to wasted time and frustration when you're already running late and need to charge your phone quickly.
According to organizational psychologist Dr. Linda Sapadin, “Physical clutter contributes to mental clutter. When your environment is chaotic, it becomes harder to focus and make decisions.” A well-organized drawer may seem like a small win, but it supports daily efficiency and reduces low-grade stress.
“Simple systems for everyday items—like cords—can significantly improve your sense of control over your space.” — Dr. Linda Sapadin, Productivity Specialist
Essential Supplies You Already Own
The best part about DIY cord organization? You likely have everything you need at home. Before heading to the store, take inventory of these common household items:
- Cardboard boxes (from deliveries, cereal, or tissue boxes)
- Plastic containers (yogurt cups, butter tubs, or takeaway containers)
- Empty toilet paper or paper towel rolls
- Popsicle sticks or wooden craft sticks
- Binder clips, clothespins, or chip bag clips
- Rubber bands, hair ties, or twist ties
- Scissors and masking tape (for labeling)
No specialty products required. Even repurposed packaging materials can serve as functional dividers or cable spools. The goal is to use what’s already available to create structure within your drawer.
Step-by-Step: Building Your DIY Drawer System
Follow this practical timeline to turn a messy drawer into an organized hub for all your electronics accessories.
- Empty and assess: Remove everything from the drawer. Lay items on a flat surface and sort them into categories: phone chargers, tablet cables, headphones, power banks, etc.
- Declutter ruthlessly: Discard frayed, broken, or obsolete cords. If you haven’t used a cable in six months, consider donating or recycling it.
- Coil each cord neatly: Use the over-under method: loop the cord with alternating directions to prevent kinks. Secure with a rubber band or hair tie.
- Create labeled zones: Use cardboard or plastic containers to build compartments. Tape labels directly onto dividers using masking tape and a marker.
- Store by frequency of use: Place frequently used items (like phone chargers) near the front. Less-used cables (e.g., old laptop adapters) go toward the back.
- Test and adjust: Slide the drawer closed and open it several times to ensure nothing shifts. Adjust compartment sizes if necessary.
This process takes less than 30 minutes and results in a sustainable system tailored to your habits.
Budget-Friendly DIY Organizers You Can Make Today
Here are five creative, no-cost solutions using recycled materials:
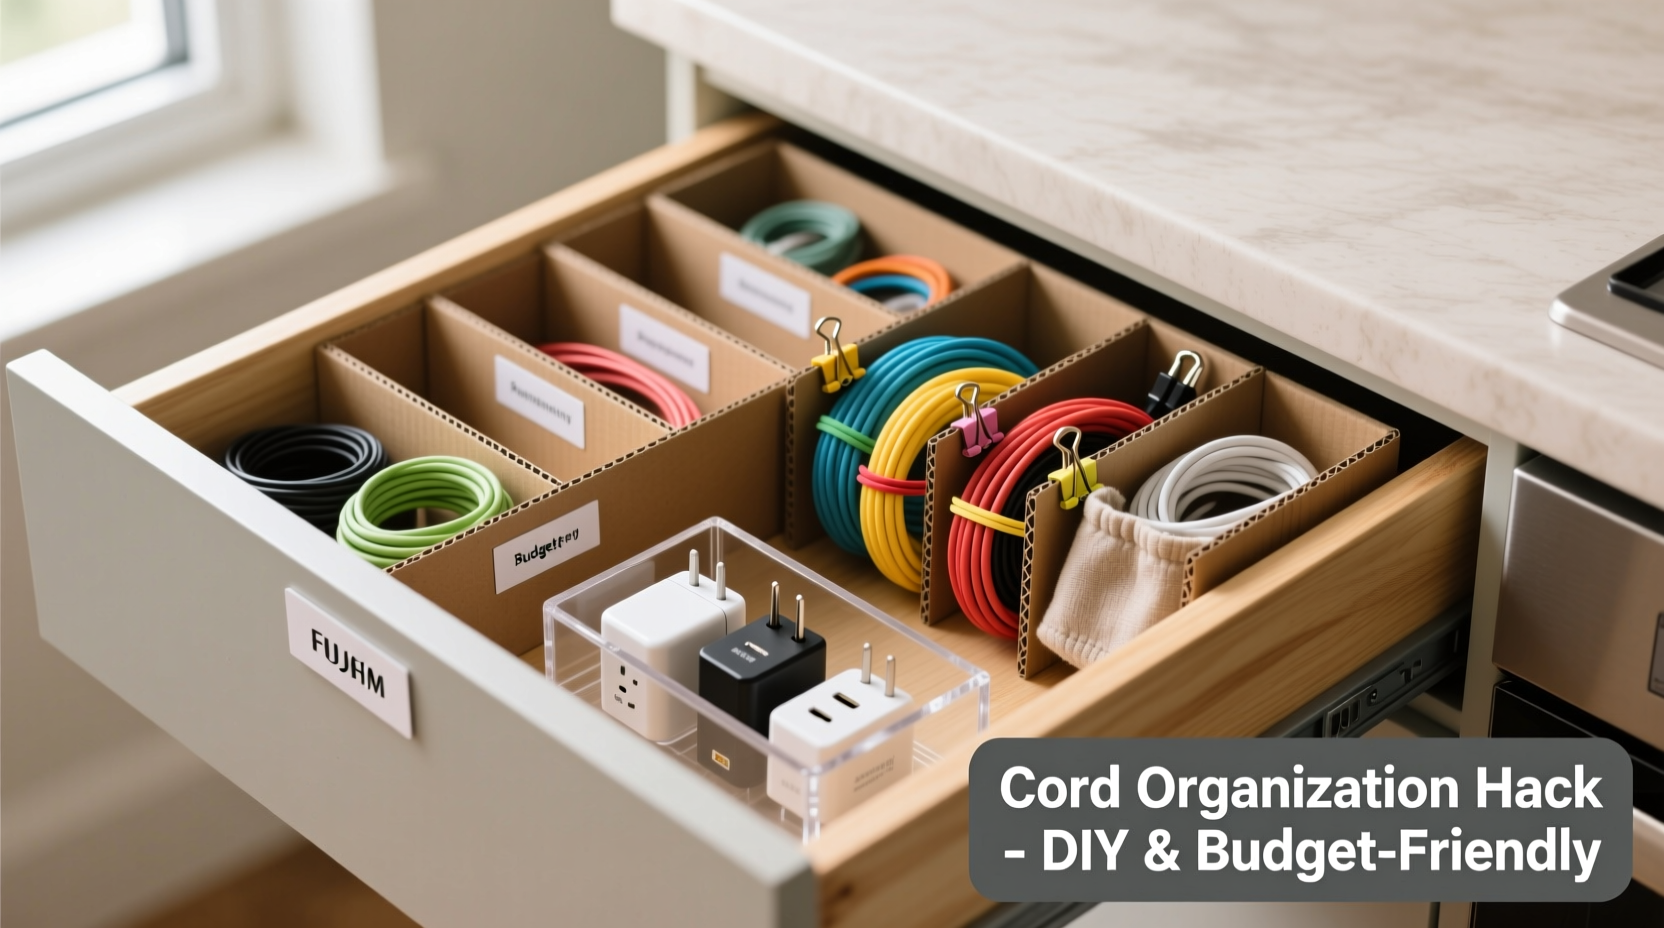
1. Toilet Paper Roll Divider
Cut cardboard tubes in half horizontally. Stand them upright in the drawer to hold coiled cords vertically. Label each roll with the device type (e.g., “iPhone,” “Headphones”). This keeps similar cables grouped and visible.
2. Plastic Container Grid
Take a shallow yogurt or deli container. Cut it into rectangular or square sections using scissors. Arrange the pieces inside the drawer like a grid. These act as sturdy walls to separate different types of chargers.
3. Binder Clip Cable Holder
Attach large binder clips to the edge of the drawer. Thread cords through the metal arms to keep them suspended and tangle-free. Ideal for longer cords you use while sitting nearby, like laptop chargers.
4. Cardboard Box Compartment Tray
Take a shoebox or shipping box. Cut the sides down to about 2 inches high. Then cut interior walls from the leftover cardboard to form custom-sized bins. Glue or tape them in place. Paint or cover with washi tape for a polished look.
5. Popsicle Stick Labels
Write device names on clean popsicle sticks with a permanent marker. Slide them into compartments as upright labels. They’re reusable and easy to update when your tech changes.
Comparison: DIY vs. Store-Bought Solutions
| Solution Type | Cost | Customizability | Eco-Impact | Setup Time |
|---|---|---|---|---|
| DIY (cardboard, containers) | $0–$2 (if buying tape) | High – fully adjustable | Low – uses recycled materials | 20–40 minutes |
| Plastic drawer organizer (store-bought) | $8–$25 | Medium – fixed compartments | Moderate – new plastic production | 5 minutes |
| Magnetic cable management kit | $15–$30 | Low – limited flexibility | Moderate – mixed materials | 10 minutes |
While store-bought options offer convenience, they often lack flexibility and contribute to unnecessary consumption. DIY methods not only save money but also allow for ongoing adaptation as your tech needs evolve.
A Real-Life Example: Transforming a Junk Drawer
Sarah, a freelance graphic designer from Portland, had a deep kitchen drawer she used for “everything that doesn’t belong anywhere.” It housed spare batteries, rubber bands, and a nest of at least 12 tangled cords. After reading about drawer organization, she spent a Sunday afternoon sorting and building a system.
She used a repurposed delivery box cut to size, dividing it into five sections with strips of cardboard. One side held phone chargers (labeled with popsicle sticks), another stored USB-C cables, and a vertical toilet paper roll kept her earbuds tangle-free. She attached two binder clips to the drawer’s front edge to hang her longest laptop charger.
“I was shocked how much time I’d wasted digging for cords,” Sarah said. “Now I open the drawer and see exactly what I need. Plus, it feels good knowing I didn’t buy anything new.”
Do’s and Don’ts of Cord Organization
“Cables last longer when coiled loosely and stored away from heat and pressure.” — Tech Maintenance Guide, Consumer Reports
| Do’s | Don’ts |
|---|---|
| Use the over-under coiling method to prevent strain | Wrap cords tightly around devices or adapters |
| Label every section clearly | Assume you’ll remember what each cord is for |
| Secure coils with soft ties (fabric, rubber) | Use metal twist ties that can damage insulation |
| Group by device type or room usage | Leave loose ends dangling into adjacent compartments |
| Reassess every 3–6 months | Ignore frayed or overheating cables |
Checklist: Build Your Budget Cord Organizer in One Session
Follow this actionable checklist to complete your project efficiently:
- ☐ Empty the target drawer completely
- ☐ Sort cords by device type or frequency of use
- ☐ Discard damaged or unused cables
- ☐ Coil remaining cords using the over-under technique
- ☐ Gather DIY materials (cardboard, containers, clips)
- ☐ Build compartments to fit drawer dimensions
- ☐ Assign zones for each cable category
- ☐ Label sections clearly with tape or popsicle sticks
- ☐ Test drawer functionality (open/close, accessibility)
- ☐ Take a photo for future reference or reassembly
Completing this list ensures a thorough, lasting solution—not just a temporary fix.
Frequently Asked Questions
Can I use tape to label cords directly?
Yes, but avoid leaving adhesive tape on delicate cables for long periods, as residue can build up. Instead, label the storage compartment rather than the cord itself. If labeling the cord, use painter’s tape or washi tape, which removes cleanly.
What if my drawer is too shallow for containers?
Go flat. Lay coiled cords side by side and use thin cardboard dividers (cut from cereal boxes) to separate them. You can also glue small fabric pouches or envelope-style pockets to the inside of the drawer front to hold tiny items like USB adapters.
How often should I reorganize my cord drawer?
Every 4–6 months is ideal. Technology changes fast—new devices arrive, old ones retire. A quick seasonal review prevents buildup and ensures your system stays relevant. Set a calendar reminder to make it effortless.
Final Thoughts: Small Change, Lasting Impact
Organizing cords and chargers doesn’t require fancy tools or a big budget. What it does require is intention and a few minutes of focused effort. By repurposing everyday materials, you create a personalized system that works with your lifestyle, not against it. The result is more than a neat drawer—it’s peace of mind, saved time, and protection for your valuable electronics.
Start today. Open that drawer. Sort one cable at a time. Build something useful from what you already have. Once you experience the ease of grabbing the right charger instantly, you’ll wonder why you waited so long.


 浙公网安备
33010002000092号
浙公网安备
33010002000092号 浙B2-20120091-4
Comments
No comments yet. Why don't you start the discussion?