
A well-organized pantry isn’t just about neat rows of matching jars—it’s a functional system that saves time, reduces stress, and prevents food from spoiling unnoticed. For many households, the pantry is both a storage space and a decision-making hub: it influences what meals get made, what gets eaten, and what ends up in the trash. Poor organization leads to duplicate purchases, expired goods, and last-minute takeout orders. The good news? With thoughtful planning and consistent habits, anyone can transform their pantry into an efficient, waste-reducing asset.
Assess Your Current Pantry Setup
Before rearranging shelves or buying containers, take stock of what you already have. Begin by removing everything from your pantry. This step may seem extreme, but it allows you to see exactly what’s there, identify expired or stale items, and assess the usability of your current layout.
As you pull items out, sort them into categories: canned goods, baking supplies, snacks, grains, pasta, sauces, breakfast foods, etc. Check expiration dates and dispose of anything past its prime. Be especially cautious with dry goods like flour, nuts, and spices, which can go rancid even if not technically expired.
While everything is out, wipe down shelves and vacuum crumbs. This not only improves hygiene but also gives you a clean slate to work with. Take note of shelf height, depth, and lighting—these factors influence how accessible your items will be once reorganized.
Create Logical Zones Based on Usage
One of the most effective strategies for pantry organization is zoning—grouping similar items together in designated areas based on how they’re used or when they’re accessed. A logical layout reduces decision fatigue and makes meal prep smoother.
Common pantry zones include:
- Cooking Staples: Oils, vinegars, spices, salt, pepper, and common condiments.
- Baking Supplies: Flour, sugar, baking powder, chocolate chips, extracts.
- Grains & Pasta: Rice, quinoa, couscous, spaghetti, noodles.
- Canned Goods: Beans, tomatoes, vegetables, broths.
- Breakfast Items: Cereal, oatmeal, granola, pancake mix.
- Snacks: Crackers, chips, nuts, dried fruit (especially important if keeping child-accessible).
- Beverages: Coffee, tea, drink mixes, hot chocolate.
Place high-use zones at eye level. Keep heavier items like canned goods on lower shelves for safety and accessibility. Reserve upper shelves for lightweight, infrequently used items such as party supplies or backup bulk purchases.
“Zoning transforms your pantry from a storage closet into a kitchen command center. When everything has a home, cooking becomes intuitive.” — Lisa Chen, Home Organization Consultant
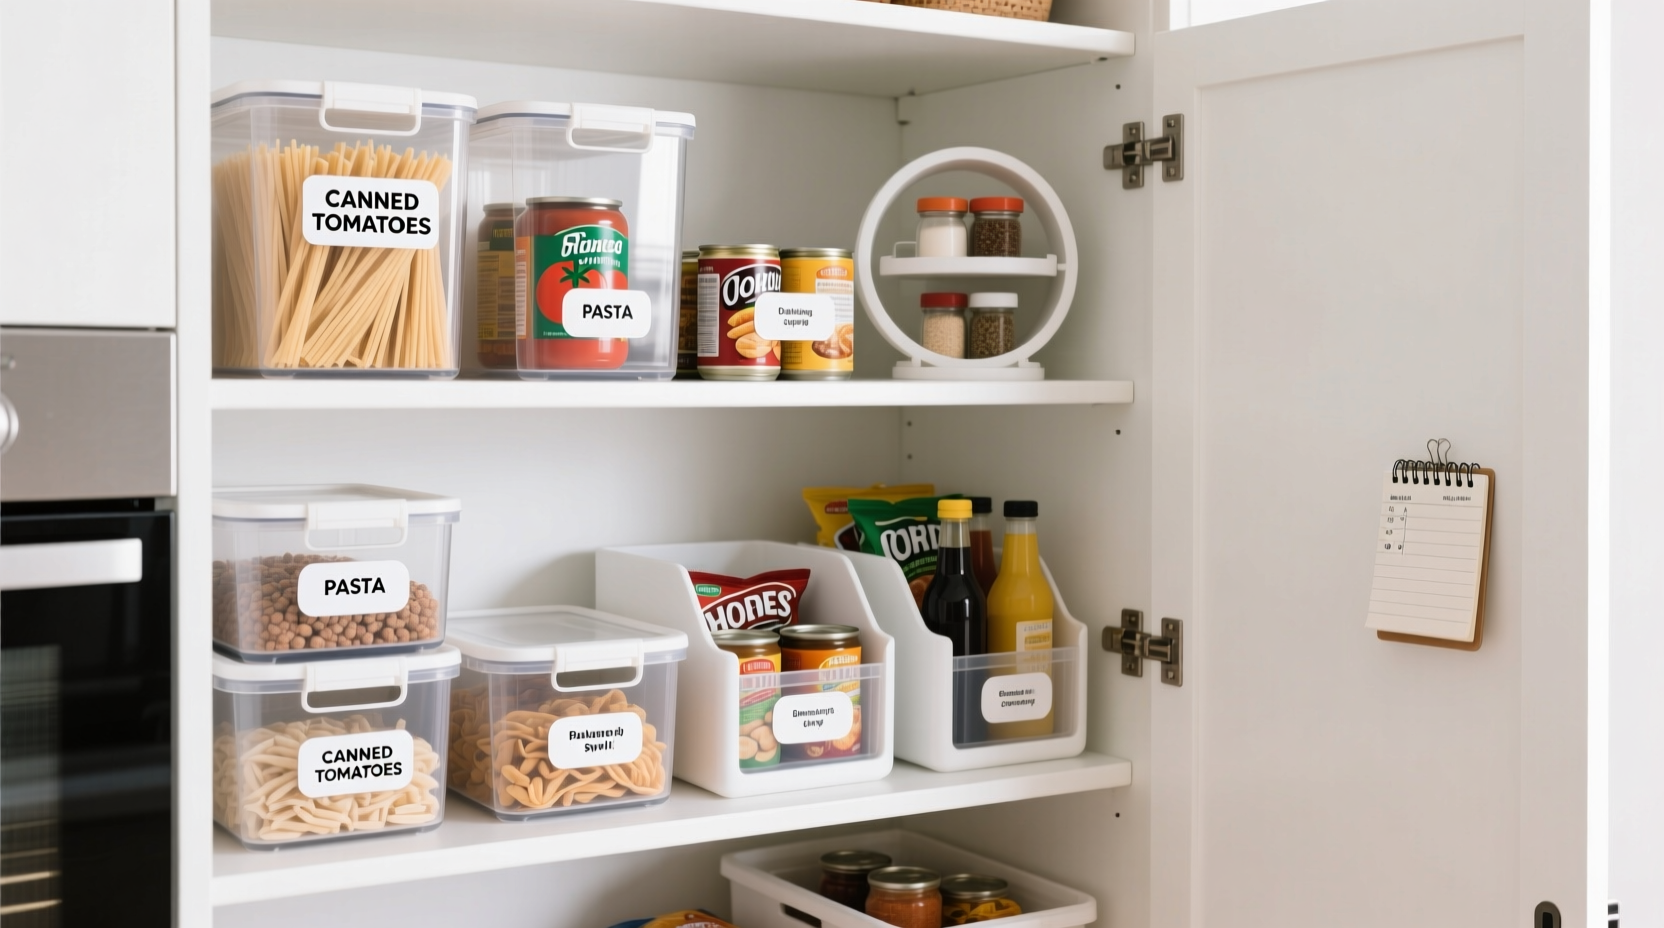
Use Containers and Labels Strategically
Transferring dry goods into clear, airtight containers does more than create a uniform look—it protects food from moisture, pests, and staleness while making contents instantly visible. Opt for square or rectangular containers to maximize shelf space and minimize gaps.
Label every container with both the item name and expiration date. This practice supports first-in, first-out (FIFO) rotation, ensuring older items are used before newer ones. Use a label maker, chalkboard tags, or waterproof stickers for durability.
| Item | Recommended Container Type | Storage Benefit |
|---|---|---|
| Rice, pasta, cereal | Airtight plastic or glass with sealable lid | Prevents bugs and maintains freshness |
| Flour, sugar | Wide-mouth, stackable container | Allows easy scooping and measuring |
| Spices | Small glass jars with shaker lids | Saves space and improves access |
| Nuts, seeds | Airtight, opaque container | Blocks light to prevent rancidity |
| Tea bags, coffee pods | Front-facing organizer or drawer bin | Enables quick selection |
Don’t over-containerize. Items in durable packaging (like cans or boxes of broth) can remain as-is if clearly labeled and stored upright. Reserve containers for items that benefit from protection or frequent use.
Step-by-Step Guide to Reorganizing Your Pantry
Follow this sequence to ensure a thorough, lasting transformation:
- Empty the pantry completely. Place items on a table or counter for sorting.
- Discard expired or spoiled food. Compost where possible; recycle packaging.
- Categorize all remaining items. Use baskets or zones to group like with like.
- Decide on zones. Sketch a simple layout plan based on frequency of use and weight.
- Transfer dry goods to containers. Choose sizes that match your consumption rate.
- Label everything. Include product name and “use by” date.
- Restock thoughtfully. Place heaviest items on bottom shelves, daily essentials at eye level.
- Add organizational tools. Use risers, lazy Susans, bins, or tiered shelves where needed.
- Create a shopping list baseline. Note what you now have to avoid overbuying.
- Set a monthly review date. Schedule a 15-minute check-in to reassess and rotate stock.
Minimize Waste with Smart Inventory Practices
Even the best-organized pantry fails if inventory isn’t managed. Food waste costs the average household hundreds of dollars per year. Much of this loss stems from poor visibility and lack of rotation.
Adopt the FIFO method: when adding new items, move older ones to the front and place new purchases behind them. This ensures older stock is used first. It’s especially critical for perishable dry goods like nuts, seeds, and whole-grain flours.
Keep a running inventory list—either on paper taped inside the pantry door or in a notes app. Update it weekly. This list helps during meal planning and grocery shopping, reducing impulse buys and duplicates.
Consider implementing a “use soon” zone—a clearly marked shelf or bin for items approaching expiration. Rotate this section weekly and build meals around these ingredients. For example, nearing-expiry oats become overnight oats; aging crackers turn into croutons.
Mini Case Study: The Johnson Family Pantry Overhaul
The Johnsons, a family of four in Portland, were spending $200 weekly on groceries but frequently throwing out stale bread, expired spices, and half-used bags of rice. After a weekend pantry reorganization using zoning and clear containers, they implemented a labeling system and added a “use soon” basket.
Within three weeks, they reduced their grocery bill by 25% and cut food waste in half. Dinner decisions became faster because ingredients were visible and accessible. They now conduct a 10-minute pantry check every Sunday morning, adjusting their meal plan accordingly. “It’s not just about looks,” says Sarah Johnson. “We’re eating better, saving money, and arguing less about dinner.”
Essential Tools for Long-Term Success
Sustainable organization depends on the right tools. Invest in a few key items that enhance functionality:
- Lazy Susans: Ideal for corner shelves or oils/vinegars/spices—spin to access items in the back.
- Stackable bins: Group snack packs, seasoning packets, or instant sides for easy pull-out access.
- Can organizers: Tiered racks let you see labels on canned goods without moving cans.
- Door racks: Maximize unused door space for small jars, spice packets, or tea.
- Clear-front baskets: Perfect for kids’ snacks—visible and reachable at their height.
Avoid overcrowding. Leave breathing room between items to maintain airflow and make restocking easier. If a shelf is packed full, consider rotating bulk items to a secondary storage area like a basement or garage, bringing them up as needed.
Pantry Organization Checklist
- ✅ Remove all items from pantry
- ✅ Discard expired or spoiled food
- ✅ Wipe down shelves and clean corners
- ✅ Sort items into categories
- ✅ Define usage zones (cooking, baking, snacks, etc.)
- ✅ Transfer dry goods to airtight containers
- ✅ Label all containers with name and date
- ✅ Restock using FIFO method
- ✅ Install organizers (lazy Susan, bins, risers)
- ✅ Create a pantry inventory list
- ✅ Schedule monthly maintenance check
Frequently Asked Questions
How often should I clean and reorganize my pantry?
A deep clean and reorganization should happen at least twice a year. However, a 10–15 minute weekly review helps maintain order, check for expiring items, and adjust inventory. Seasonal changes (e.g., switching from soup stocks to summer salads) are ideal triggers for refreshes.
Should I refrigerate certain pantry items to extend shelf life?
Yes. While not traditional pantry fare, some items last significantly longer in cool environments. Whole-grain flours, nuts, seeds, and nut butters benefit from refrigeration. Olive oil should stay in a cool, dark place but not the fridge (it can solidify). Spices lose potency faster in heat, so avoid storing them near the stove or oven.
What’s the best way to store bulk purchases without wasting space?
Purchase only what you’ll realistically use within 6–12 months. Store bulk items in large, lidded bins labeled with purchase and expiration dates. Keep a smaller portion in a kitchen-accessible container and refill as needed. This keeps frequently used items convenient while preserving the bulk stash.
Conclusion: Turn Your Pantry Into a Functional Asset
An organized pantry is more than a tidy closet—it’s a tool for smarter eating, financial savings, and environmental responsibility. By categorizing items, using clear containers, labeling thoroughly, and maintaining a regular inventory, you gain control over your food supply and reduce unnecessary waste.
The effort you invest today pays off every time you open the pantry and find exactly what you need, when you need it. No more mystery bags or surprise mold. No more buying duplicates because you forgot you had three cans of beans. You’ll cook with confidence, shop with purpose, and eat with intention.


 浙公网安备
33010002000092号
浙公网安备
33010002000092号 浙B2-20120091-4
Comments
No comments yet. Why don't you start the discussion?