
Pan-frying a hamburger at home offers the perfect balance of convenience, control, and flavor. Unlike grilling, which depends on weather and equipment, stovetop cooking gives you consistent heat and excellent browning—critical for developing rich, savory flavors. When done right, a pan-seared burger is juicy inside, deeply caramelized outside, and far superior to anything from a fast-food chain. The key lies not in complexity, but in precision: choosing the right meat, seasoning properly, managing heat, and knowing when to flip.
This guide walks through each step of the process with practical advice backed by culinary science and chef-tested methods. Whether you're cooking for one or feeding a family, mastering the art of the pan-fried burger ensures delicious results every single time.
Selecting the Right Ground Beef
The foundation of any great hamburger is the meat. Not all ground beef performs the same under high heat. Fat content plays a crucial role in moisture retention and flavor development. Lean cuts like 95% lean may seem healthier, but they often result in dry, tough patties due to insufficient fat to lubricate the fibers during cooking.
A ratio of 80% lean to 20% fat (often labeled as 80/20) is ideal for pan frying. This blend provides enough marbling to keep the burger moist while allowing for proper sear formation. Chuck roast is a popular base for this grind because it naturally contains intramuscular fat that melts during cooking, enhancing juiciness.
If possible, buy freshly ground chuck or ask your butcher to grind it for you. Pre-ground meat exposed to air for hours loses oxidation potential, reducing its ability to develop a deep crust. Freshness matters not just for taste, but for texture and appearance.
Forming the Perfect Patty
How you shape your patty influences both cooking performance and final texture. Start by dividing one pound of ground beef into four equal portions—about 4 ounces each—for standard-sized burgers. Gently form each portion into a ball, then flatten it into a disc roughly ¾ inch thick.
Press a shallow dimple into the center of each patty with your thumb. This prevents bulging during cooking, ensuring even thickness and flat contact with the pan. Without this step, burgers tend to puff up in the middle, leaving an undercooked core.
Keep handling minimal. Overworking the meat compacts the proteins, leading to a dense, chewy result rather than a tender bite. Think of the patty as delicate—handle it like you would a soufflé.
“Resist the urge to over-season or mix ingredients into the meat. Pure beef flavor shines when left simple.” — Daniel Ruiz, Executive Chef at Hearth & Co.
Step-by-Step Guide to Pan Frying
Frying a burger well requires attention to detail at every stage. Follow this timeline for optimal results:
- Prep the patties: Season both sides generously with kosher salt and freshly ground black pepper just before cooking. Do not season too early—salt draws out moisture, which can interfere with searing.
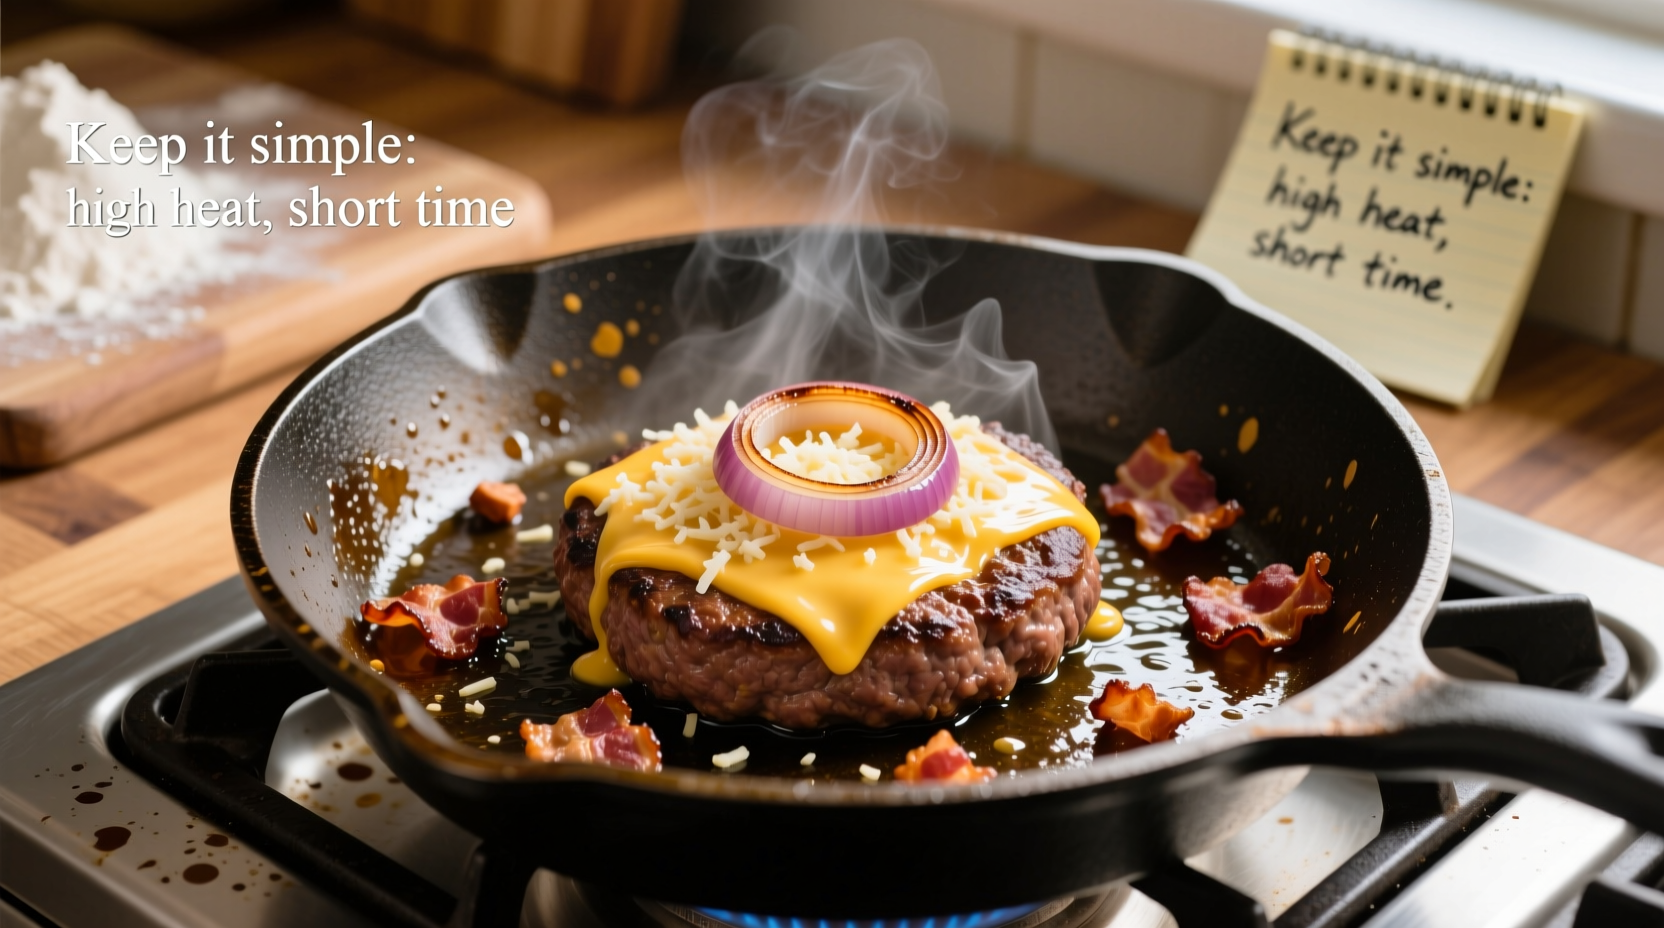
- Choose the right pan: Use a heavy-bottomed skillet—cast iron or carbon steel are best. These retain and distribute heat evenly, promoting consistent browning.
- Preheat thoroughly: Place the pan over medium-high heat for 3–5 minutes until hot. A drop of water should sizzle and evaporate instantly.
- Add oil: Use a high-smoke-point oil like canola, avocado, or grapeseed. Add about ½ teaspoon and swirl to coat the surface.
- Place patties in the pan: Lay them down gently without crowding. Leave at least 1 inch between each if cooking multiple.
- Sear undisturbed: Cook for 3–4 minutes on the first side. Resist pressing down with a spatula—this forces out precious juices.
- Flip once: Turn the burger using a wide metal spatula. Cook another 2–4 minutes depending on desired doneness.
- Add cheese (optional): In the last minute, place a slice of cheese on top and cover the pan briefly to melt.
- Rest before serving: Transfer to a plate and let rest for 2–3 minutes. This allows juices to redistribute.
Doneness Guide and Internal Temperatures
Juiciness correlates directly with internal temperature. Cooking beyond medium increases the risk of dryness, especially with 80/20 beef. Use an instant-read thermometer for accuracy.
| Doneness | Internal Temperature | Cook Time (per side) | Visual & Texture Cues |
|---|---|---|---|
| Rare | 120–125°F (49–52°C) | 3 min / 1.5 min | Cool red center, very soft to touch |
| Medium Rare | 130–135°F (54–57°C) | 3 min / 2 min | Warm red center, soft spring |
| Medium | 140–145°F (60–63°C) | 3 min / 3 min | Pink center, slight resistance |
| Medium Well | 150–155°F (65–68°C) | 4 min / 3.5 min | Slight pink, firm to touch |
| Well Done | 160°F+ (71°C+) | 5 min / 4 min | No pink, very firm—risk of dryness |
Note: Temperatures will rise 5–10 degrees during resting due to carryover cooking.
Avoiding Common Mistakes
Even experienced cooks make errors that compromise burger quality. Recognizing these pitfalls helps ensure success.
- Pressing the patty with a spatula: A common habit, but it squeezes out flavorful juices and reduces moisture.
- Flipping too early or too often: Wait until the patty releases easily from the pan. Frequent flipping prevents proper crust formation.
- Cooking cold meat: Taking patties straight from the fridge leads to uneven cooking. Let them sit at room temperature for 10–15 minutes before frying.
- Overcrowding the pan: This lowers the temperature rapidly and causes steaming instead of searing.
- Slicing into the burger to check doneness: Always use a thermometer—cutting releases steam and juice.
“The sear isn’t just about looks—it’s where flavor is born. Maillard reaction creates hundreds of aromatic compounds you can’t get any other way.” — Dr. Lena Torres, Food Scientist
Real Example: From Dry to Delicious
Mark, a home cook in Portland, used to struggle with dry, bland burgers despite following recipes closely. He grilled in summer but relied on the stove in winter. His early attempts involved lean turkey blends, frequent flipping, and pressing the patties flat “to cook faster.” The results were consistently disappointing.
After learning about fat content and searing science, he switched to 80/20 chuck, formed dimpled patties, and used a cast-iron skillet preheated on medium-high. He seasoned just before cooking and flipped only once. The difference was immediate: a dark, flavorful crust, a juicy interior, and no more dry edges. Now, his weekly burger night is a family favorite.
Checklist for Foolproof Pan-Fried Burgers
Follow this checklist before starting:
- ☐ Use 80/20 ground chuck, fresh if possible
- ☐ Form 4-oz patties, ¾” thick with a center dimple
- ☐ Season with salt and pepper right before cooking
- ☐ Preheat cast-iron or heavy skillet over medium-high heat
- ☐ Use high-smoke-point oil (canola, avocado)
- ☐ Sear 3–4 minutes per side, flip once
- ☐ Check temp with thermometer (don’t guess)
- ☐ Rest 2–3 minutes before serving
FAQ
Can I use butter instead of oil?
Butter adds flavor but burns easily due to milk solids. If desired, combine ½ tsp butter with 1 tsp high-smoke-point oil to prevent scorching while enriching taste.
Why did my burger stick to the pan?
Likely causes include insufficient preheating, using a nonstick pan (which doesn’t promote crust), or flipping too soon. Ensure the pan is hot and let the patty sear fully before turning.
Should I cover the pan while cooking?
No—cover only when melting cheese. Covering traps steam, softening the crust and inhibiting browning.
Final Thoughts
Pan-frying a hamburger may seem simple, but mastery comes from understanding the interplay of heat, fat, and timing. With the right ingredients and technique, you can produce restaurant-quality burgers in your own kitchen—juicy, deeply flavored, and perfectly seared. It’s not about fancy tools or rare ingredients; it’s about consistency, patience, and respect for the process.


 浙公网安备
33010002000092号
浙公网安备
33010002000092号 浙B2-20120091-4
Comments
No comments yet. Why don't you start the discussion?