
Every pet owner knows that a collar is more than just an accessory—it's a vital part of a pet’s identity, safety, and daily comfort. While store-bought collars offer convenience, customizing one at home allows you to blend functionality with personality. Adding reflective elements ensures visibility during early morning or late-night walks, while charm tags can carry meaningful symbols, names, or even medical information. With a few tools and thoughtful planning, you can create a collar that’s as unique as your pet—and built to last.
Why Personalization Matters for Pet Collars
A personalized pet collar serves multiple purposes: identification, safety, and emotional connection. Standard collars often lack the visibility needed in low-light conditions, putting pets at risk when they wander. Meanwhile, generic ID tags may not reflect your pet’s character—or your own sense of style.
By incorporating reflective materials and custom charm tags, you’re not only enhancing safety but also creating a keepsake that celebrates your pet’s individuality. This level of customization is especially valuable for pets with special needs, rescue animals with unknown histories, or those who spend time outdoors.
Selecting the Right Base Collar
The foundation of any personalized collar is the base strap. Choosing the correct material, width, and closure type ensures durability and comfort.
- Nylon: Lightweight, water-resistant, and available in many colors. Ideal for dogs and cats alike.
- Leather: Durable and stylish, but requires more maintenance and may not be suitable for pets who swim or play in rain frequently.
- Webbing: Often used in harnesses, it’s strong and ideal if you plan to attach multiple accessories.
When selecting width, consider your pet’s size. Small breeds benefit from ½-inch-wide collars, while larger dogs may need 1-inch or wider straps for strength and visibility. Ensure the collar has adjustable buckles and enough room—about two fingers’ width—for comfort.
“Custom collars are becoming increasingly popular because they merge safety with storytelling.” — Dr. Lena Patel, Veterinary Behaviorist
Step-by-Step Guide to Adding Reflective Details
Reflective elements significantly improve visibility after dark. You don’t need advanced tools to add them—just careful attention to placement and adhesion.
- Choose your reflective material: Options include reflective tape, sew-on strips, or heat-transfer vinyl. Tape is easiest for beginners; ensure it’s weather-resistant.
- Clean the collar surface: Wipe down the area where you’ll apply the material using rubbing alcohol to remove oils and debris.
- Measure and cut: Cut the reflective strip into small rectangles (1–2 inches) or continuous bands. Placing them on both sides of the collar maximizes visibility.
- Apply adhesive-backed tape: Peel and press firmly onto the collar. Run your finger along the edge to eliminate air bubbles.
- Sew for permanence: For long-term durability, stitch around the edges of the reflective piece using nylon thread, which resists rot and UV damage.
- Test visibility: Shine a flashlight on the collar in a dark room. The reflection should be bright and clear from multiple angles.
If sewing isn’t feasible, use high-strength fabric glue designed for outdoor gear. Allow 24 hours of drying time before use.
Types of Reflective Materials Compared
| Material | Pros | Cons | Best For |
|---|---|---|---|
| Adhesive Reflective Tape | Easy to apply, affordable, flexible | May peel over time without reinforcement | Beginners, temporary upgrades |
| Sew-On Reflective Webbing | Durable, washable, professional look | Requires needlework skill | Dogs with active lifestyles |
| Heat-Activated Vinyl | Precise designs, customizable shapes | Needs iron or heat press, less flexible | Decorative accents |
| 3M Scotchlite™ Fabric | Industry standard, highly reflective | More expensive, limited retail availability | High-safety applications |
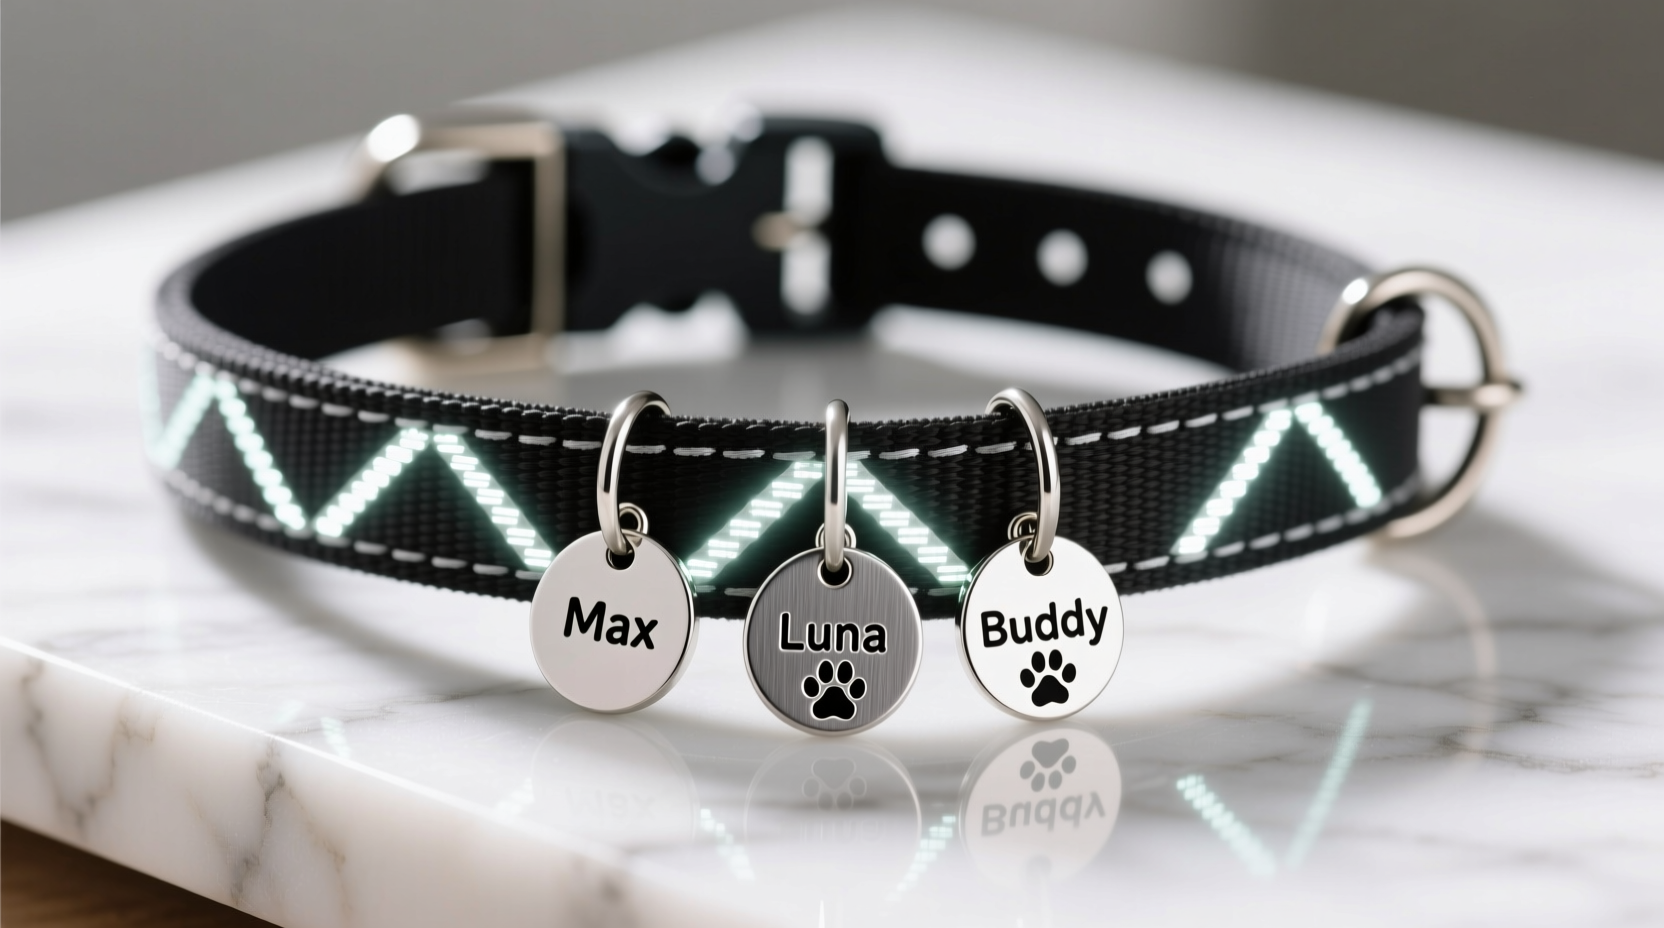
Designing and Attaching Charm Tags
Charm tags go beyond basic ID—they can represent hobbies, milestones, or even memorialize a beloved pet. The key is balancing aesthetics with practicality.
Start by choosing a tag shape: round, bone-shaped, heart, or custom laser-cut silhouettes. Materials range from stainless steel and aluminum to enamel-coated brass. Stainless steel resists rust and scratching, making it ideal for outdoor pets.
You can engrave the tag with your pet’s name, your phone number, or a short message like “Beloved Family Member.” Many online vendors offer DIY upload tools so you can preview fonts and layouts before ordering.
To attach the charm:
- Use a split ring (commonly found on keychains) to connect the charm to the D-ring on the collar.
- For lightweight charms, a jump ring opened with pliers works well.
- If adding multiple charms, stagger their positions to prevent clanging and noise during movement.
Ensure the charm doesn’t dangle too low—ideally, it should sit above the ground when your pet walks to avoid snagging on grass or furniture.
Mini Case Study: Bella the Rescue Dog
Bella, a three-year-old mixed breed adopted from a rural shelter, was prone to slipping out of her collar during evening walks. Her owner, Maya, wanted a solution that combined visibility with emotional significance. She chose a navy-blue nylon collar and added diagonal strips of silver reflective tape on both sides. Then, she ordered a custom charm shaped like a paw print with the engraving: “Found Safe. Thank you.”
Within weeks, neighbors began commenting on how easy it was to spot Bella at dusk. One night, when Bella chased a squirrel into a dimly lit alley, a passerby recognized her collar immediately and guided her back home. The charm also sparked conversations about pet adoption—turning Bella’s collar into a subtle advocacy tool.
Checklist: Building Your Personalized Collar
Follow this checklist to ensure your customized collar is safe, functional, and beautiful:
- ☐ Choose a comfortable, properly sized base collar
- ☐ Measure and cut reflective material to fit
- ☐ Attach reflective pieces securely via adhesive or stitching
- ☐ Select a charm tag with meaningful engraving
- ☐ Verify all metal components are rust-resistant
- ☐ Attach charm using a secure ring system
- ☐ Test fit on your pet—check for tightness and irritation
- ☐ Inspect weekly for wear, especially after rain or swimming
Common Mistakes to Avoid
Even well-intentioned personalizations can compromise safety or comfort. Be mindful of these pitfalls:
- Overloading with charms: Too many accessories increase weight and risk tangling. Stick to one primary charm and one ID tag.
- Poorly secured attachments: Loose rings or weak glue can lead to lost tags. Double-check all connections weekly.
- Using non-reflective \"glitter\" instead of true reflective material: Shiny surfaces don’t reflect light like engineered retroreflective fabrics.
- Ignoring growth: Puppies and kittens grow quickly. Reassess collar fit every 4–6 weeks during early development.
- Blocking adjustment holes: Don’t place reflective strips directly over buckle slots—this limits future sizing options.
“Simplicity often wins in pet product design. A single, well-placed reflective element is safer than flashy clutter.” — Mark Tran, Pet Product Designer at SafePaw Gear Co.
Frequently Asked Questions
Can I wash a personalized collar?
Yes, but with care. Hand-wash using mild soap and lukewarm water. Remove charm tags first if possible, and avoid soaking reflective tape for prolonged periods. Air dry completely before reuse.
Are engraved charms better than printed ones?
Engraved charms are more durable and fade-resistant. Printed designs may wear off after months of exposure to moisture and friction. For long-term use, choose deep engraving or etching.
How do I know if the reflective material works?
Test it at night with a smartphone flashlight. Stand 10–15 feet away and shine the light at the collar. A good reflective strip will glow brightly, mimicking headlights. If there’s no noticeable reflection, consider upgrading the material.
Final Thoughts and Call to Action
Personalizing a pet collar with reflective details and charm tags is more than a craft project—it’s an act of care. You’re designing something that protects, identifies, and expresses love in a tangible way. Whether you’re honoring a rescue journey, celebrating a birthday, or simply ensuring your dog is seen on foggy mornings, each detail carries meaning.
The best collars aren’t the most expensive or elaborate—they’re the ones thoughtfully made with the pet’s needs in mind. Now that you have the tools and knowledge, why not create one today? Measure your pet’s neck, sketch a simple design, and start assembling. Share your creation online with fellow pet lovers, or inspire a friend to make one for their furry companion.


 浙公网安备
33010002000092号
浙公网安备
33010002000092号 浙B2-20120091-4
Comments
No comments yet. Why don't you start the discussion?