
The Nintendo Switch has become one of the most versatile gaming platforms, blending handheld and console experiences seamlessly. While the Joy-Con controllers are compact and functional, many players find them lacking in ergonomics, grip, and personal flair. Fortunately, customization options like skins and grips offer both aesthetic enhancement and improved usability. Whether you're looking to prevent hand fatigue during long play sessions or simply want your controller to reflect your personality, personalizing your Switch controller is a practical and creative upgrade.
Why Customize Your Switch Controller?
The standard Joy-Con design prioritizes portability over comfort. Their smooth plastic surface can feel slippery, especially during intense gameplay, and their narrow form factor isn’t ideal for larger hands. Over time, this can lead to discomfort or even strain. Personalization addresses these issues by improving grip, reducing slippage, and protecting the controller from scratches and wear.
Beyond functionality, customization allows gamers to express themselves. A unique skin or textured grip transforms a mass-produced accessory into something personal—whether it’s a sleek minimalist look, a vibrant anime design, or a retro gaming theme. For collectors and enthusiasts, customizing controllers also adds value and distinctiveness to their setup.
“Custom grips and skins aren't just cosmetic—they’re ergonomic upgrades that enhance control and reduce fatigue during extended gaming.” — Jordan Lee, Game Peripheral Designer
Understanding Skins vs. Grips: What’s the Difference?
While often used interchangeably, skins and grips serve different purposes and offer distinct benefits. Knowing the difference helps you choose the right option—or combine both for maximum effect.
| Feature | Skins | Grips |
|---|---|---|
| Purpose | Visual customization and light protection | Improved ergonomics and secure handling |
| Material | Vinyl or adhesive polyester film | Silicone, rubber, or thermoplastic polyurethane (TPU) |
| Installation | Peel-and-stick application | Slips over or attaches to controller |
| Removability | Generally removable without residue | Reusable and detachable |
| Durability | Moderate; may peel at edges over time | High; resistant to sweat and impact |
| Cost Range | $5–$15 per set | $10–$25 per pair |
Skins are ideal if you want to change the look of your controller without altering its shape. They come in thousands of designs—from solid colors to intricate artwork—and are easy to apply. However, they don’t significantly improve grip or comfort.
Grips, on the other hand, add physical texture and bulk. They cushion your hands, reduce vibration transfer, and make the controller easier to hold during fast-paced games. Some grips even include trigger extenders or finger loops for added precision.
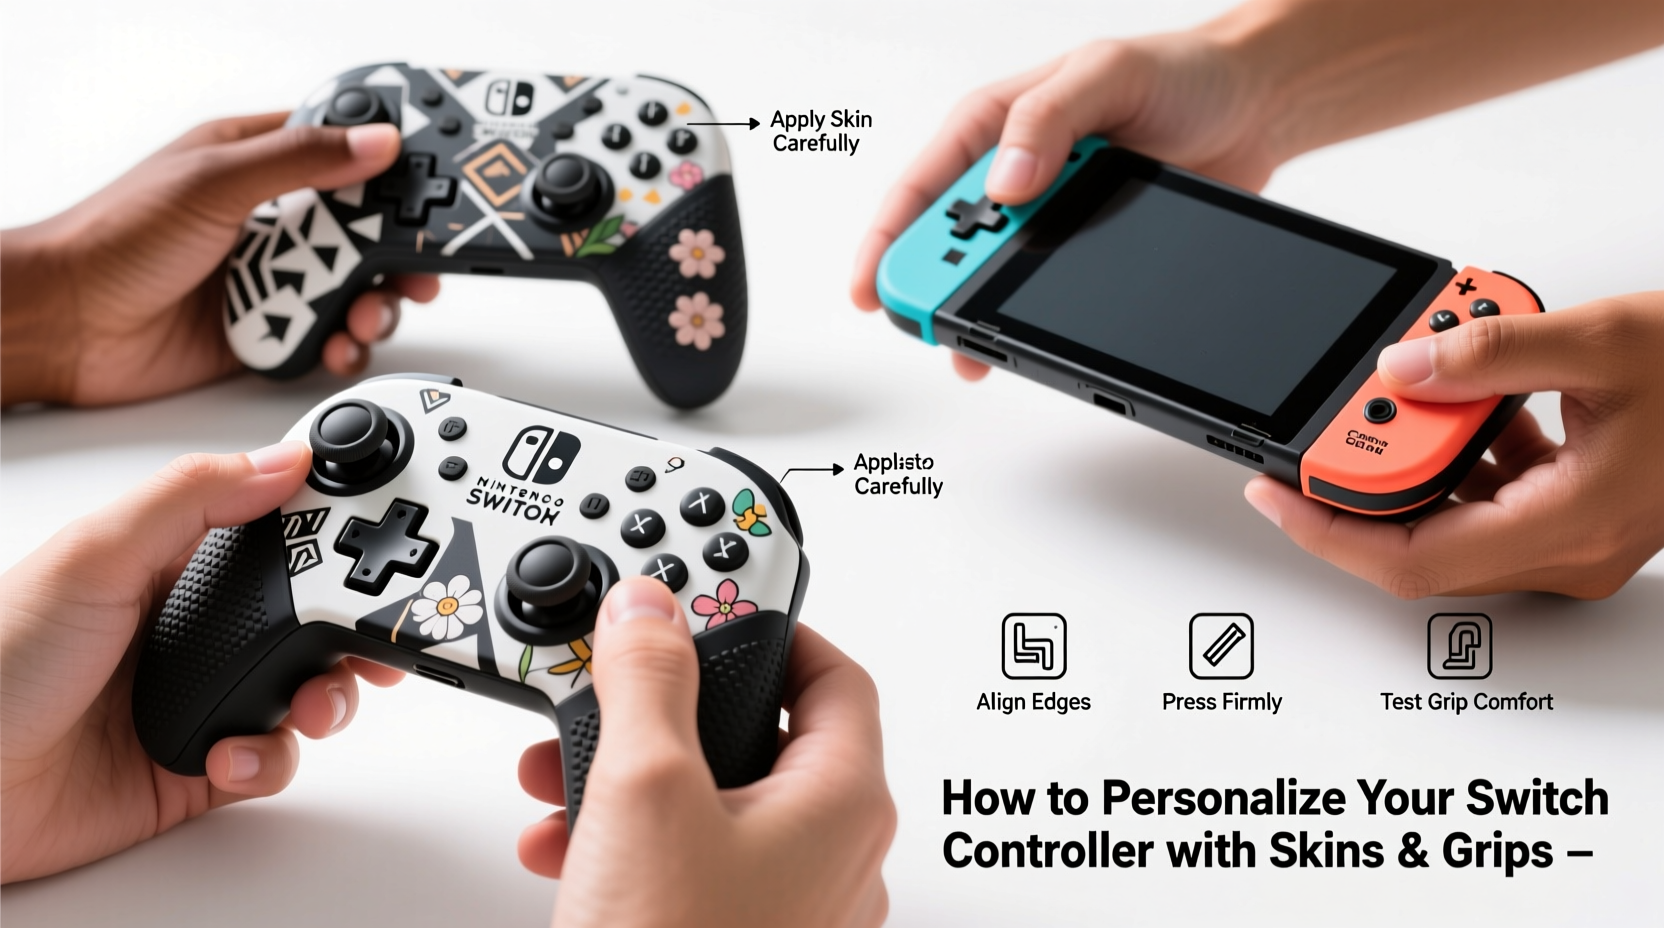
Step-by-Step Guide to Applying Controller Skins
Applying a skin correctly ensures a clean, bubble-free finish. Rushing the process can result in misalignment or trapped air. Follow this detailed sequence for professional-looking results.
- Clean the Controller Surface: Use a microfiber cloth lightly dampened with isopropyl alcohol (70% or higher) to wipe down the entire Joy-Con. Focus on seams, buttons, and analog sticks. Let it dry completely—any moisture will prevent proper adhesion.
- Prepare Your Workspace: Work on a flat, dust-free surface under bright lighting. Open the skin packaging carefully and lay the pieces out to identify top, bottom, and side sections.
- Peel and Position: Slowly peel back a small portion of the backing. Align the skin precisely with the controller’s edge, starting from the top. Hold the rest of the skin taut to avoid wrinkles.
- Smooth as You Go: Use a credit card or squeegee tool to press the skin onto the surface while gradually peeling off the backing. Move from top to bottom, applying firm but gentle pressure to push out air bubbles.
- Handle Corners and Cutouts: When reaching buttons or analog sticks, fold the excess material around the edges rather than stretching it. Most high-quality skins have pre-cut holes, but some require careful trimming with a hobby knife.
- Final Inspection: Check for any lifted edges or bubbles. Small bubbles usually dissipate within 24 hours. Larger ones can be gently pierced with a pin and smoothed out.
For best results, avoid touching the adhesive side with bare fingers—oils from your skin can interfere with sticking. If you make a mistake during application, most vinyl skins can be peeled up and repositioned within the first few minutes.
Choosing and Installing the Right Grips
Selecting the correct grip depends on your hand size, play style, and whether you use the Joy-Con attached to the Switch or detached. There are three main types:
- Sleeve-Style Grips: Made of stretchy silicone, these slip over the entire controller. They offer full coverage and excellent grip but can make charging via the dock slightly tighter.
- Half-Cover Grips: These attach only to the sides, leaving the top and bottom exposed. Ideal if you frequently insert and remove Joy-Cons from the console.
- Ergonomic Add-Ons: Rigid attachments that snap onto the back or sides, sometimes including wrist straps or extended triggers. Best for serious gamers who prioritize performance.
When installing sleeve-style grips, start at the bottom edge and roll the silicone upward, ensuring the thumbsticks and buttons align perfectly with the cutouts. Avoid pulling too hard, which can distort the fit. Half-covers typically use adhesive or friction-fit mechanisms—press firmly along the seams to secure them.
Real Example: From Slippery to Secure – A Gamer’s Transformation
Mark, a competitive Splatoon 3 player, struggled with his Joy-Con slipping during heated matches. His palms would sweat, and he’d lose precision when dodging enemy fire. After researching solutions, he ordered a matte-finish vinyl skin with a camouflage pattern and paired it with textured half-grips made of anti-slip TPU.
Within days, his gameplay improved noticeably. The skin reduced fingerprint smudges, while the grips gave him consistent thumbstick control. “I no longer have to readjust my grip every few minutes,” he said. “It feels like I’ve upgraded my gear without buying new hardware.”
He later switched to a full silicone sleeve with built-in trigger extenders for Mario Kart tournaments, finding that the added leverage helped him execute drifts more consistently. His experience highlights how targeted customization can directly influence performance.
Checklist: How to Personalize Your Switch Controller Like a Pro
Follow this checklist before purchasing and installing your skins and grips:
- ✅ Measure your Joy-Con model (original, OLED, or Pro Controller) to ensure compatibility
- ✅ Decide whether you want full-body coverage or partial customization
- ✅ Choose between permanent skins or reusable grips based on flexibility needs
- ✅ Select materials suited to your environment (e.g., matte finishes resist fingerprints)
- ✅ Verify cutout accuracy for buttons, sticks, and ports
- ✅ Clean the controller thoroughly before application
- ✅ Test fit grips before committing to adhesive versions
- ✅ Keep spare skins or grips for rotation and backup
Frequently Asked Questions
Can skins damage my Joy-Con over time?
No, high-quality vinyl skins are designed to be non-abrasive and removable without residue. However, cheap or poorly made skins may leave behind adhesive or discolor the plastic. Always purchase from reputable brands and remove slowly if changing designs.
Do grips affect motion controls or HD Rumble?
Slight dampening of vibration feedback is common with thick grips, but it rarely impacts gameplay. Motion controls remain fully functional, though extremely bulky grips might alter balance slightly during gesture-based games like 1-2-Switch.
Are custom skins allowed in tournaments or public gaming spaces?
Yes, unless specifically restricted by event rules. Most gaming communities encourage personalization as long as it doesn’t provide an unfair mechanical advantage. Avoid sharp edges or modifications that could damage shared equipment.
Final Thoughts and Action Steps
Personalizing your Switch controller isn’t just about aesthetics—it’s about creating a gaming experience tailored to your body, habits, and tastes. A well-applied skin protects your investment and turns your Joy-Con into a statement piece. A thoughtfully chosen grip enhances comfort, reduces fatigue, and improves responsiveness when it matters most.
The best part? These upgrades are affordable, reversible, and accessible to everyone. Whether you spend $10 on a simple color-matched skin or invest in premium ergonomic accessories, the improvement in daily use is immediate and tangible.


 浙公网安备
33010002000092号
浙公网安备
33010002000092号 浙B2-20120091-4
Comments
No comments yet. Why don't you start the discussion?