
In a world where technology blends seamlessly into daily life, personal expression matters more than ever. Your tablet is likely one of your most-used devices—whether for work, creativity, or entertainment. Yet, its plain, factory-standard cover often goes unnoticed. Why settle for generic when you can transform it into a reflection of your personality? Personalizing your tablet cover doesn’t require artistic mastery or expensive tools. With simple materials and a bit of imagination, you can create a custom design that stands out, protects your device, and brings joy every time you use it.
This guide explores practical, accessible ways to customize your tablet cover using everyday supplies. From fabric wraps to hand-drawn art, these DIY ideas are designed for all skill levels. Whether you’re crafting for yourself or making a thoughtful gift, these techniques offer lasting satisfaction and a unique touch to your digital experience.
Choose the Right Base Cover
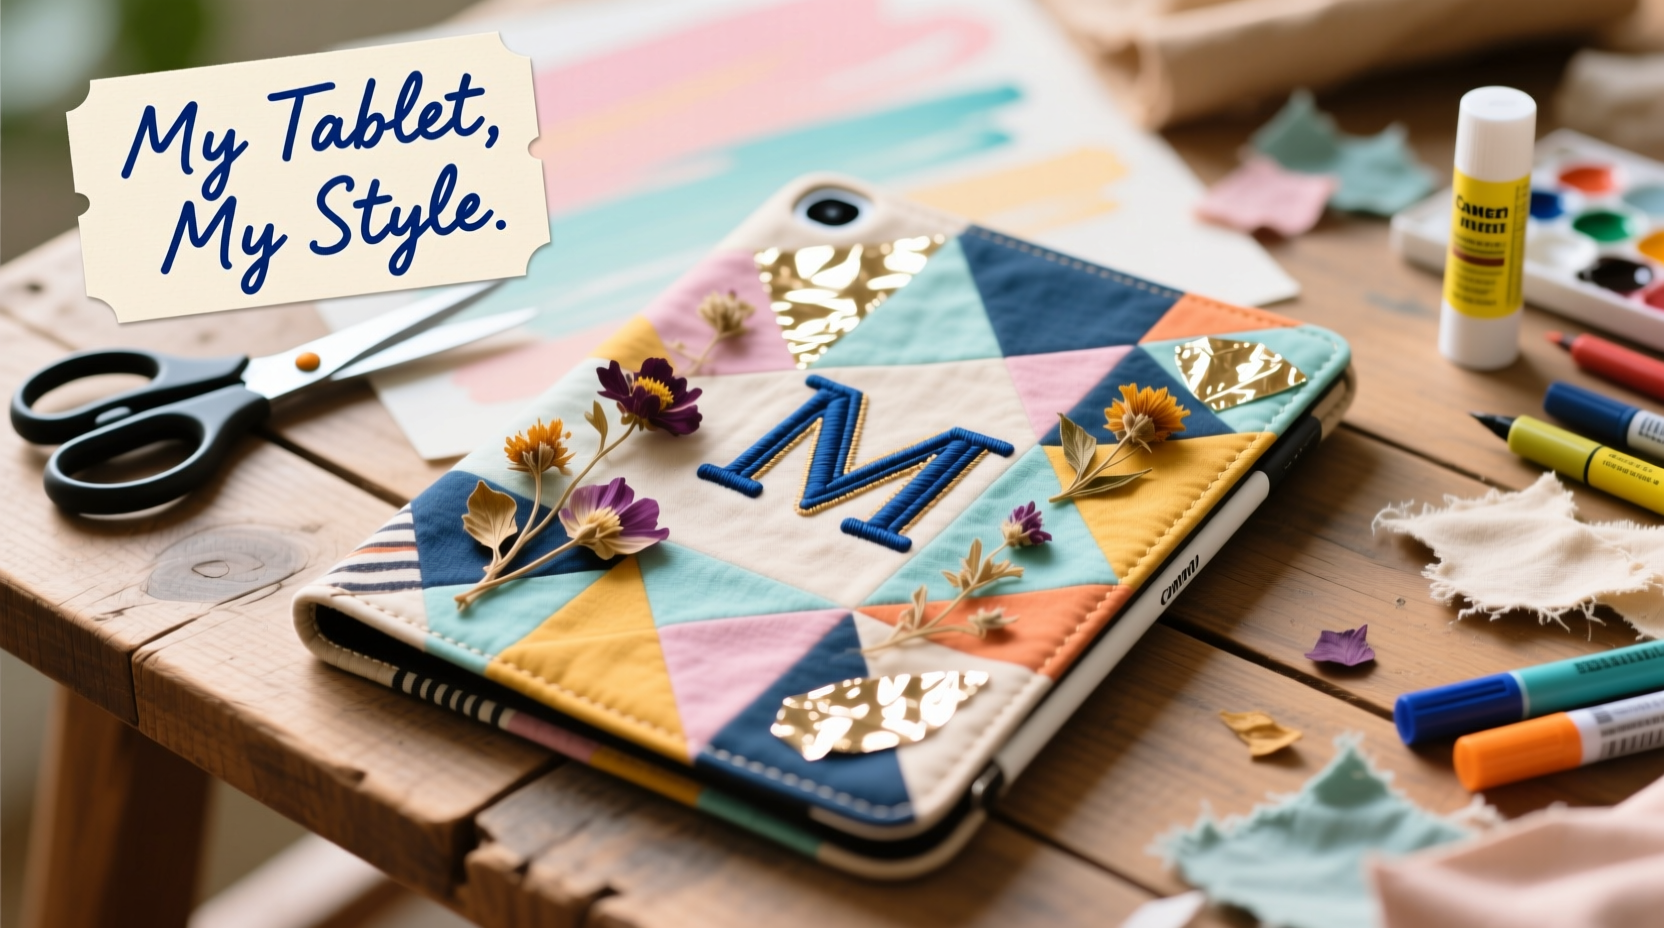
Before diving into decoration, selecting the right tablet cover is crucial. Not all cases are equally suited for customization. Some materials absorb paint better, while others provide a smooth surface for adhesives. Consider the following options:
- Silicone cases: Flexible and grippy, ideal for painting or adding stickers.
- Plastic (hard-shell) cases: Smooth finish works well with vinyl decals and permanent markers.
- Fabric-covered cases: Great for embroidery, fabric paint, or attaching patches.
- Leather or faux leather: Elegant base for engraving, stamping, or metallic pens.
Avoid ultra-thin magnetic closures or cases with moving parts if you plan on applying thick layers of paint or embellishments. A basic snap-on case gives you the most creative freedom.
Creative DIY Methods to Customize Your Cover
Once you’ve chosen your base, it’s time to get creative. Below are five proven techniques that yield professional-looking results without requiring special skills.
1. Fabric Wrap Technique
Transform your tablet cover with a piece of colorful fabric. This method works best with hard-shell plastic or silicone cases.
- Clean the case thoroughly with rubbing alcohol to remove oils.
- Measure and cut the fabric slightly larger than each side of the case.
- Apply a thin, even layer of fabric glue or Mod Podge to one side.
- Press the fabric onto the case, smoothing out air bubbles.
- Wrap excess fabric around the edges and trim neatly with scissors.
- Seal with 1–2 coats of clear Mod Podge to protect against wear.
Use cotton prints, denim scraps, or even old clothing for an eco-friendly twist. Floral patterns, geometric designs, or vintage band tees add instant character.
2. Hand-Drawn Art with Permanent Markers
For those who enjoy sketching, permanent markers like Sharpies or Posca pens allow detailed artwork directly on the case. Use stencils for clean lines or freehand for expressive flair.
Popular themes include mandalas, inspirational quotes, zodiac signs, or minimalist line art. After completing your design, seal it with a clear acrylic spray to prevent smudging.
“Personalization turns functional objects into emotional companions. A hand-drawn cover becomes part of your daily ritual.” — Lena Torres, Creative Lifestyle Coach
3. Decoupage with Paper or Magazine Cutouts
Decoupage is a classic craft technique involving layered paper and adhesive. It’s perfect for creating collage-style covers using favorite images, lyrics, or travel mementos.
Select high-quality paper to avoid tearing. Apply decoupage glue to the case, place your cutout, then seal with additional layers. Sand lightly between coats for a smooth finish, then top with a protective varnish.
4. Sticker and Vinyl Overlays
Not ready to commit to paint? Removable vinyl stickers or die-cut decals offer flexibility and precision. You can buy pre-made designs or create your own using a cutting machine like Cricut or Silhouette.
Alternatively, repurpose old stickers, washi tape, or even laminated photos. Layer them creatively—try framing the camera cutout with washi tape borders or spelling out initials in metallic letter stickers.
5. Embellishments and Textured Elements
Add dimension with beads, rhinestones, fabric flowers, or small charms glued to the back. E6000 or strong craft glue ensures durability. For fabric cases, try embroidery around the edges using contrasting thread.
Be mindful of bulk—avoid anything that prevents the tablet from lying flat or fitting into bags. Subtle texture near the corners often strikes the right balance between style and function.
Material Comparison Table: Best Uses by Case Type
| Case Material | Best For | Not Recommended For |
|---|---|---|
| Hard Plastic | Stickers, vinyl, marker art, decoupage | Fabric wrapping (poor adhesion) |
| Silicone | Paint, temporary decals, rubber stamps | Heavy embellishments (may peel) |
| Fabric-Covered | Embroidery, fabric paint, iron-ons | Washi tape (doesn’t stick well) |
| Faux Leather | Metallic pens, embossing, engraving tools | Water-based paints (can warp) |
Step-by-Step Guide: Creating a Photo Collage Cover
One of the most meaningful ways to personalize your tablet is by turning it into a visual journal of memories. Follow this step-by-step process to create a photo collage cover:
- Gather Materials: Printed photos (glossy or matte), scissors, decoupage glue, foam brush, clear sealant spray, and a clean hard-shell case.
- Select Images: Choose 3–5 small photos—travel snapshots, pet pictures, or concert tickets. Trim to fit the case dimensions.
- Arrange Layout: Lay the pieces on the case without glue to experiment with placement. Overlap edges slightly for a scrapbook effect.
- Glue Photos: Apply a thin layer of decoupage medium to the case, press each photo down gently, then coat the top with another layer.
- Dry Completely: Allow 2–4 hours between layers. Apply 2–3 topcoats for durability.
- Final Protection: Once dry, spray with a UV-resistant clear sealant to prevent yellowing and scratching.
This project takes under two hours and creates a deeply personal accessory that sparks conversation and nostalgia.
Mini Case Study: Sarah’s Commemorative Cover
Sarah, a college student from Portland, wanted a way to feel connected to her family while studying abroad. She printed four small photos: her parents at her graduation, her dog, a scenic hike, and a group shot from a holiday. Using a clear plastic tablet case, she applied the images with Mod Podge, added handwritten captions in fine-tip marker, and sealed it with waterproof varnish.
“Every time I open my tablet, I smile,” she shared. “It’s not just about looks—it keeps me grounded when I’m far from home.” Her classmates loved the idea so much that she started a workshop at her dorm, teaching others how to make their own memory covers.
Checklist: DIY Tablet Cover Success Plan
Follow this checklist to ensure your customization project goes smoothly:
- ☐ Choose a compatible case type for your preferred method
- ☐ Clean the surface with rubbing alcohol before starting
- ☐ Gather all materials: glue, scissors, brushes, sealant, etc.
- ☐ Test colors, adhesives, or layouts on a spare surface
- ☐ Work in a well-ventilated area when using sprays or solvents
- ☐ Allow ample drying time between layers
- ☐ Seal the final design with a protective coating
- ☐ Store finished case flat until fully cured (24 hours recommended)
Common Mistakes to Avoid
Even simple DIY projects can go wrong without proper planning. Watch out for these pitfalls:
- Skipping the sealant: Unsealed designs chip, fade, or smear quickly.
- Using water-based glue on porous surfaces: Can cause warping or bubbling.
- Overloading with heavy decorations: May interfere with charging ports or screen alignment.
- Ignoring durability: Choose finishes that resist fingerprints and daily friction.
- Starting too complex: Begin with one technique before combining multiple methods.
Remember, simplicity often has the greatest impact. A single elegant quote or a bold color block can be more striking than a cluttered design.
FAQ
Can I remove the customization later?
Yes, depending on the method. Vinyl stickers and magnetic skins are fully removable. Paint and decoupage are permanent but can be sanded off if needed. Always consider reversibility when choosing your approach.
Will decorating my case void the warranty?
No, modifications to the case do not affect the tablet’s warranty, as long as internal components remain untouched. However, some manufacturers may exclude damage caused by poorly adhered accessories, so ensure your design doesn’t interfere with functionality.
How do I clean a customized tablet cover?
Use a soft, slightly damp cloth. Avoid harsh cleaners or submerging the case. For sealed designs, a drop of mild soap on the cloth is safe. Never scrub aggressively over painted or glued areas.
Conclusion
Personalizing your tablet cover is more than a craft—it’s an act of ownership. In a sea of identical devices, a custom cover becomes a signature detail, reflecting your tastes, memories, and creativity. The methods outlined here are accessible, affordable, and deeply satisfying. Whether you wrap it in fabric from a childhood quilt, sketch a favorite lyric, or preserve travel memories in a collage, your tablet transforms from a tool into a companion.
You don’t need fancy tools or years of experience. All you need is a blank case, a few household supplies, and the willingness to make something uniquely yours. Start small, experiment freely, and let your personality shine through.


 浙公网安备
33010002000092号
浙公网安备
33010002000092号 浙B2-20120091-4
Comments
No comments yet. Why don't you start the discussion?