
There’s a quiet magic in watching your holiday display pulse to life the moment someone rings your doorbell—a subtle nod to guests, a festive surprise for delivery drivers, and a small triumph of home automation. This isn’t just about blinking bulbs; it’s about intentionality, interactivity, and turning seasonal decor into responsive, joyful infrastructure. While many assume this requires advanced programming or proprietary ecosystems, the reality is more accessible than ever. With off-the-shelf hardware, open-source tools, and clear configuration logic, homeowners, hobbyists, and even tech-curious beginners can build reliable, safe, and customizable light reactions—without soldering irons or cloud subscriptions. What matters most is matching the right solution to your existing setup, prioritizing electrical safety, and designing for sustainability over spectacle.
Understanding the Core Signal Path
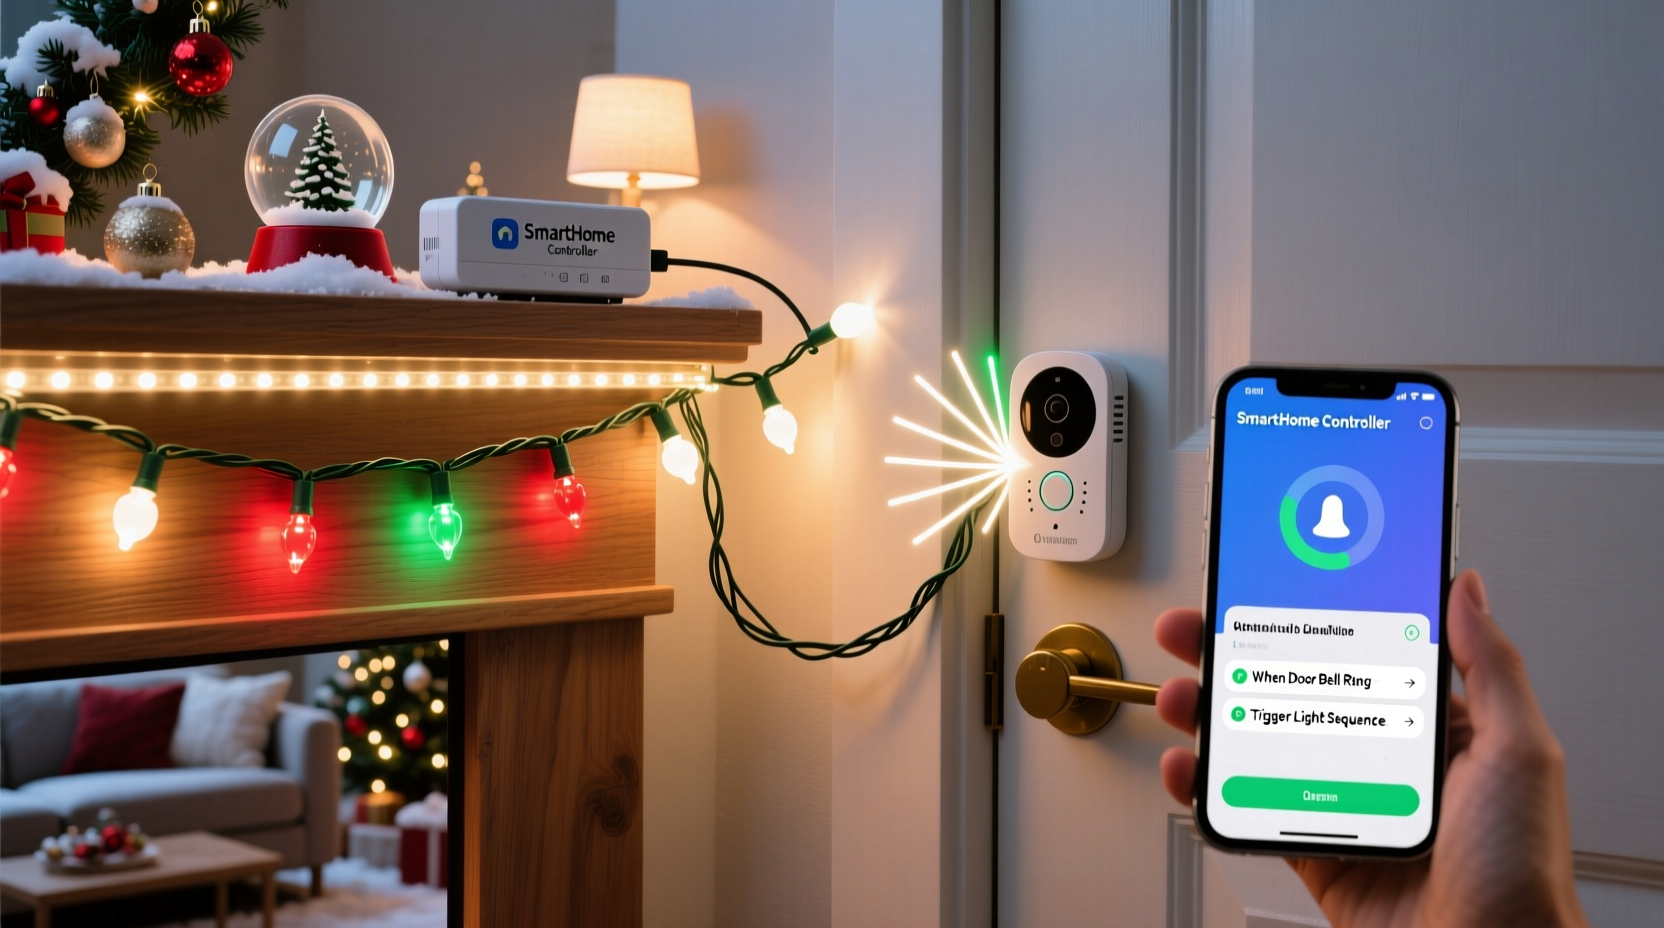
Before wiring anything, grasp the signal flow: a doorbell ring generates an electrical event (either mechanical contact closure or digital notification), which must be detected, interpreted, and translated into a lighting command. Traditional wired doorbells operate at low-voltage AC (typically 16–24V), while modern smart doorbells (like Ring, Nest, or Arlo) emit HTTP webhooks, MQTT messages, or push notifications. Your Christmas lights may be analog (standard incandescent strings), smart (Wi-Fi or Bluetooth-enabled bulbs), or programmable (addressable LED strips). The bridge between these domains determines your approach—and your success.
The three dominant integration models are:
- Smart Ecosystem Relay: Leverages built-in automations in platforms like Apple HomeKit, Google Home, or Amazon Alexa. Fastest to deploy but limited to compatible devices and constrained by platform rules (e.g., no custom timing curves or multi-light sequencing).
- Microcontroller-Based Detection: Uses a device like a Raspberry Pi or ESP32 to monitor the doorbell’s physical circuit or Wi-Fi traffic, then triggers lights via GPIO or network commands. Offers full control, local processing, and zero cloud dependency—but requires basic wiring and CLI familiarity.
- Network-Level Interception: Captures doorbell notifications at the router or network layer (e.g., sniffing UDP packets from a Ring doorbell) and forwards them to a local controller. Highly flexible but demands networking fluency and raises privacy considerations.
Your choice hinges on technical comfort, existing hardware, and desired behavior: a simple on/off flash? A 5-second color sweep across 100 LEDs? Or synchronized audio-reactive pulses? Each path supports different outcomes—but only one fits your context without over-engineering.
Hardware & Compatibility Checklist
Not all lights and doorbells play well together. Avoid frustration by verifying compatibility *before* purchasing or configuring. Use this checklist to audit your current setup and identify gaps:
| Component | What to Verify | Red Flags |
|---|---|---|
| Doorbell | Is it battery-powered or hardwired? Does its app support IFTTT, Webhooks, or Matter/Thread? For wired models: does it have accessible terminals (e.g., “Front” and “Trans”)? | No API documentation; no firmware updates in >12 months; uses closed proprietary protocols (e.g., older SkyBell models). |
| Lights | Are they Wi-Fi, Bluetooth, Zigbee, or dumb (plug-in)? Do they support local control (not cloud-only)? Can they accept timed or scene-based commands? | Requires constant internet to function; no local API (e.g., some budget “smart” bulbs); non-dimmable LEDs incompatible with PWM-triggered controllers. |
| Bridge/Controller | Do you own a Hue Bridge, SmartThings Hub, or Home Assistant server? If building DIY: do you have a spare Raspberry Pi 4 (2GB+) or ESP32-WROOM-32 with USB-C power? | Using unsupported firmware (e.g., outdated Raspbian); relying on a single-point-of-failure hub without backup power. |
Crucially, avoid mixing high-voltage and low-voltage circuits without isolation. Never connect a microcontroller directly to a 120V AC outlet—even if powered by USB, accidental backfeed can destroy components and void warranties. Always use optocouplers, relay modules rated for your load, or UL-listed smart plugs as intermediaries.
Three Practical Implementation Paths (Step-by-Step)
Below are three field-tested approaches—ordered from fastest to most capable—each with realistic time estimates, cost ranges, and maintenance expectations.
Path 1: Smart Plug + Doorbell App Automation (Under 15 Minutes)
- Plug your Christmas lights into a certified smart plug (e.g., TP-Link Kasa KP125 or Wemo Mini).
- In your doorbell’s app (e.g., Ring → Settings → Devices → Automations), create a new rule: “When doorbell is pressed → Turn on [Plug Name] for 10 seconds.”
- Test by ringing manually. Adjust duration in the app if lights cut off too soon.
Cost: $25–$40. Pros: No coding, no wiring, works out-of-box. Cons: Lights only toggle—no color changes, fades, or sequences.
Path 2: ESP32 + Physical Doorbell Monitoring (90 Minutes, Moderate Skill)
- Power down your doorbell transformer at the breaker. Identify the two low-voltage wires connected to the chime unit.
- Solder thin-gauge wires to those terminals, routing them to an ESP32 dev board with an optocoupler module (e.g., PC817) to isolate the 24V AC signal.
- Flash ESP32 with MicroPython or Arduino IDE code that detects voltage transitions (ring = brief AC pulse) and sends an MQTT message to a local broker (e.g., Mosquitto on Raspberry Pi).
- Configure your smart lights (e.g., WLED on addressable strips) to subscribe to that MQTT topic and execute a preloaded effect (e.g., “Christmas Pulse” scene).
Cost: $35–$60. Pros: Fully local, customizable timing/effects, works with any wired doorbell. Cons: Requires basic soldering and terminal identification.
Path 3: Home Assistant + Webhook Integration (45 Minutes, Beginner-Friendly)
- Install Home Assistant OS on a Raspberry Pi 4 (or use a supervised install on existing Linux/macOS).
- Add your smart doorbell via official integration (e.g., Ring via “ring-mqtt” add-on) and your lights (e.g., Philips Hue via Hue Bridge integration).
- Create an automation: Trigger = “Ring event detected”; Action = “Call service → light.turn_on → entity_id: light.christmas_tree, brightness: 255, rgb_color: [255,0,0], transition: 1.5”.
- Optionally add conditions: “Only between Dec 1–Jan 5” or “Only if front door is unlocked” for layered logic.
Cost: $0 (if using existing Pi) to $75 (Pi + case + power supply). Pros: Visual editor, version-controlled automations, unified dashboard. Cons: Requires learning HA’s YAML/visual builder syntax; initial setup has steeper learning curve.
Real-World Example: The Miller Family’s Front Porch Sync
The Millers live in Portland, Oregon, where winter rain means frequent package deliveries—and often, no one home to answer. Their setup began with a $30 Ring Video Doorbell Pro and a string of 200 warm-white fairy lights plugged into a Kasa smart plug. Initially, they used Ring’s native automation: “Ring → turn on plug for 8 seconds.” It worked—but felt abrupt. Guests saw lights snap on, then vanish.
They upgraded to Path 3 (Home Assistant) after reading community forums. Using a $20 Raspberry Pi Zero 2W, they installed HA OS, added Ring via the community “ring-mqtt” add-on, and integrated their new Govee RGBIC strip lights. They wrote a 12-line automation that triggered a 3-second fade-in, held for 5 seconds, then faded out over 4 seconds—mimicking candlelight. Crucially, they added a condition: “Only activate if ambient light sensor reads <50 lux,” preventing daytime flashes. They also linked it to their Nest thermostat: if indoor temp dropped below 62°F, the lights shifted to cool blue tones, signaling “we’re cozy inside.”
“It’s not flashy,” says Sarah Miller, a middle-school science teacher. “But when my 7-year-old sees the porch glow softly as the mail carrier approaches, she runs to the window and waves. That’s the point—not tech for tech’s sake, but connection, made visible.”
“The strongest home automations aren’t about complexity—they’re about reducing friction between human intent and environmental response. A doorbell-triggered light isn’t a gadget; it’s a ‘welcome’ written in photons.” — Dr. Arjun Patel, Human-Computer Interaction Researcher, MIT Media Lab
Common Pitfalls & How to Avoid Them
Even seasoned builders encounter roadblocks. Here’s what actually breaks setups—and how to prevent it:
- False triggers from power surges or electromagnetic interference: Wired doorbells near HVAC units or garage door openers often send phantom pulses. Mitigate with RC snubber circuits across relay contacts or software debouncing (e.g., require two consecutive 50ms pulses within 200ms).
- Cloud latency killing responsiveness: Smart lights relying on remote servers can take 2–5 seconds to react—making the “doorbell → light” link feel broken. Prioritize local control: WLED on ESP32, Tasmota-flashed plugs, or Home Assistant’s local execution engine.
- Overloading circuits: A single 15A household circuit powers lights, doorbell transformers, and outdoor outlets. Calculate total wattage: 100 LED mini-lights ≈ 4–5W; 50ft of 5V addressable strip ≈ 60W. Never exceed 80% of circuit capacity (12A = 1440W @ 120V).
- Seasonal firmware decay: Many smart devices stop receiving updates after 2–3 years. Check manufacturer end-of-life policies. Prefer open-source alternatives (e.g., ESPHome over vendor lock-in) for long-term maintainability.
FAQ
Can I trigger lights without a smart doorbell?
Yes—if you have a traditional wired doorbell. Use a low-voltage detector circuit (optocoupler + ESP32) to sense the brief AC pulse when the button is pressed. This avoids modifying your chime unit and works with any mechanical or digital button. Battery-powered wireless doorbells are trickier; their signals are often encrypted or proprietary, making interception unreliable without specialized RF gear.
Will this void my doorbell warranty?
Monitoring the low-voltage side (terminals at the chime unit) does not void warranties—it’s passive sensing, like a multimeter. However, splicing into high-voltage lines, opening sealed doorbell housings, or modifying firmware does. Always consult your device’s regulatory documentation first. When in doubt, choose Path 1 (smart plug + app automation) or Path 3 (webhook-based)—both are warranty-safe.
How do I make lights react differently for front vs. back doorbells?
Assign unique identifiers to each doorbell in your automation system. In Home Assistant, create separate binary sensors (e.g., binary_sensor.front_doorbell and binary_sensor.back_doorbell). Then build distinct automations: front triggers red/gold patterns on main tree; back triggers green/white pulses on patio string. With ESP32, wire each doorbell to a separate GPIO pin and read them independently in code.
Conclusion: Light as Language
Programming Christmas lights to respond to a doorbell ring is rarely about the technology itself. It’s about translating a simple human gesture—the press of a button—into a shared, sensory experience. That flicker of light says “We’re here,” “We see you,” or “Come in, it’s warm.” It transforms passive decoration into active hospitality. You don’t need a lab coat or a degree in embedded systems to achieve this. You need curiosity, a willingness to test one path at a time, and the patience to treat each failure as calibration—not defeat. Start small: automate a single string. Observe how neighbors pause, how children point, how the ordinary act of answering a door gains quiet resonance. Then iterate. Add timing. Add color. Add context-aware logic. Let your lights speak—not in code, but in warmth, rhythm, and welcome.


 浙公网安备
33010002000092号
浙公网安备
33010002000092号 浙B2-20120091-4
Comments
No comments yet. Why don't you start the discussion?