
Photographs are more than files—they’re memories. When you accidentally delete them from an SD card, panic sets in. The good news: most deleted photos aren’t truly gone. Digital storage works differently than physical erasure. But the wrong recovery attempt can overwrite data permanently. Recovering deleted images safely means understanding how deletion works, avoiding further damage, and using reliable tools and methods that preserve what remains on the card.
The key is acting quickly and correctly. Every second counts because continued use of the SD card increases the risk of overwriting lost data. This guide walks through the science behind file deletion, safe recovery workflows, recommended software, and real-world strategies used by digital forensics experts—all designed to help you retrieve your photos without causing irreversible harm.
Why Deleted Photos Aren't Really Gone (Yet)
When you delete a photo from an SD card, the camera or device doesn’t erase the actual image data. Instead, it updates the file system’s directory to mark that space as “available.” The original photo remains intact until new data is written over it. Think of it like removing a book’s title from a library catalog—the book is still on the shelf, but the system no longer knows where to find it.
This behavior applies to both quick deletions via camera menus and formatting the card. Even after formatting, the bulk of your data often survives—temporarily. That window of opportunity is when recovery becomes possible.
“Data isn’t destroyed upon deletion—it’s just disassociated from the index. With proper tools and immediate action, recovery success rates exceed 90% if the card hasn’t been reused.” — Dr. Lena Torres, Digital Forensics Researcher, MIT Media Lab
The danger lies in continuing to use the SD card. Taking new photos, saving files, or even attempting multiple recovery attempts with unreliable software can write new information into the very sectors where your lost photos reside. Once overwritten, recovery becomes impossible with current technology.
Immediate Actions to Take After Deletion
The first few minutes after realizing photos are missing determine whether recovery succeeds or fails. Follow this urgent protocol:
- Stop using the SD card immediately. Do not take another photo, record video, or save any file to it.
- Do not format the card again. Reformatting multiplies the risk of overwriting and reduces chances of full recovery.
- Use a reliable card reader, not a built-in laptop slot, to connect the SD card to your computer. Integrated readers sometimes apply background writes during detection.
- Avoid auto-run software such as photo importers or antivirus scanners that may silently access the card.
- Create a disk image (optional but recommended for critical cases). For maximum safety, especially with irreplaceable photos, make a bit-for-bit copy of the card before attempting recovery.
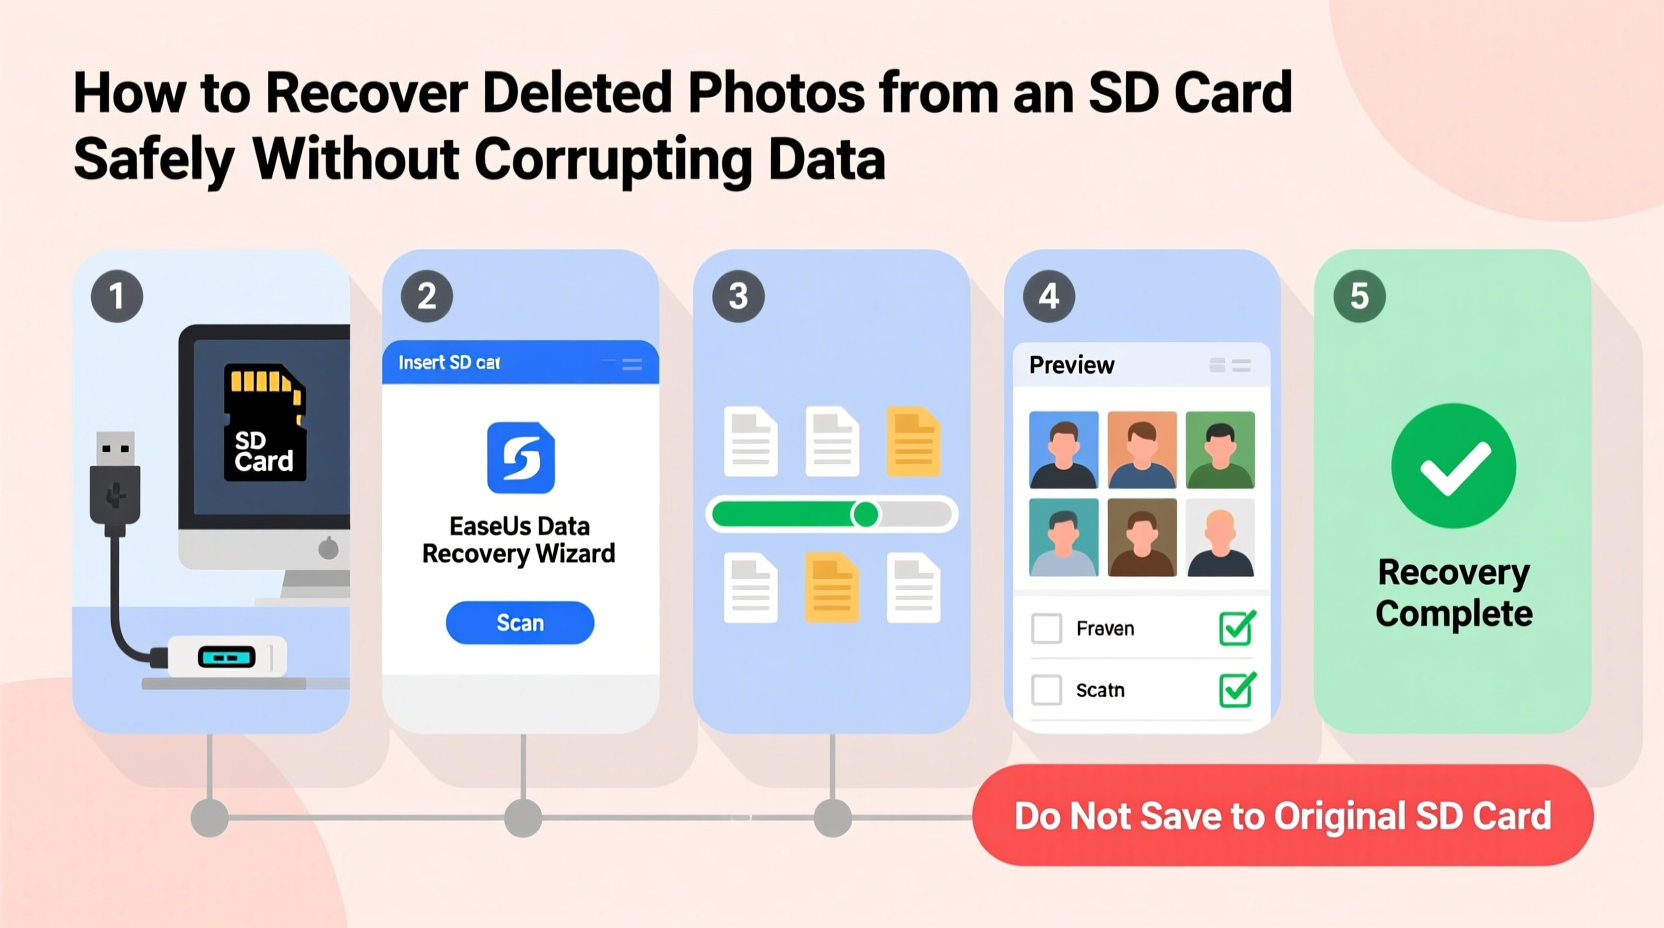
Step-by-Step Guide to Safe Photo Recovery
Follow this methodical process to maximize recovery odds while minimizing risks:
Step 1: Prepare Your Environment
Work on a clean computer free of malware. Close unnecessary programs to reduce background disk activity. Use a high-quality USB 3.0+ card reader for faster, stable transfers.
Step 2: Connect the SD Card Safely
Insert the card into the reader and connect it to your computer. Wait for recognition—but do not open it yet. On Windows, disable autoplay. On macOS, avoid letting Photos or Image Capture launch automatically.
Step 3: Assess the Situation
Open File Explorer (Windows) or Finder (macOS) and see if the card appears. Check its capacity and available space. A sudden drop in used space suggests mass deletion.
Step 4: Choose the Right Recovery Software
Select a reputable tool known for deep scanning and non-invasive access. Free tools can work for simple cases, but paid versions offer better filtering, preview quality, and support.
Step 5: Scan the Card Without Writing to It
Run the recovery software and select the SD card as the target. Ensure the scan mode is set to “read-only” or “deep scan.” Never save recovered files back to the same card.
Step 6: Preview and Recover Selectively
After scanning, preview thumbnails to identify your photos. Look for recognizable scenes or timestamps. Recover only confirmed files to avoid clutter and wasted time.
Step 7: Save Files to a Different Drive
Always export recovered photos to your computer’s hard drive or an external SSD—not the SD card itself. Saving to the source device risks overwriting unrecovered data.
Step 8: Verify and Back Up
Open recovered photos in multiple viewers to confirm integrity. Then back them up to two separate locations—cloud storage and a secondary drive—for long-term safety.
Top Recovery Tools Compared
Not all recovery software is created equal. Some modify the card during scanning, while others prioritize read-only operations. Below is a comparison of trusted tools based on safety, success rate, usability, and platform support.
| Software | Platform | Free Version? | Read-Only Mode | Photo Preview | Expert Rating |
|---|---|---|---|---|---|
| Recuva | Windows | Yes | Yes | Limited | ★★★★☆ |
| PhotoRec (part of TestDisk) | Win/macOS/Linux | Yes | Yes (strictly read-only) | Yes, via file recovery | ★★★★★ |
| Stellar Data Recovery | Win/macOS | Trial (preview only) | Yes | Excellent | ★★★★☆ |
| EaseUS Data Recovery Wizard | Win/macOS | Yes (limited) | Yes | Good | ★★★☆☆ |
| Digicam Photo Recovery | Win | Yes | Yes | Strong for JPEG/RAW | ★★★★☆ |
For maximum safety, PhotoRec stands out due to its open-source nature, cross-platform availability, and strict adherence to non-destructive recovery principles. However, its interface is less intuitive. Beginners may prefer Stellar or EaseUS for guided workflows.
Mini Case Study: Recovering Wedding Photos from a Formatted Card
Sarah, a freelance photographer, accidentally formatted her 128GB SD card during a wedding shoot, believing it was empty. Realizing her mistake moments later, she powered down her camera and did not reinsert the card.
She transferred the card to her MacBook Pro using a Sandisk Extreme Pro reader. She downloaded TestDisk/PhotoRec and ran a deep scan in read-only mode. The software detected over 1,200 files, including RAW .CR2 and JPEG formats. Using the preview function in a companion tool, she verified the recovered images matched the timeline of the ceremony.
She saved all files to an encrypted Time Machine backup drive. Of the 1,247 photos, 1,239 were fully intact. Eight showed minor corruption but were salvageable using Adobe DNG Converter. Sarah delivered the album on schedule and now uses a dual-card camera setup with automatic cloud sync.
Her experience underscores two lessons: immediate action prevents overwriting, and professional-grade tools can recover even after formatting.
Common Mistakes That Destroy Recovery Chances
Well-intentioned actions often sabotage recovery. Avoid these pitfalls:
- Re-saving files to the same card – This is the most common error. Even moving recovered photos back \"just to test\" can ruin other recoverable data.
- Using the camera after deletion – Powering on the camera may prompt it to reinitialize the card or create temporary files.
- Running defragmentation or disk repair tools – These utilities assume ownership of the file system and can rewrite critical metadata.
- Ignoring file system warnings – If your computer says “This card needs to be formatted,” don’t do it. Click “Cancel” and proceed with recovery software instead.
- Trusting online “quick fix” tools – Many freeware tools bundle adware or perform unsafe operations under the hood.
When to Seek Professional Help
If the SD card is physically damaged—unusual noises, visible cracks, water exposure, or burn marks—do not attempt DIY recovery. Physical damage requires cleanroom environments and specialized hardware tools.
Data recovery labs use techniques like chip-off recovery, where memory chips are removed and directly imaged. While expensive ($300–$1,500), they can retrieve data when software methods fail. Labs such as DriveSavers, Gillware, and SecureData specialize in SD and flash media recovery.
Even in severe cases, professionals report recovery success rates of 60–70% when clients stop using the card immediately after failure.
Frequently Asked Questions
Can I recover photos after formatting the SD card?
Yes, in most cases. Formatting only resets the file system, not the stored data. As long as no new files have been written, recovery tools can locate and restore deleted photos. Act quickly and avoid reusing the card.
Is it safe to use free recovery software?
Some free tools are safe, especially open-source options like PhotoRec. However, many free downloads come bundled with malware or impose artificial limits that pressure users to upgrade. Always download from official websites and verify checksums when possible.
Why can’t I open some recovered photos?
Partial corruption occurs when part of the file was overwritten. Try opening the file in alternative software (e.g., IrfanView, GIMP). Some corrupted JPEGs can be repaired using online tools or hex editors, though success varies.
Final Checklist: What to Do Right Now
- ✅ Stop using the SD card immediately.
- ✅ Use a trusted card reader to connect to your computer.
- ✅ Disable auto-launch applications (Photos, AutoPlay, etc.).
- ✅ Download a reputable recovery tool (e.g., PhotoRec, Stellar, Recuva).
- ✅ Run a read-only scan of the card.
- ✅ Preview and recover only confirmed files.
- ✅ Save recovered photos to a different drive.
- ✅ Back up recovered files in at least two locations.
- ✅ Label and organize restored photos promptly.
- ✅ Consider replacing old or frequently used SD cards to prevent future loss.
Conclusion
Recovering deleted photos from an SD card is entirely possible—if done correctly and promptly. The difference between success and permanent loss comes down to discipline: resisting the urge to keep using the card, choosing safe tools, and following a structured recovery path. Technology gives us a second chance, but only if we act wisely in the first moments after data vanishes.
Whether it’s a child’s first steps, a once-in-a-lifetime trip, or a professional assignment, those pixels hold meaning far beyond their file size. Protect them not just through recovery, but through better habits—regular backups, dual storage, and mindful handling. Don’t wait for another accident to appreciate the fragility of digital memory.


 浙公网安备
33010002000092号
浙公网安备
33010002000092号 浙B2-20120091-4
Comments
No comments yet. Why don't you start the discussion?