
Losing precious photos—whether from a vacation, family event, or once-in-a-lifetime moment—can be distressing. When those images are stored on an SD card and accidentally deleted, it’s natural to assume they’re gone forever. But in most cases, they aren’t. Digital files don’t vanish instantly when deleted; instead, the space they occupied is marked as available for new data. Until that space is overwritten, recovery is possible.
This guide walks you through the science of file deletion, practical recovery steps, and expert-backed strategies to maximize your chances of retrieving lost photos. Whether your SD card was formatted, corrupted, or simply had files removed, the right approach can bring them back.
Why Deleted Photos Can Still Be Recovered
When you delete a photo from an SD card, the operating system removes the file’s reference from the directory table but leaves the actual data intact on the storage medium. This means the image remains physically present until new data overwrites it. This behavior applies whether you deleted the file manually, used “Delete All,” or even formatted the card.
The key to successful recovery lies in acting quickly and minimizing further use of the SD card. Every time you take a new photo, save a file, or even attempt multiple recovery scans, you risk overwriting the sectors where your lost images were stored.
“Data isn’t truly erased until it’s overwritten. That window—sometimes hours, sometimes days—is your best chance at recovery.” — Dr. Alan Reyes, Digital Forensics Specialist
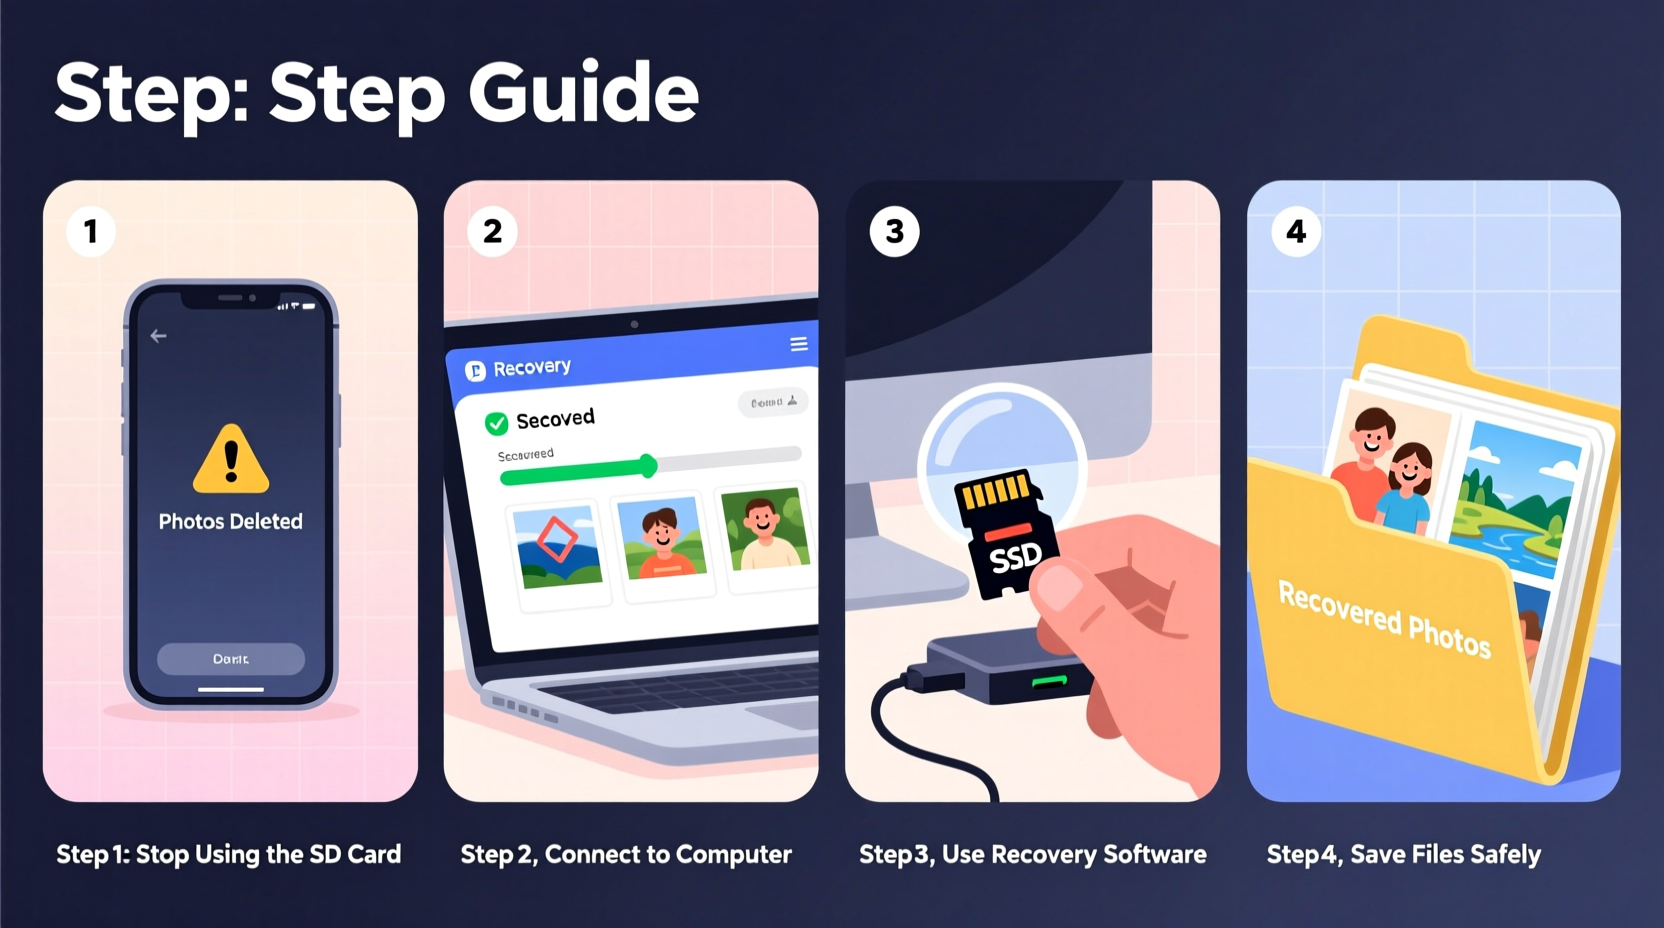
Step-by-Step Recovery Process
Follow this structured sequence to maximize your chances of recovering deleted photos. Skipping steps or rushing the process can reduce success rates.
- Stop using the SD card immediately. Do not take new photos, transfer files, or format the card again.
- Safely remove the SD card from your camera, phone, or device. Handle it gently to avoid physical damage.
- Use a reliable card reader to connect the SD card to your computer. Built-in readers are preferable to USB hubs, which may cause connection issues.
- Verify the card is detected. Open File Explorer (Windows) or Finder (Mac). If the card appears but shows no files, proceed. If it doesn’t appear, check connections or try another reader.
- Choose a trusted recovery tool (see next section) and install it on your computer—not on the SD card.
- Scan the SD card using the software. Opt for a deep scan if available, though it will take longer.
- Preview recoverable files and identify your lost photos by date, size, or thumbnail.
- Select only the files you need and recover them to a folder on your computer’s hard drive—never back to the SD card.
- Verify recovered photos by opening them in an image viewer.
- Back up your recovered files to cloud storage or an external drive to prevent future loss.
Best SD Card Recovery Software Options
Not all recovery tools are equal. Some offer better compatibility, deeper scanning, or user-friendly interfaces. Below is a comparison of five trusted programs:
| Software | Platform | Free Version? | Deep Scan | Photo Preview | User Rating |
|---|---|---|---|---|---|
| Recuva | Windows | Yes | Yes | Yes | 4.5/5 |
| PhotoRec | Win/macOS/Linux | Yes | Yes | No | 4.3/5 |
| Stellar Data Recovery | Win/macOS | Yes (limited) | Yes | Yes | 4.6/5 |
| EaseUS Data Recovery Wizard | Win/macOS | Yes (2GB limit) | Yes | Yes | 4.7/5 |
| Digicam Photo Recovery | Windows | Yes | Limited | Yes | 4.1/5 |
For beginners, EaseUS and Recuva offer intuitive interfaces and strong photo recognition. Advanced users may prefer PhotoRec, a free open-source tool known for its thoroughness, though it lacks a preview function and requires command-line comfort.
Real Example: Recovering Wedding Photos from a Formatted SD Card
Sarah, a freelance photographer, accidentally formatted her 64GB SD card while preparing for a client shoot. The card contained over 800 high-resolution photos from a wedding she had shot two weeks prior. Panicked, she stopped using the card and connected it to her laptop using a USB 3.0 card reader.
She downloaded EaseUS Data Recovery Wizard (free version) and ran a deep scan. After 45 minutes, the software listed 783 recoverable JPEG files. Using the preview feature, she confirmed the images were intact. She upgraded to the paid version to recover all files and saved them to her desktop. Of the original set, only 17 photos were partially corrupted due to minor sector damage—likely from previous wear.
Sarah backed up the recovered images to both an external drive and Google Drive. She now uses a dual-card recording setup in her camera and labels backup drives immediately after each event.
“Mistakes happen, but preparedness turns disasters into learning experiences.” — Sarah Lin, Professional Photographer
Do’s and Don’ts of SD Card Recovery
Avoid common pitfalls that compromise recovery success. The following table summarizes critical behaviors:
| Action | Recommended? | Reason |
|---|---|---|
| Keep the SD card powered off after deletion | ✅ Yes | Prevents overwriting of deleted data |
| Use built-in Windows/Mac recovery tools | ❌ No | They lack deep scanning capabilities |
| Run multiple recovery tools simultaneously | ❌ No | Increases read/write cycles and corruption risk |
| Recover files to your computer’s hard drive | ✅ Yes | Preserves integrity of the SD card |
| Format the card before recovery | ❌ No | Destroys recovery potential permanently |
| Try recovery software more than twice | ⚠️ Only if necessary | Each scan stresses the card; use sparingly |
Checklist: What to Do Immediately After Deleting Photos
- ⏹️ Stop using the SD card immediately
- 🔌 Remove the card from the device safely
- 📎 Connect via a high-quality card reader
- 💻 Install recovery software on your computer (not the card)
- 🔍 Run a deep scan and preview results
- 💾 Recover selected files to a local folder
- 📂 Back up recovered photos to multiple locations
- 🔄 Consider replacing the SD card after recovery
Frequently Asked Questions
Can I recover photos from a physically damaged SD card?
If the card is cracked, bent, or has exposed circuitry, software recovery may fail. In such cases, professional data recovery services are recommended. These labs use clean rooms and specialized hardware to extract data from compromised cards, though costs can range from $200 to $1,200 depending on severity.
Is free recovery software safe and effective?
Yes, many free tools like Recuva and PhotoRec are developed by reputable companies and open-source communities. However, free versions often limit the amount or size of recoverable data. Always verify the publisher and read user reviews before installation.
Why can’t I see my recovered photos after saving them?
This usually happens when files are saved in an unsupported format or the recovery process was interrupted. Try opening the images with different viewers (e.g., IrfanView, XnView). If thumbnails appear but the full image doesn’t load, the file may be partially overwritten and irreparable.
Protecting Your Photos Moving Forward
Recovery is a safety net, not a long-term strategy. To prevent future data loss, adopt these habits:
- Implement a 3-2-1 backup rule: Keep 3 copies of important data, on 2 different media types, with 1 stored offsite (e.g., cloud).
- Use write-protected SD cards when transferring files to reduce accidental deletion.
- Label and organize cards by project or date to avoid confusion.
- Replace SD cards every 2–3 years, even if they seem functional. Flash memory degrades over time.
- Enable auto-upload on smartphones and cameras when possible (Google Photos, iCloud, etc.).
“The best recovery method is never needing one. Automate backups, and treat every SD card as temporary storage.” — Marcus Tran, IT Infrastructure Consultant
Conclusion
Recovering deleted photos from an SD card is not magic—it’s methodical digital forensics grounded in how storage systems work. By acting fast, choosing the right tools, and avoiding common mistakes, you can reclaim lost memories with remarkable success. While technology helps, the real safeguard lies in consistent habits: immediate action after deletion, disciplined backups, and treating every card as vulnerable.
Your photos matter. Don’t wait for another loss to build a better system. Start today—organize your existing files, test a recovery tool, and set up automatic backups. One hour now could save months of regret later.


 浙公网安备
33010002000092号
浙公网安备
33010002000092号 浙B2-20120091-4
Comments
No comments yet. Why don't you start the discussion?