
Glass tabletops add elegance and openness to any room, but their smooth, reflective surfaces are prone to scratches from everyday use—keys, plates, decorative objects, or even cleaning tools can leave behind fine marks. While deep gouges may require professional attention, most light to moderate scratches can be minimized or removed at home with the right approach. The key is understanding the type of scratch you're dealing with and applying methods that won’t compromise the integrity of the glass. This guide walks through practical, tested techniques using accessible materials, helping you restore clarity and shine without risking further damage.
Understanding Glass Scratches: Surface vs. Deep Damage
Not all scratches are created equal. Before attempting any repair, it's essential to determine whether the damage is superficial or structural. A surface-level scratch affects only the top layer of the glass and is often visible only at certain angles or under bright light. These are typically caused by sand, grit, or abrasive cloths during cleaning. In contrast, deep scratches penetrate the glass structure and may catch your fingernail when gently traced. They usually result from sharp metal objects or heavy impacts.
Home remedies work best on fine, hairline scratches. Attempting to polish out deep grooves may spread microfractures or create uneven spots. If the scratch catches on fabric or feels like a ridge, it’s likely beyond DIY repair and may require replacement or professional refinishing.
Essential Supplies for Safe Scratch Removal
Effective scratch removal doesn’t require expensive tools. Most solutions rely on mild abrasives that level the glass surface at a microscopic level, scattering light more evenly and reducing the visibility of imperfections. Below is a list of commonly available materials suitable for this task:
- Toothpaste (non-gel, preferably whitening)
- Baking soda
- Cerium oxide powder (available online or at auto supply stores)
- Mild dish soap
- Soft cotton cloths or microfiber towels
- Circular buffer or electric drill with soft polishing pad (optional)
- Rubber gloves and safety glasses (recommended for extended use)
Avoid using steel wool, vinegar, ammonia-based cleaners, or harsh scouring pads—these can worsen existing scratches or etch the glass over time. Stick to non-abrasive, pH-neutral products designed for delicate surfaces.
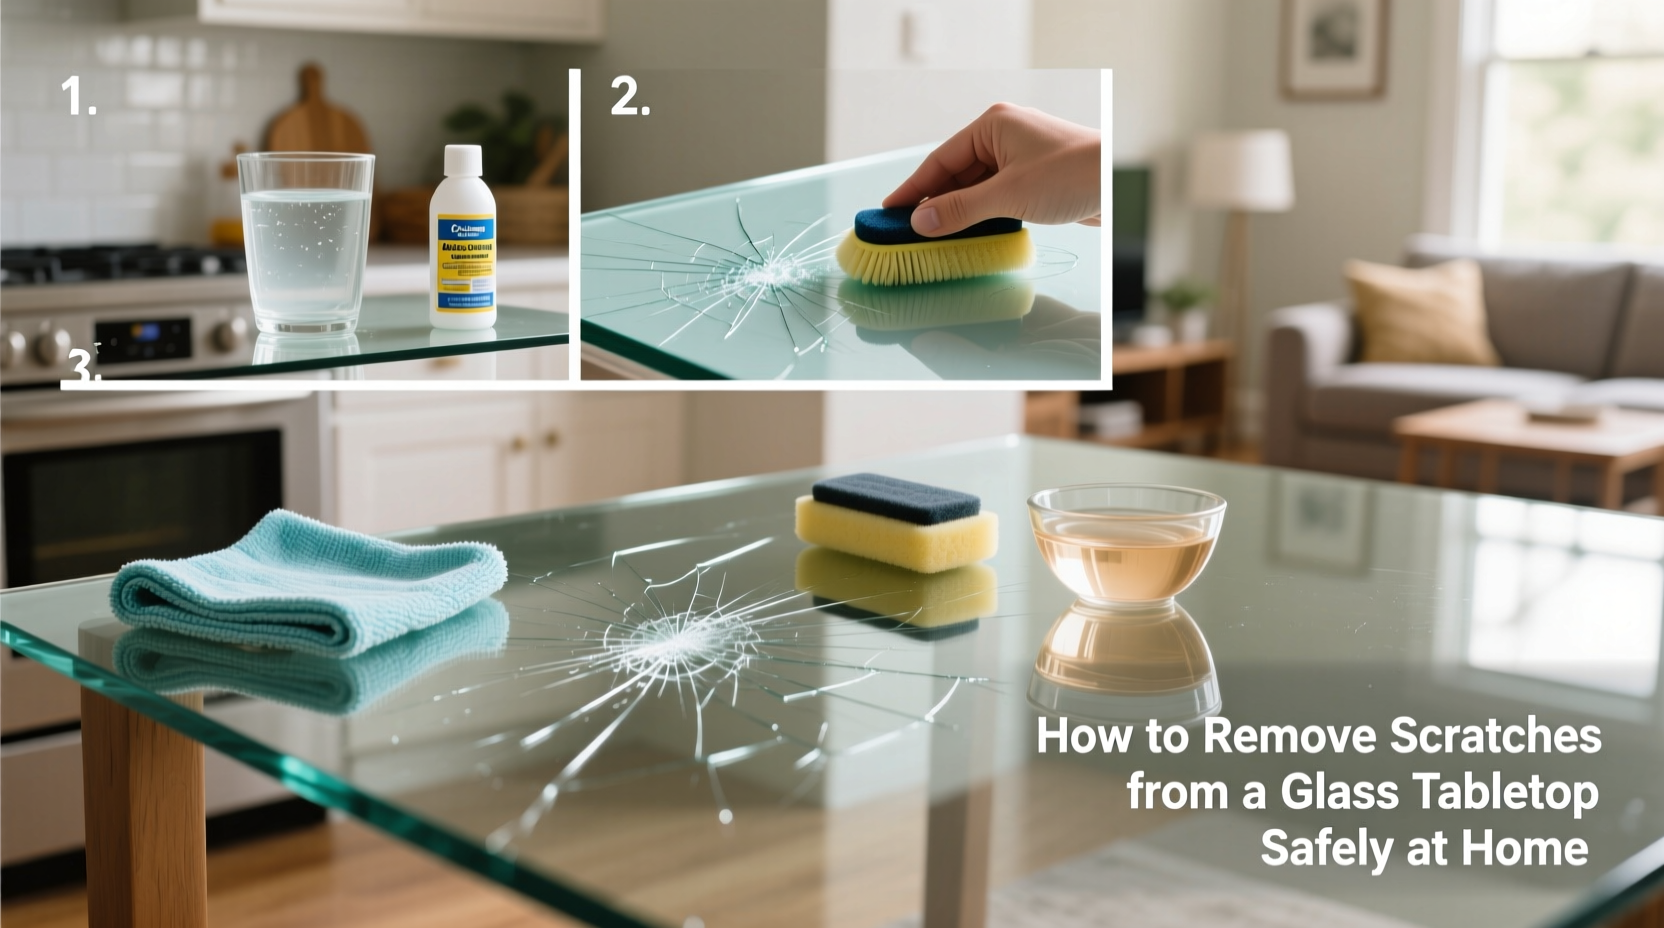
Step-by-Step Guide to Removing Light Scratches
Follow this methodical process to address minor scratches safely and effectively:
- Clean the Surface Thoroughly: Use warm water and a few drops of dish soap with a soft cloth to remove dust, oils, and debris. Dry completely with a lint-free towel.
- Assess the Scratch Location: Note if the scratch is near an edge or in the center. Edge areas are more fragile and should be treated gently.
- Apply a Mild Abrasive: Squeeze a small amount of non-gel toothpaste onto the scratch. Alternatively, mix baking soda with water to form a thick paste (two parts baking soda to one part water).
- Buff in Circular Motions: Using a clean microfiber cloth, rub the paste over the scratch using firm, consistent circular motions for 30–60 seconds.
- Wipe and Inspect: Dampen a corner of the cloth and wipe away the residue. Dry and examine the area under direct light. Repeat if necessary, up to three times.
- Rinse and Polish: Once satisfied, clean the entire surface with water and dry with a fresh cloth to prevent streaks.
This technique works because silica particles in toothpaste and baking soda act as micro-abrasives, smoothing microscopic ridges along the scratch. While they don’t “fill” the groove, they reduce its depth and scatter reflected light more uniformly, making the scratch less noticeable.
Advanced Method: Using Cerium Oxide for Persistent Marks
For slightly deeper or more visible scratches, cerium oxide offers a stronger yet still safe solution. Commonly used in automotive and optical industries, this fine polishing compound is specifically formulated for glass restoration.
Here’s how to apply it effectively:
- Mix one tablespoon of cerium oxide powder with enough water to create a creamy slurry.
- Apply the mixture directly to the scratch using a soft cloth or sponge pad.
- Buff manually in tight circles for several minutes, reapplying slurry as needed. For larger areas, attach a soft foam polishing pad to a low-speed rotary tool (set below 1,500 RPM).
- After buffing, rinse thoroughly with clean water and dry completely.
The polishing action gradually wears down the edges of the scratch, blending it into the surrounding surface. Results are often visible within minutes, though multiple sessions may be required for optimal clarity.
“Cerium oxide is one of the safest chemical abrasives for glass because it removes material evenly without introducing new fractures.” — Dr. Alan Reeves, Materials Scientist at the National Glass Research Institute
Do’s and Don’ts of Glass Scratch Repair
| Do | Don’t |
|---|---|
| Test the method on a small, inconspicuous area first | Use powdered cleansers like Comet or Ajax—they’re too harsh |
| Work in a well-lit space to monitor progress | Apply excessive pressure; let the abrasive do the work |
| Wear gloves to protect skin from prolonged contact with pastes | Use vinegar or acidic solutions—they can degrade sealants or frames |
| Allow adequate drying time between applications | Polish near cracks or chips—this could cause spreading |
| Repeat treatment over 1–2 days for best results | Expect miracles on deep or wide scratches—they may remain faintly visible |
Real Example: Reviving a Dining Table After Years of Wear
Sarah, a homeowner in Portland, noticed her glass dining table had accumulated dozens of fine radial scratches after five years of family meals, homework sessions, and holiday gatherings. She avoided placing placemats consistently, and silverware often scraped across the surface. Initially hesitant to try DIY fixes, she began with toothpaste after researching safe methods.
She cleaned the table with soapy water, dried it, then applied Colgate whitening toothpaste to a microfiber cloth. Focusing on one quadrant at a time, she buffed each section for about 45 seconds per spot. After wiping clean, she was surprised to see nearly 70% reduction in scratch visibility. Encouraged, she repeated the process two days later with a baking soda paste on the remaining marks. The final result restored much of the table’s original luster, saving her over $200 in potential replacement costs.
“I didn’t think anything short of replacing the glass would help,” Sarah said. “But taking the time to treat it in stages made all the difference.”
When to Seek Professional Help
While many scratches respond well to home care, some situations call for expert intervention. Consider professional glass refinishing if:
- The scratch is deep enough to trap dirt or liquids
- Multiple deep scratches cluster in high-traffic zones
- The tabletop shows signs of delamination or cloudiness beneath the surface
- It’s tempered glass—DIY polishing risks compromising structural integrity
Professionals use diamond-lap polishing systems that precisely abrade and re-smooth glass without heat buildup or stress fractures. Though more costly, this service can extend the life of expensive or custom tables significantly.
Frequently Asked Questions
Can I use car scratch remover on glass?
No. Automotive scratch removers are formulated for paint or clear coat layers, not glass. Many contain solvents or resins that can leave residues or even etch the surface. Stick to products specifically intended for glass or general-purpose mild abrasives like toothpaste.
Will these methods work on tinted or coated glass?
Proceed with caution. Tinted, mirrored, or low-emissivity (Low-E) glass often has thin metallic coatings that can be damaged by abrasives. Test in an inconspicuous area first. If color shifts or hazing occurs, discontinue use immediately.
How long do the results last?
If the scratch is truly removed or minimized, the improvement is permanent. However, new scratches can form with continued exposure to abrasives. To maintain results, use coasters, felt pads under decor, and soft cloths for cleaning.
Final Checklist: Your Action Plan
- Identify scratch depth using the fingernail test
- Gather supplies: toothpaste or baking soda, microfiber cloths, water
- Clean the glass surface thoroughly before treatment
- Apply abrasive in small sections using circular motions
- Inspect, rinse, and repeat as needed (up to 3 times)
- For stubborn marks, consider cerium oxide with proper ventilation
- Protect the surface afterward with felt pads and mindful usage
Conclusion
Removing scratches from a glass tabletop doesn’t require specialized equipment or costly services in most cases. With careful assessment and the right technique, you can significantly improve the appearance of your furniture using simple household items. Patience and consistency matter—don’t rush the process, and always prioritize safety over speed. Whether reviving a cherished family piece or refreshing your living room centerpiece, these methods empower you to take control of your space’s aesthetics and longevity. A little effort today can bring back the brilliance of your glass surface for years to come.


 浙公网安备
33010002000092号
浙公网安备
33010002000092号 浙B2-20120091-4
Comments
No comments yet. Why don't you start the discussion?