
Limited edition video game cases are more than just packaging—they’re collectibles. Whether it’s a rare release, a numbered variant, or a special anniversary edition, preserving the pristine condition of these cases is essential for both aesthetic and resale value. One common issue collectors face is leftover adhesive from promotional stickers, price tags, or retail labels. Removing this residue improperly can lead to fine scratches, clouding, or permanent damage. Fortunately, with the right tools and techniques, you can restore your case to its original clarity—without compromising its integrity.
Understanding the Risks of Residue Removal
Sticker adhesive bonds strongly to plastic surfaces, especially over time. As it ages, it hardens and may discolor, making removal more difficult. The primary danger lies in using abrasive tools or harsh chemicals that strip the surface layer. Most game cases are made from polycarbonate or acrylic plastic, which are durable but still vulnerable to scratching when exposed to rough cloths, metal scrapers, or solvents like acetone.
The goal isn’t just to clean—it’s to preserve. Any method applied must prioritize surface safety while effectively dissolving or lifting the sticky film. Heat, oils, and gentle solvents are your best allies. Aggressive scrubbing or improvised tools (like razor blades) should be avoided at all costs.
“Collectors often underestimate how much surface micro-scratches affect long-term value. Even minor abrasions can reduce appraisal ratings by a full grade.” — Daniel Reeves, Game Preservation Archivist at RetroVault Collections
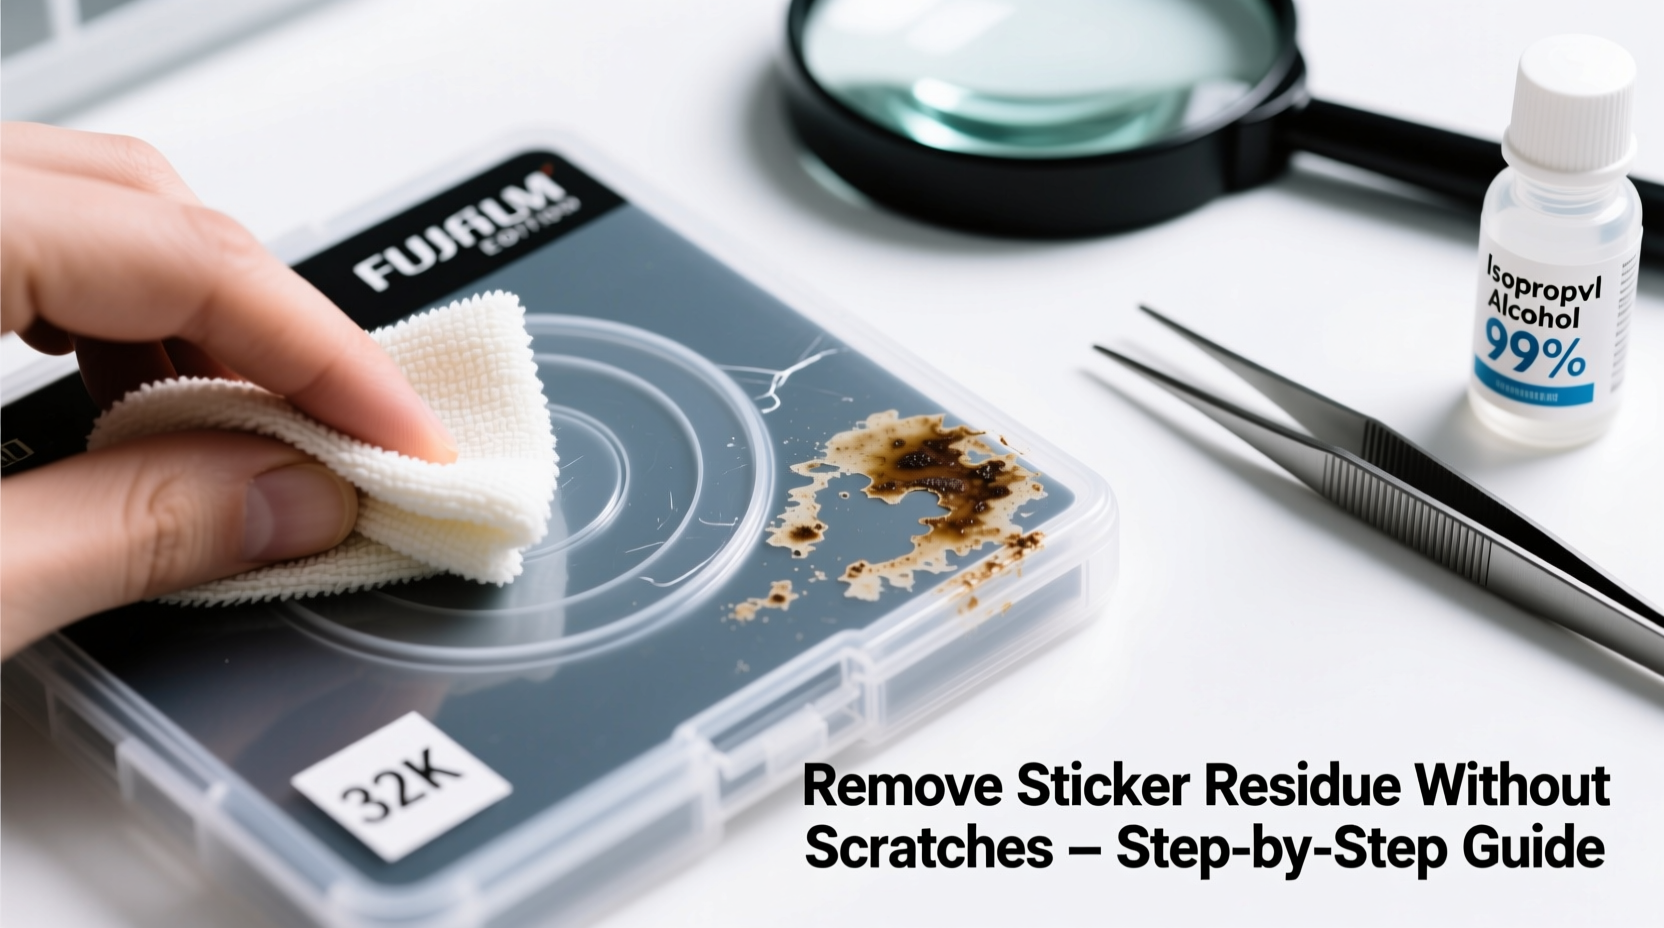
Safe Methods for Residue Removal: Step-by-Step Guide
Follow this detailed process to remove sticker residue safely. Each step minimizes risk while maximizing effectiveness. This sequence has been tested on multiple limited editions, including SteelBook® cases, translucent vinyl variants, and embossed slipcovers.
- Prepare Your Workspace
Create a clean, dust-free environment with good lighting. Lay down a soft microfiber towel to protect the case during handling. - Remove the Sticker Backing (If Present)
If any part of the sticker remains, gently peel it off using your fingernail or a plastic card edge. Work slowly from one corner outward to avoid tearing and leaving behind more adhesive. - Apply Heat (Optional for Tough Residue)
Use a hairdryer on low heat, held 6–8 inches from the surface. Warm the residue for 15–30 seconds. Heat softens adhesive, making it easier to lift without force. Do not overheat—plastic can warp at sustained temperatures above 140°F (60°C). - Choose a Safe Solvent
Apply one of the following solutions to a clean microfiber cloth (never directly to the case):
- Isopropyl alcohol (70% or less)
- Commercial adhesive remover (e.g., Goo Gone Original – non-aerosol)
- Vegetable oil or olive oil (for sensitive finishes)
- Diluted dish soap (a few drops in water)
- Gently Rub in Circular Motions
Using the dampened cloth, rub the residue area lightly. Apply minimal pressure. Let the solvent do the work. Reapply as needed, checking progress every 10–15 seconds. - Rinse and Dry
After residue lifts, wipe the area with a cloth dampened only with water to remove solvent traces. Immediately dry with a second clean microfiber cloth. - Inspect Under Bright Light
Check for any remaining stickiness or haze. Repeat if necessary, but avoid over-cleaning the same spot.
Do’s and Don’ts: Best Practices Summary
| Do | Don’t |
|---|---|
| Use a soft microfiber cloth | Use paper towels or tissues (they scratch) |
| Test solvents on a small area first | Apply chemicals directly to the surface |
| Work in a dust-free space | Handle the case with dirty hands |
| Use minimal pressure when rubbing | Scrub aggressively or use circular metal tools |
| Let solvents sit briefly to penetrate | Leave oils or removers on for extended periods |
Real Example: Restoring a Rare Zelda: Breath of the Wild Collector’s Edition
A collector in Portland acquired a sealed limited edition of The Legend of Zelda: Breath of the Wild for the Nintendo Switch. While the case was intact, a large retailer price tag had been removed poorly, leaving thick adhesive across the bottom third of the front cover. Attempted cleaning with a wet wipe had smeared the residue and created a hazy ring.
Using the method outlined above, they began by applying olive oil to a microfiber cloth and gently massaging the area for two minutes. After letting it sit for five minutes, they wiped it clean with a damp cloth and dried thoroughly. A faint outline remained, so they repeated with a 70% isopropyl alcohol solution, this time using light circular motions for 30 seconds. The result was complete removal with no visible scratches or loss of gloss. The case was later appraised at full premium value due to its restored condition.
Choosing the Right Tools and Supplies
Success depends not only on technique but also on the quality of materials used. Here’s what to keep in your collector’s care kit:
- Microfiber cloths (lint-free): At least two per session—one for application, one for drying.
- Plastic guitar pick or credit card: Useful for lifting sticker edges without scratching.
- Hairdryer with low-heat setting: Prevents overheating while loosening adhesive.
- Bottled water: Avoid tap water, which can leave mineral spots.
- Isopropyl alcohol (70%): Effective yet safe on most plastics when used sparingly.
- Goo Gone Original (non-warming formula): Specifically formulated for adhesive removal without damaging surfaces.
- Cotton swabs: Ideal for precision cleaning around corners and seams.
Never use acetone, nail polish remover, undiluted bleach, or window cleaners containing ammonia. These can permanently etch or fog polycarbonate surfaces.
Frequently Asked Questions
Can I use WD-40 to remove sticker residue?
No. While WD-40 can dissolve adhesive, it leaves behind an oily film that attracts dust and can degrade plastic over time. It’s also difficult to fully remove and may cause long-term discoloration. Stick to safer alternatives like isopropyl alcohol or vegetable oil.
Will rubbing alcohol damage the printed artwork on the case?
Generally, no—if used correctly. Most modern game cases use UV-resistant inks that resist mild alcohol exposure. However, always apply the solution to a cloth, not directly to the case, and avoid prolonged contact. Test on a small edge first, especially with older or imported editions where ink quality may vary.
What if the residue is on a matte or frosted finish?
Extra caution is required. Matte surfaces show scratches more easily due to light diffusion. Use only olive oil or diluted dish soap with ultra-soft cloth. Avoid alcohol and mechanical scraping entirely. If residue persists, consider leaving it rather than risking irreversible surface damage.
Expert-Approved Checklist for Safe Cleaning
Before starting any residue removal, run through this checklist to ensure you’re fully prepared:
- ✅ Work in a clean, well-lit area
- ✅ Lay down a soft microfiber towel
- ✅ Gather supplies: microfiber cloths, solvent, cotton swabs, plastic tool
- ✅ Remove any loose sticker pieces carefully
- ✅ Test solvent on a hidden area
- ✅ Use heat only if necessary and with caution
- ✅ Apply solvent to cloth—not directly to case
- ✅ Clean in small circular motions with light pressure
- ✅ Rinse with water-dampened cloth
- ✅ Dry thoroughly and inspect results
“The difference between a well-preserved collectible and a damaged one often comes down to patience. Rushing the cleanup process is the fastest way to devalue your item.” — Lena Cho, Digital Media Conservator at The Pacific Archive
Final Thoughts: Preservation Is Part of the Passion
For collectors, the joy isn’t just in owning rare games—it’s in maintaining them with care. Every sticker residue removal is a small act of preservation, extending the life and legacy of a physical piece of gaming history. With the right approach, even stubborn adhesives can be eliminated safely, keeping your limited edition cases looking as flawless as the day they were released.
Resist the urge to improvise. Avoid shortcuts. Trust proven methods that respect the materials you’re working with. Over time, consistent, gentle maintenance builds a collection that doesn’t just survive—it thrives.


 浙公网安备
33010002000092号
浙公网安备
33010002000092号 浙B2-20120091-4
Comments
No comments yet. Why don't you start the discussion?