
Lash extensions enhance the eyes, adding volume and length with minimal daily effort. But when it’s time to take them off—whether due to overgrowth, irritation, or a desire to return to bare lashes—many people make the mistake of pulling or tugging them out. Doing so can cause irreversible damage to natural lashes, including breakage, follicle trauma, and even long-term thinning.
The good news? With the right tools, technique, and patience, you can safely remove lash extensions at home without compromising the health of your natural lashes. This guide walks you through every step, from preparation to aftercare, ensuring a gentle and effective removal process that protects your lash line.
Why Safe Removal Matters
Natural lashes follow a growth cycle lasting 60–90 days. Each hair grows, rests, and sheds naturally. Extensions are glued to individual natural hairs, meaning they stay in place until the natural lash completes its cycle. When removed improperly—especially by force—the extension can pull out the natural lash prematurely, disrupting the cycle and weakening future growth.
Repeated trauma from improper removal may lead to:
- Thinning or spotty lash lines
- Slower regrowth
- Inflammation of the eyelid (blepharitis)
- Damage to the hair follicle, potentially causing permanent loss
A safe, gradual removal method respects the biology of your lashes and minimizes stress on the delicate eye area.
Essential Tools and Ingredients
Before beginning, gather all necessary items. Using the correct products ensures effectiveness without irritation. Avoid improvising with kitchen oils or makeup removers not formulated for eyes.
| Item | Purpose | Recommended Examples |
|---|---|---|
| Lash Extension Remover Gel | Specially formulated to dissolve semi-permanent lash glue | Allure Lash Off, NovaLash Remover, Lily Licks Dissolve |
| Coconut or Olive Oil (Optional) | Natural alternative for very stubborn extensions; must be pure and food-grade | Organic cold-pressed coconut oil |
| Cotton Pads or Rounds | To apply remover gently | Unbleached, lint-free cotton |
| Spoolie Brush or Clean Mascara Wand | To separate and comb lashes during removal | Used mascara wand (cleaned with alcohol) |
| Q-tips or Micro Swabs | For precise application along the lash line | Soft-tip applicators |
| Tear-Free Eye Makeup Remover | To cleanse afterward | Bioderma Sensibio H2O, Almay Extra Gentle |
“Using a professional-grade remover is key. These are pH-balanced for the eye area and designed to break down cyanoacrylate glue—the type used in lash extensions—without harming skin or natural lashes.” — Dr. Lena Torres, Ophthalmic Esthetician
Step-by-Step Guide to At-Home Removal
Patience is essential. Rushing increases the risk of pulling. Follow this timeline across one to three sessions depending on extension density.
- Prepare Your Space
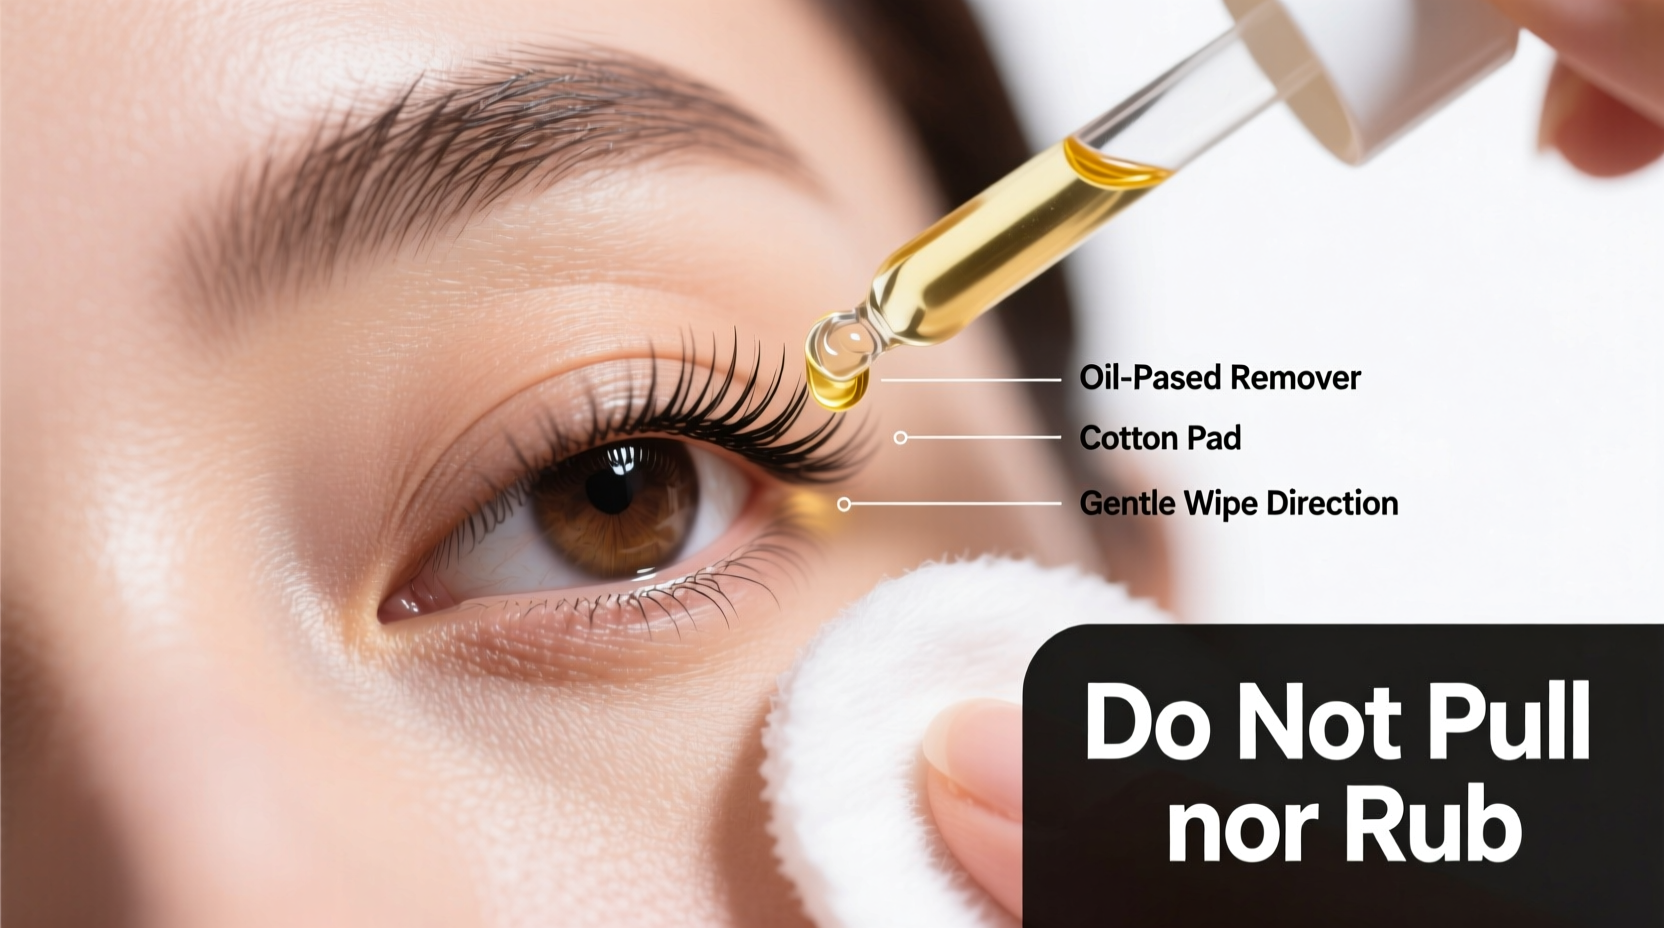
Wash your hands thoroughly. Sit in a well-lit area with a mirror. Lay down a towel to catch drips. Remove all eye makeup beforehand using a gentle cleanser. - Apply the Remover
Dip a cotton pad in lash remover gel or saturate it with coconut oil if using a natural method. Close your eyes and place the pad directly over your closed lids, pressing gently for 3–5 minutes. This softens the adhesive bond. - Wait and Reapply
Let the solution sit. Do not rub. After 5 minutes, check if the extensions feel looser. Reapply if needed, especially near the outer corners where glue tends to be stronger. - Use a Spoolie to Gently Separate
After sufficient soaking, use a clean spoolie to lightly brush through the lashes. If an extension slides off easily, let it fall. Never tug. Repeat the process on any remaining clusters. - Target Stubborn Areas with Q-tips
For extensions still firmly attached, dip a Q-tip in remover and carefully swipe along the base of the lash line. Hold for 10–15 seconds per section. - Rinse and Cleanse
Once all extensions are gone, wash your eyelids with lukewarm water and a tear-free cleanser. Use a fresh cotton pad to wipe away residue. Avoid scrubbing. - Condition Natural Lashes
Apply a nourishing lash serum or a tiny drop of vitamin E oil to support recovery and encourage healthy regrowth.
Timeline for Best Results
- Day 1: Begin with one eye. Focus on half the lash line. Let the other side rest.
- Day 2: Complete the first eye and start the second.
- Day 3: Finish remaining extensions and begin aftercare routine.
This phased approach prevents eye fatigue and reduces exposure to solvents.
Do’s and Don’ts During Removal
Mistakes are common, especially for first-timers. Refer to this checklist to avoid damaging your lashes.
| Do’s | Don’ts |
|---|---|
| Use products specifically made for lash extension removal | Never pick, pull, or yank extensions |
| Work slowly and in good lighting | Use nail polish remover or acetone |
| Keep eyes closed throughout the process | Rub your eyes vigorously after removal |
| Follow up with a lash serum | Apply mascara immediately after removal |
| Repeat sessions as needed instead of forcing results | Share tools with others (risk of infection) |
Real-Life Example: A Cautionary Story
Marissa, a 29-year-old graphic designer, had worn lash extensions for over a year. When she decided to go natural, she tried removing them herself using olive oil and excessive rubbing. Within days, her lashes began falling out in clumps. She noticed bald patches along her lash line and developed mild swelling on her upper lids.
She consulted a dermatologist who diagnosed traction alopecia—a condition caused by repeated mechanical stress on hair follicles. It took Marissa nearly six months of consistent serums and medical treatments to restore fullness. Her experience underscores the importance of gentle methods and respecting the natural lash cycle.
Had she used a proper remover and followed a slow, non-abrasive process, she likely could have avoided lasting damage.
Post-Removal Care: Healing Your Lash Line
After removal, your lashes and follicles need time to recover. The eyelid skin may also be sensitized from prolonged adhesive exposure.
Follow these steps to promote healing:
- Hydrate the Skin: Apply a light, fragrance-free moisturizer around the eye area (avoid direct contact with the lash line).
- Use Lash Serum Daily: Look for formulas with peptides, biotin, or panthenol. These strengthen new growth and improve density over time.
- Avoid Waterproof Makeup: For at least two weeks, skip waterproof mascara and heavy eyeliners that require aggressive removal.
- Give It Time: Full lash regrowth takes 6–8 weeks. Resist the urge to reapply extensions too soon—allow your natural lashes to breathe and rebuild.
“The two weeks following extension removal are critical. This is when follicles reset. Supporting them with nutrients and avoiding stress leads to healthier, stronger lashes in the long run.” — Jasmine Reed, Licensed Esthetician & Lash Educator
Frequently Asked Questions
Can I use baby oil to remove lash extensions?
While baby oil contains mineral oil that can weaken adhesive, many formulations include fragrances and additives that may irritate sensitive eye tissue. It’s safer to use a dedicated lash remover or pure coconut oil, which is less likely to cause reactions.
How long does it take to remove lash extensions at home?
Depending on the number of extensions and method used, full removal typically takes 1–3 sessions of 20–30 minutes each. Rushing increases risk, so allow several days for complete, safe removal.
Is it normal for my natural lashes to shed after removal?
Yes, some shedding is normal. Extensions attach to natural lashes, so when both shed together, it may seem like more loss than usual. However, if shedding continues beyond 3–4 weeks or you notice bald spots, consult a dermatologist.
Checklist: Safe At-Home Lash Extension Removal
- ✔ Gather proper tools: remover, cotton pads, spoolie, Q-tips
- ✔ Wash hands and face; remove all makeup
- ✔ Perform patch test if using a new product
- ✔ Apply remover with cotton pad; wait 3–5 minutes
- ✔ Gently comb lashes with a spoolie—let loose extensions fall
- ✔ Use Q-tips for stubborn areas; never pull
- ✔ Rinse eyelids with gentle cleanser
- ✔ Apply lash serum to support regrowth
- ✔ Repeat next day if needed
- ✔ Avoid makeup and extensions for 1–2 weeks
Final Thoughts
Removing lash extensions doesn’t have to mean sacrificing your natural lash health. With the right knowledge and tools, you can take control of the process in the comfort of your home—safely and effectively. The key is patience, precision, and respect for your body’s natural rhythms.
Your lashes are more than cosmetic—they protect your eyes and frame your face. Treat them with care during every phase, including removal. By following this guide, you’re not just taking off extensions—you’re investing in the long-term vitality of your lashes.


 浙公网安备
33010002000092号
浙公网安备
33010002000092号 浙B2-20120091-4
Comments
No comments yet. Why don't you start the discussion?