
A scratch on your tablet screen can be more than just an eyesore—it can affect touch sensitivity, visibility, and even long-term durability. While deep gouges may require professional repair or screen replacement, many light to moderate surface scratches can be minimized or removed with careful, at-home methods. The key is knowing which techniques are safe, effective, and won’t compromise your device’s protective coatings. This guide walks you through practical, tested approaches to restore clarity and smoothness to your tablet’s display using accessible materials and smart precautions.
Understanding Screen Scratches: What You’re Dealing With
Before attempting any remedy, it's crucial to understand the nature of the scratch. Tablet screens today are typically made from chemically strengthened glass such as Gorilla Glass, often coated with oleophobic (oil-repelling) and anti-reflective layers. Scratches vary in severity:
- Surface-level micro-scratches: Caused by dust, sand, or fingernails. These appear as fine white lines and don’t catch your nail when touched.
- Moderate scratches: Slightly deeper, visible under certain lighting, and may create a faint drag when swiping.
- Deep gouges: Noticeable indentations that disrupt touch response or create visual distortion. These usually cannot be repaired at home.
Only surface-level and some moderate scratches are candidates for DIY treatment. Attempting to polish deep scratches risks spreading cracks or damaging the touchscreen matrix.
“Most minor scratches are cosmetic and don’t impair function, but they can worsen over time if exposed to abrasives.” — Dr. Lin Zhao, Materials Scientist, Consumer Electronics Lab
Safe Home Remedies That Work
Several household products have gained popularity for their ability to fill or buff out light scratches. However, not all are equally safe. Below are the most reliable methods backed by user testing and material compatibility research.
Toothpaste Method: The Classic Approach
Non-gel, white toothpaste (preferably with mild abrasives like hydrated silica) has been used for years to polish surfaces. It works by gently abrading the edges of a scratch, leveling it with the surrounding glass.
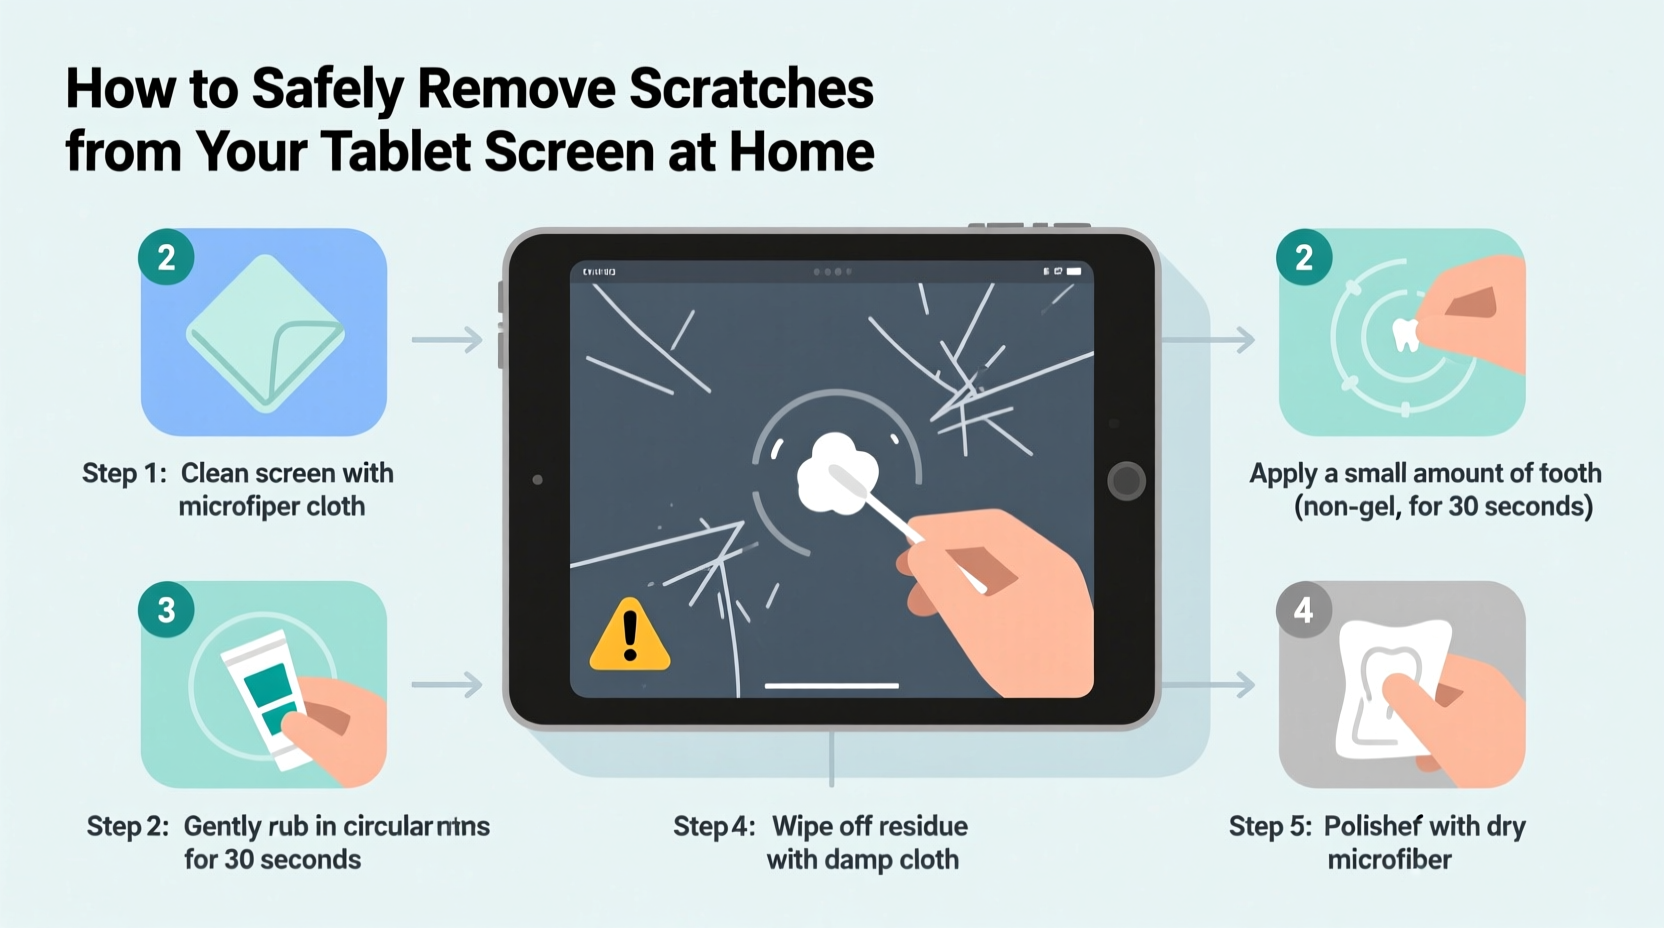
- Clean the screen thoroughly with a microfiber cloth and screen-safe cleaner.
- Apply a pea-sized amount of toothpaste to a soft, lint-free cloth (not directly on the screen).
- Gently rub in a circular motion over the scratch for 30–45 seconds.
- Wipe off residue with a damp corner of the cloth, then dry with a clean section.
- Inspect under bright light. Repeat once if needed, but no more than twice.
This method is best suited for micro-scratches. Overuse can wear down the oleophobic coating, increasing fingerprint smudges over time.
Baking Soda Paste: A Natural Alternative
For those avoiding commercial toothpaste, a paste made from baking soda and water offers similar abrasive properties in a controlled form.
| Ingredient | Ratio | Application Time | Risk Level |
|---|---|---|---|
| Baking soda + water | 3:1 (soda to water) | 20–30 seconds | Low to Moderate |
| Commercial metal polish (e.g., brass) | As directed | Not recommended | High – damages coatings |
| Car wax | Thin layer | Buff immediately | Moderate – may leave residue |
Mix three parts baking soda with one part water to form a thick paste. Apply with a microfiber cloth using gentle circular motions for no more than half a minute. Rinse the area with a slightly damp cloth and dry completely. Baking soda is slightly more abrasive than toothpaste, so use sparingly and only on non-coated glass areas (if applicable).
Wood Polish or Furniture Wax: Filling vs. Removing
Some users report success with clear wood polish (like Pledge) or carnauba-based waxes. These don’t remove scratches but fill them optically, making them less visible under light.
- Apply a tiny drop to a microfiber cloth.
- Buff lightly over the scratch in straight lines (not circles) to avoid streaks.
- Remove excess immediately—do not let it dry on the screen.
This is a temporary cosmetic fix. Over time, wax can attract dust and degrade touchscreen responsiveness if residue builds up near sensors.
Step-by-Step Guide: Safely Treating a Light Scratch
Follow this structured process to maximize results while minimizing risk:
- Assess the scratch: Run a fingernail over it. If it doesn’t catch, it’s likely superficial and treatable.
- Power off the tablet: Prevent accidental inputs and allow full inspection during treatment.
- Clean the screen: Use a microfiber cloth slightly dampened with distilled water or isopropyl alcohol (70% or lower). Wipe gently and dry completely.
- Choose your method: For first-time attempts, start with non-gel toothpaste.
- Test in an inconspicuous area: Try the product on the edge of the screen bezel or back panel to check for adverse reactions.
- Apply with minimal pressure: Let the abrasive do the work—pressing harder increases the chance of micro-fractures.
- Limit duration: Never exceed one minute of rubbing per session.
- Re-evaluate: After cleaning off the residue, inspect under multiple lighting angles. If improved, stop. If unchanged, consider accepting the scratch or seeking professional refinishing.
Repeat only once if necessary. Multiple applications increase the risk of coating degradation.
What Not to Do: Common Mistakes That Cause More Harm
Many well-intentioned solutions can permanently damage your tablet. Avoid these practices at all costs:
- Using aluminum polish or metal buffers: These are designed for softer metals and will etch glass coatings.
- Applying vinegar or lemon juice: Acidic substances can corrode conductive layers beneath the glass.
- Using paper towels or rough cloths: Even after polishing, abrasive wiping can create new scratches.
- Trying “scratch removal” kits with power tools: Rotary tools lack precision and generate heat that can crack the screen.
- Ignoring manufacturer guidelines: Apple, Samsung, and others explicitly warn against using chemical polishes on their devices.
The oleophobic layer on tablets is thin and easily stripped by aggressive treatments. Once gone, the screen becomes more prone to smudges and harder to clean—essentially trading one problem for another.
When to Accept the Scratch (and Protect What’s Left)
Not every scratch can or should be removed. Deep scratches, especially those radiating from an impact point, indicate structural weakness. Polishing could accelerate cracking. In such cases, focus shifts from repair to protection.
Apply a high-quality tempered glass screen protector. Modern protectors offer 9H hardness, matching sapphire-level resistance. They also provide a sacrificial layer, absorbing future scratches while preserving the original screen underneath.
“A screen protector isn’t just prevention—it’s insurance. It gives you peace of mind and preserves resale value.” — Marcus Tran, Mobile Device Technician, iFixHub Repair Services
If the scratch affects usability—such as erratic touch response or spiderwebbing—consult a certified repair center. Some manufacturers offer screen replacement services at reduced cost, especially under extended warranties.
Real Example: Recovering a Child’s Tablet After a Playground Incident
Sarah, a parent from Portland, noticed her 8-year-old’s tablet had several fine scratches after being left in a sandbox. The device was functional, but the screen looked worn. She tried the toothpaste method using a children’s non-gel formula (to minimize abrasiveness).
After cleaning the screen with a microfiber cloth, she applied a small amount of toothpaste and rubbed gently for 30 seconds. Two scratches became nearly invisible; one deeper line remained but was less prominent. She followed up by applying a matte-finish screen protector to reduce glare and prevent future damage.
“I didn’t expect miracles,” she said, “but going from ‘this looks ruined’ to ‘it’s barely noticeable’ made a big difference. And now it’s protected.”
This case highlights the realistic outcome of home remedies: improvement, not perfection. But for everyday users, that’s often enough.
Prevention Checklist: Keep Your Screen Scratch-Free Moving Forward
Once your screen is restored—or accepted as-is—take proactive steps to prevent future damage:
- ✅ Always use a padded tablet case with a built-in screen cover.
- ✅ Apply a tempered glass screen protector immediately after purchase.
- ✅ Store the tablet separately from keys, coins, or tools in bags.
- ✅ Clean the screen only with a microfiber cloth—dry or slightly damp.
- ✅ Avoid placing the tablet face-down on rough surfaces like concrete or gravel.
- ✅ Educate children or shared users about proper handling.
Regular maintenance is far more effective than reactive fixes. A $15 screen protector can save you hundreds in premature replacement costs.
Frequently Asked Questions
Can I use toothpaste on an iPad or Samsung Galaxy Tab?
Yes, but with caution. Both brands use durable glass, but their anti-smudge coatings are sensitive. Use only non-gel, non-whitening toothpaste and limit application to one or two passes. Always test first on the screen’s edge.
Will these methods work on plastic screen protectors?
Sometimes. Plastic is softer than glass, so abrasive pastes may actually deepen scratches. For plastic protectors, replacement is usually the better option since they’re inexpensive and designed to be disposable.
Is there a permanent fix for deep scratches?
No home method permanently repairs deep scratches. Professional resurfacing exists but is rarely cost-effective for consumer tablets. Most technicians recommend screen replacement or using a protector to mask the issue.
Final Thoughts: Balance Caution with Practicality
Removing scratches from a tablet screen at home is possible—but only within limits. Success depends on scratch depth, technique, and material compatibility. The safest approach combines gentle abrasives like non-gel toothpaste with meticulous application and realistic expectations.
Remember: your goal isn’t laboratory-grade perfection, but functional restoration. A slightly improved screen that remains responsive and protected is a win. Above all, prioritize preservation over correction. Once the original coating is compromised, future scratches become more likely and more visible.


 浙公网安备
33010002000092号
浙公网安备
33010002000092号 浙B2-20120091-4
Comments
No comments yet. Why don't you start the discussion?