
Leather bags are investments—crafted for durability, style, and longevity. Yet even the most carefully maintained piece can fall victim to an unexpected annoyance: sticky residue. Whether it’s from price tags, adhesive labels, tape, or spilled substances, these residues not only mar the appearance of your bag but can also degrade the leather over time if improperly treated. The key is removal that preserves the material’s integrity. Unlike fabric or plastic, leather reacts sensitively to chemicals and abrasives. A wrong move can lead to discoloration, drying, cracking, or permanent surface damage.
This guide provides a thorough, expert-backed approach to eliminating sticky residue from leather bags—safely and effectively. From identifying leather types to choosing the right solvents and techniques, every step is designed to protect your bag while restoring its clean finish.
Understanding Leather Types and Their Sensitivity
Before attempting any cleaning method, it's crucial to identify the type of leather your bag is made from. Not all leathers respond the same way to moisture or cleaning agents. Using a solution on the wrong kind can result in irreversible harm.
- Aniline Leather: Full-grain leather dyed with transparent dyes. It has no protective coating, making it highly susceptible to stains and chemical damage. Avoid water and solvents unless absolutely necessary.
- Semi-Aniline Leather: Similar to aniline but with a light protective topcoat. Slightly more resistant to spills and stains, yet still delicate.
- Protected (Pigmented) Leather: Coated with a polymer layer for durability and stain resistance. Most common in handbags and luggage. Tolerates gentle cleaning better than other types.
- Suede and Nubuck: Both are unfinished leathers with a velvety texture. Extremely sensitive to moisture and oils. Standard sticky residue removers often ruin their nap.
If you're unsure about your bag’s leather type, check the care label or manufacturer’s website. When in doubt, assume it’s delicate and test any method on a hidden area first—such as inside a pocket flap or along the bottom edge.
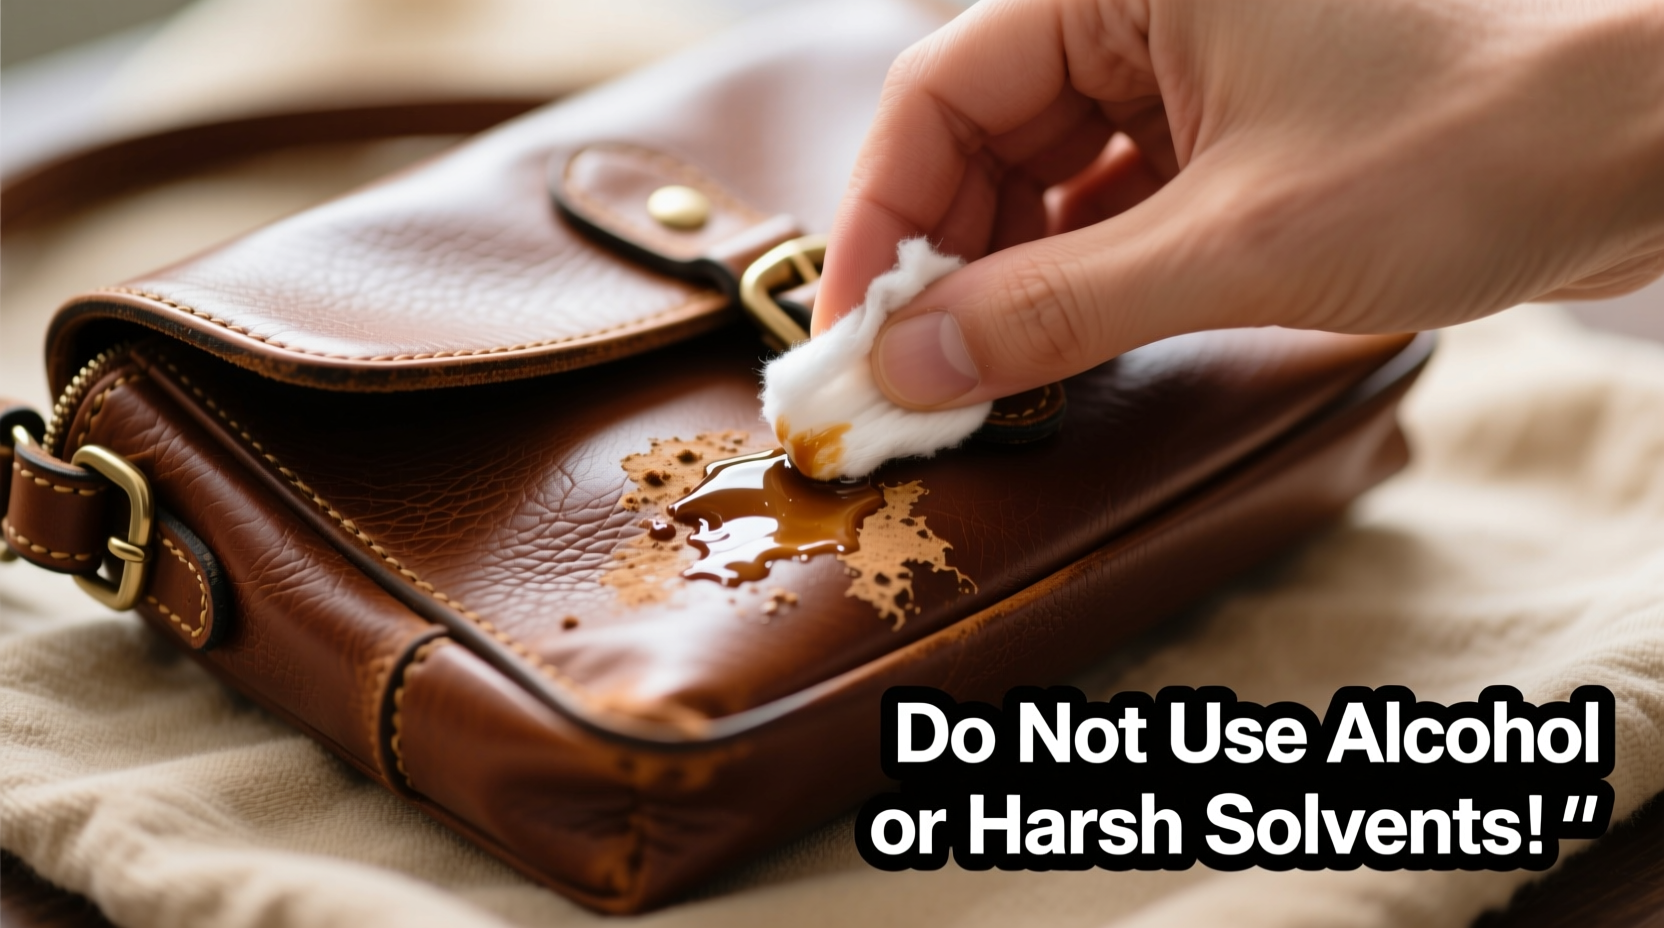
Safe Methods to Remove Sticky Residue: Step-by-Step Guide
Removing adhesive doesn’t require harsh chemicals. In fact, gentler approaches are usually more effective and safer. Below is a proven sequence of steps using household or specialty items that won’t compromise leather quality.
- Blot and Lift Excess Residue
Use a clean, dry microfiber cloth to gently lift off loose adhesive. If the residue is thick, use a plastic card (like an old credit card) to scrape lightly at a low angle. Never use metal tools—they can scratch or gouge the surface. - Dampen a Cloth with Distilled Water
Moisten a corner of a soft cloth with distilled water (not tap water, which may contain minerals). Gently dab the area to soften the residue. Do not soak the leather. Wipe in one direction to avoid spreading. - Apply a Mild Solvent (If Needed)
If water alone doesn’t work, proceed with caution. Use one of the following:- Isopropyl Alcohol (70% or less): Dilute with equal parts distilled water. Dab lightly with a cotton swab—never rub. Effective for synthetic adhesives.
- White Vinegar Solution: Mix 1 part white vinegar with 2 parts water. Less aggressive than alcohol but still effective on mild stickiness.
- Commercial Leather Cleaner: Choose pH-balanced products like Lexol or Bickmore. Follow label instructions precisely.
- Wipe and Dry Immediately
After applying any solution, use a dry microfiber cloth to wipe the area thoroughly. Let the bag air-dry at room temperature, away from direct heat or sunlight. Do not use a hairdryer. - Condition the Leather
Cleaning—even gentle cleaning—can strip natural oils. Apply a small amount of leather conditioner with a clean cloth, buffing lightly to restore suppleness and sheen.
This process minimizes risk while maximizing effectiveness. For older or vintage bags, consider professional restoration instead of DIY attempts.
Do’s and Don’ts: What to Use and What to Avoid
Mistakes in adhesive removal often stem from using everyday household items without understanding their impact on leather. The table below summarizes safe practices versus harmful ones.
| Action | Do | Don’t |
|---|---|---|
| Cleaning Tools | Microfiber cloths, cotton swabs, plastic scrapers | Metal scrapers, rough sponges, paper towels |
| Liquids | Distilled water, diluted isopropyl alcohol, vinegar solution, leather-specific cleaners | Bleach, acetone, nail polish remover, ammonia, undiluted alcohol |
| Application Method | Dabbing, light wiping, minimal contact | Rubbing aggressively, soaking, scrubbing in circles |
| Drying | Air-dry naturally in shade, use fan for airflow | Direct sunlight, radiators, hairdryers |
| Aftercare | Apply leather conditioner within 24 hours | Leave cleaned area untreated or use oil-based polishes |
Adhering to this framework prevents unintended consequences such as staining, stiffening, or peeling of the finish. Remember: when in doubt, less is more.
Real-World Example: Removing a Price Tag Residue from a Designer Tote
Sophia, a frequent traveler and owner of a high-end cognac-colored leather tote, noticed a stubborn sticky patch near the handle after removing a store tag. She tried wiping it with a damp cloth, but the residue remained. Concerned about damaging the bag, she researched before acting.
She began by testing a drop of diluted isopropyl alcohol on the inside lining seam. No discoloration occurred. Using a cotton swab, she applied the solution sparingly to the affected area, letting it sit for 15 seconds. With a second swab, she gently lifted the softened adhesive. After two rounds, the residue was gone. She wiped the spot with a dry cloth, let it rest overnight, then applied a pea-sized amount of leather conditioner.
The result? A clean, unharmed surface that looked as good as new. Sophia now keeps a small leather care kit in her closet, including sample-sized cleaners and microfiber cloths, for future incidents.
“Many clients come to us with damaged leather because they used kitchen degreasers or rubbing alcohol straight from the bottle. A little patience and the right product make all the difference.” — Marcus Tran, Master Leather Conservator at Heritage Leather Studio
Essential Checklist for Safe Residue Removal
Follow this concise checklist before and during the cleaning process to ensure safety and success:
- ✅ Identify the leather type (check manufacturer details or perform a spot test)
- ✅ Gather supplies: microfiber cloths, cotton swabs, plastic scraper, distilled water, mild solvent (e.g., diluted alcohol), leather conditioner
- ✅ Test any liquid on a hidden area and wait 10 minutes for adverse reactions
- ✅ Work in a well-lit, dry space with good ventilation
- ✅ Remove excess residue with a plastic tool using light pressure
- ✅ Dampen—not soak—a cloth or swab with your chosen solution
- ✅ Dab gently; never scrub or rub vigorously
- ✅ Wipe dry immediately with a clean cloth
- ✅ Allow the area to air-dry completely (minimum 4–6 hours)
- ✅ Condition the leather to replenish moisture and prevent cracking
Completing each step systematically reduces the chance of error and ensures long-term preservation of your bag’s appearance and structural integrity.
Frequently Asked Questions
Can I use olive oil or coconut oil to dissolve sticky residue?
No. While natural oils are sometimes recommended online for conditioning, they are not suitable for removing adhesive. Oils like olive or coconut can clog leather pores, attract dust, and eventually turn rancid, leading to odor and deterioration. Stick to tested solvents and proper leather conditioners instead.
What if the sticky area has already discolored the leather?
If discoloration is present, stop further cleaning immediately. The damage may be chemical or moisture-related. At this stage, professional restoration is the safest option. Attempting home remedies could worsen the issue. Consult a leather specialist who can assess whether color reintegration or surface repair is needed.
How can I prevent sticky residue from forming in the future?
Always remove tags and stickers soon after purchase. If immediate removal isn’t possible, store the bag in its dust bag until you can address it. Avoid placing adhesive notes, tape, or shipping labels directly on leather surfaces. For travel, wrap items separately and keep them in ziplock bags inside the tote.
Final Thoughts: Care Today Prevents Damage Tomorrow
Sticky residue might seem like a minor flaw, but improper removal can lead to lasting harm. Leather is a natural material that demands respect and informed care. By understanding its limitations and responding with precision, you preserve both beauty and function.
The methods outlined here—gentle lifting, cautious solvent use, and post-cleaning conditioning—are grounded in conservation principles used by professionals. They reflect years of experience in maintaining luxury goods without compromising integrity.
Your leather bag tells a story through its wear and patina. Let that story be one of thoughtful use and careful maintenance—not avoidable damage from a simple sticker. With the right knowledge, you’re fully equipped to handle residue safely and confidently.


 浙公网安备
33010002000092号
浙公网安备
33010002000092号 浙B2-20120091-4
Comments
No comments yet. Why don't you start the discussion?