
Tight shoes can turn a simple walk into an ordeal. Whether you’ve just bought a new pair that runs small or your favorite loafers have stiffened over time, discomfort doesn’t have to be the price of style. Fortunately, you don’t need expensive stretching tools or professional cobbler visits to fix the problem. With everyday household items and two reliable principles—ice expansion and heat molding—you can gently and effectively stretch tight shoes at home.
The key is doing it right: preserving the integrity of the material while achieving a more comfortable fit. This guide covers safe, tested methods using ice and heat, explains which materials respond best to each technique, and provides step-by-step instructions so you can avoid common mistakes that lead to warping, cracking, or irreversible damage.
Why Ice and Heat Work: The Science Behind Shoe Stretching
Shoe stretching relies on manipulating the structure of the material temporarily so it conforms to a larger shape. Both ice and heat exploit physical properties of matter—phase change and thermal elasticity—to achieve this without forceful pulling or mechanical stress.
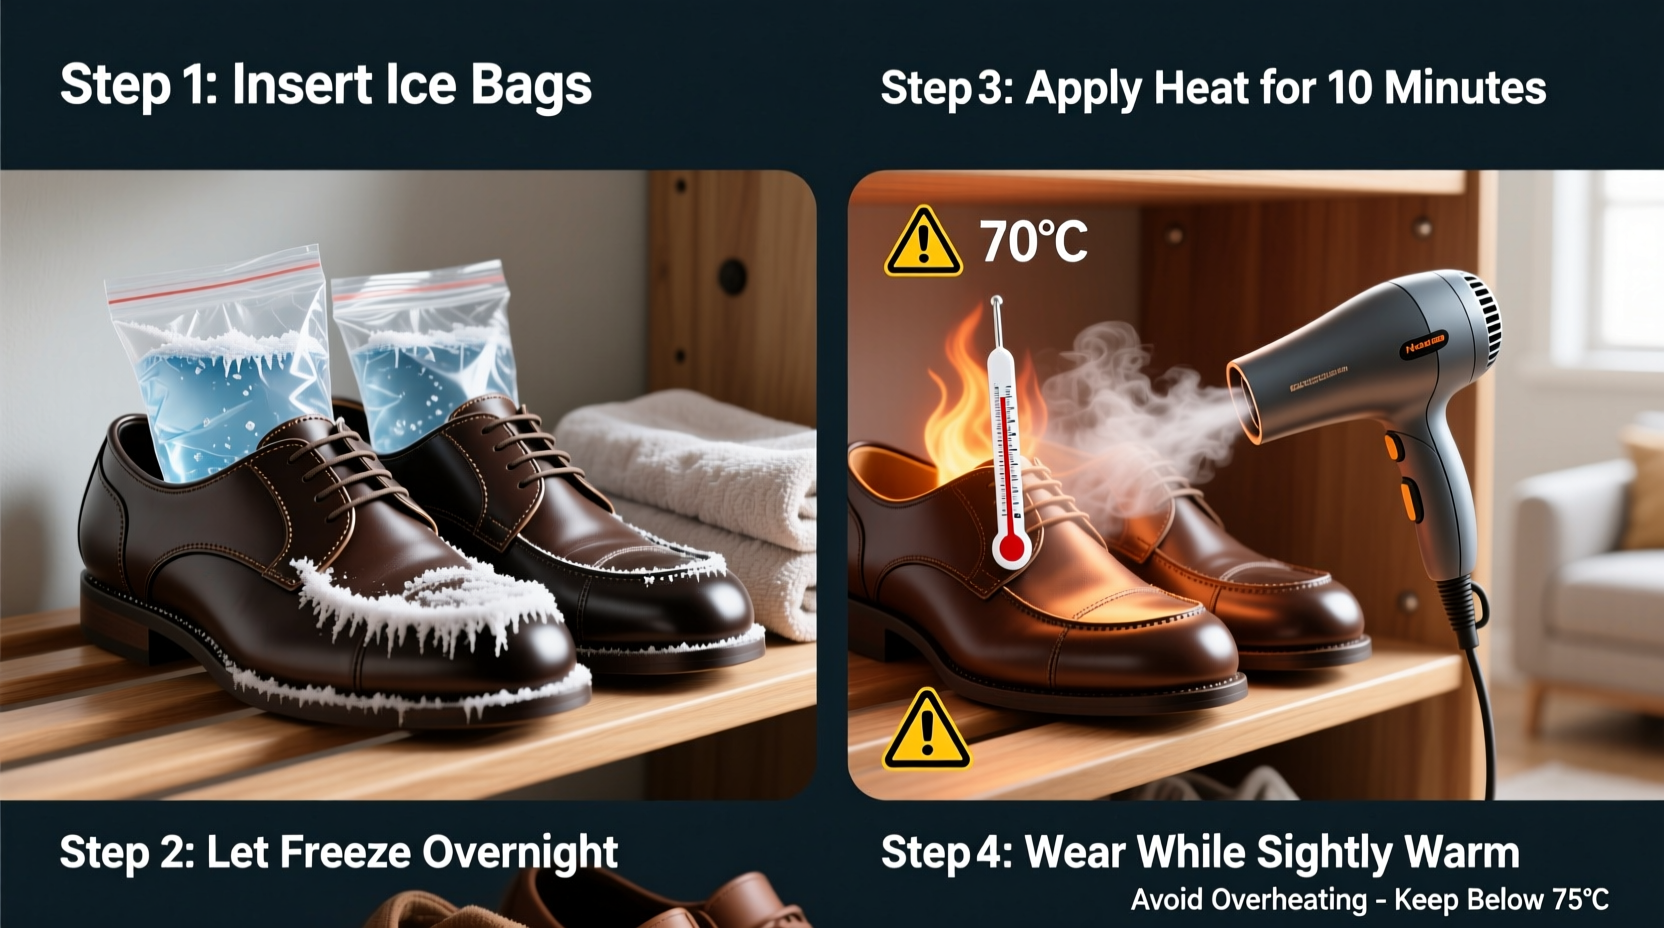
Ice Method: Also known as the “freeze method,” this technique uses water’s unique property of expanding when frozen. By filling sealed plastic bags with water and placing them inside your shoes, then freezing them, the expanding ice applies outward pressure from within. As the ice grows, it gently pushes against the inner walls of the shoe, stretching tight areas like the toe box or instep. This method works best on natural materials such as leather and canvas, which are flexible enough to expand under slow, even pressure.
Heat Method: Applying heat softens the fibers in many shoe materials, especially leather, synthetic blends, and some textiles. Once warmed, these materials become malleable and can be stretched either by wearing the shoes with thick socks or inserting expandable forms. When cooled, they retain their new shape. Unlike aggressive stretching sprays or steam irons (which risk scorching), controlled heat from a hairdryer or oven-safe approach offers precision and safety when done correctly.
“Gradual, consistent pressure produces better long-term results than brute force. Shoes stretched too quickly often lose structural integrity.” — Marcus Reed, Footwear Restoration Specialist with 18 years of experience
Step-by-Step Guide: Using the Ice Method to Stretch Shoes
The ice method is ideal for localized tightness—especially in the toe area—and requires no special equipment beyond what's already in your kitchen. It’s particularly effective for closed-toe shoes like oxfords, boots, and ballet flats.
- Prepare your shoes: Clean the interior lightly with a dry cloth to remove dust or debris. Remove the insoles if possible to allow greater expansion space.
- Fill sealable bags with water: Use two sandwich-sized zip-top plastic bags per shoe. Fill each about two-thirds full with water to allow room for expansion. Double-bagging prevents leaks.
- Insert bags into the shoe: Place one bag inside the other, then position them in the toe box where stretching is needed. Ensure the open end faces upward to prevent spillage.
- Seal and freeze: Prop the shoe upright in the freezer. Make sure the water-filled bags remain in place and do not shift during freezing. Leave for 4–6 hours, or until completely solid.
- Allow thawing and repeat: After freezing, let the ice melt naturally (about 30–60 minutes). Check the fit. If still tight, repeat the process once daily for up to three days.
Using Heat to Mold and Stretch Shoes: A Controlled Approach
Heat-based stretching is faster than the ice method and allows immediate feedback through wear testing. However, it demands closer attention to temperature control to avoid melting synthetics or drying out leather.
The most accessible tool is a standard hairdryer set to medium heat. Never use direct flame or industrial heaters. Follow this sequence:
- Wear thick socks: Put on two or three pairs of wool or cotton blend socks to create bulk.
- Heat the tight areas: Hold the hairdryer 6–8 inches from the shoe’s upper, focusing on constricted zones (e.g., top of foot, heel collar). Warm for 30–60 seconds until the material feels pliable but not hot to touch.
- Put on the shoes: Immediately wear the heated shoes and walk around for 10–20 minutes. The warmth combined with foot pressure molds the shoe to your shape.
- Cool in place: Sit down and keep the shoes on until they cool completely. Avoid removing them prematurely, as this can reverse the shaping effect.
For shoes that cannot be worn immediately after heating (e.g., damp from moisture treatments), insert a shoe stretcher or rolled towel to maintain expanded form during cooling.
Alternative Heat Method: Oven-Assisted Stretching (Advanced)
This method should only be attempted with all-leather shoes—no glue-heavy constructions or rubber components. Preheat your oven to 175°F (80°C). Dampen the inside of the shoe slightly with water spray. Place the shoes on a baking sheet and heat for 5–8 minutes. Quickly put them on with thick socks and walk for 15 minutes. Turn off the oven and leave the shoes inside (oven turned off) for another 30 minutes to cool slowly.
“Oven stretching can add half a size if done carefully—but one degree too high can warp heels or delaminate soles.” — Lena Torres, Bespoke Shoemaker, Barcelona Atelier
Material-Specific Guidelines: What Works and What Doesn’t
Not all shoes react the same way to ice or heat. Understanding your shoe’s composition ensures you choose the safest method.
| Material | Ice Method Safe? | Heat Method Safe? | Notes |
|---|---|---|---|
| Full-Grain Leather | Yes | Yes | Responds well to both; retains shape after stretching. |
| Suede/Nubuck | Limited | Yes (low heat) | Avoid excess moisture; use protective paper lining during ice method. |
| Synthetics (Polyester, Nylon) | No | Cautious only | High risk of melting; use minimal heat and short exposure. |
| Cotton Canvas | Yes | Yes | Best results when slightly dampened before heating. |
| Patent Leather | No | No | Prone to cracking; use professional spray conditioners instead. |
| Vegan Leather | No | Cautious only | Often layered plastics; high heat causes bubbling. |
Mini Case Study: Rescuing Winter Boots After Seasonal Storage
Sarah, a graphic designer from Portland, stored her favorite leather hiking boots in a garage bin over summer. When she retrieved them in October, they felt painfully tight across the instep. She tried wearing them with thick socks but developed blisters after ten minutes.
Instead of buying new ones, she researched home remedies and opted for the ice method. She double-bagged water, placed the bags in the toe and midfoot areas, and froze them overnight. On the second day, she repeated the process. By the third morning, she could wear the boots comfortably—even with winter socks. The gradual expansion preserved the sole stitching and avoided creasing the shaft.
Sarah now stores her boots with cedar inserts and conditions them twice yearly, but credits the ice trick with extending their usable life by at least two seasons.
Checklist: Safely Stretching Shoes at Home
- ✅ Identify the shoe material before choosing a method
- ✅ Remove insoles to maximize internal space
- ✅ Use double-sealed bags for the ice method to prevent leaks
- ✅ Apply heat evenly—never concentrate in one spot
- ✅ Wear thick socks during heat stretching for optimal molding
- ✅ Limit ice cycles to 3 days maximum to avoid over-stretching
- ✅ Condition leather afterward to restore moisture lost during heating
- ✅ Stop immediately if you notice cracking, odor changes, or glue separation
Frequently Asked Questions
Can I stretch shoes more than one size using these methods?
Generally, home methods yield a quarter to half-size increase. Stretching beyond this risks damaging seams, weakening support, or distorting the sole. For larger adjustments, consider professional stretching machines or custom orthotic inserts.
Is it safe to use a microwave instead of a hairdryer for heating?
No. Microwaves heat unevenly and can ignite synthetic fibers or melt adhesives instantly. They also pose fire hazards with metal eyelets or shanks. Always use external, controllable heat sources like hairdryers.
How do I prevent my shoes from shrinking back after stretching?
After stretching, allow shoes to cool fully in their new shape. For extra stability, stuff them with tissue paper or shoe trees overnight. Conditioning leather every few weeks helps maintain flexibility and prevents re-tightening due to dryness.
Final Tips for Long-Term Comfort and Care
While emergency fixes help, long-term comfort comes from prevention. Buy shoes at the end of the day when feet are slightly swollen. Try them on with the socks you plan to wear regularly. Break in new shoes gradually—start with 30-minute walks before full-day wear.
If you frequently struggle with narrow widths or high arches, consider investing in adjustable styles with laces or elastic panels. Some brands offer multiple width options, which reduce the need for stretching altogether.
And remember: stretching isn’t a substitute for proper fit. A shoe that’s fundamentally too small in length or volume may never feel truly comfortable, regardless of treatment.
Conclusion
Stretching tight shoes at home doesn’t require costly gadgets or technical skills—just an understanding of materials and patience. Whether you’re using the quiet power of freezing water or the responsive pliability of heat, both methods offer real solutions for improving fit without sacrificing quality.
Start conservatively. Test one method at a time. Respect the limits of your footwear. And above all, prioritize comfort without compromising craftsmanship. With these techniques, you can breathe new life into snug shoes and walk farther—literally and figuratively.


 浙公网安备
33010002000092号
浙公网安备
33010002000092号 浙B2-20120091-4
Comments
No comments yet. Why don't you start the discussion?