
Staggering Christmas light strands—layering multiple strings at varying intervals to create rich, dimensional illumination—is the hallmark of professional-grade holiday displays. Yet many homeowners abandon the idea after tripping a breaker, melting a plug, or watching their front porch go dark mid-December. The problem isn’t ambition—it’s misaligned expectations about electrical capacity and strand sequencing. Fullness doesn’t require more wattage; it requires smarter distribution. This guide details exactly how to achieve dense, lush lighting while staying safely within circuit limits—using real-world load math, tested staggering patterns, and UL-certified best practices.
Why Staggering Works (and Why It’s Often Done Wrong)
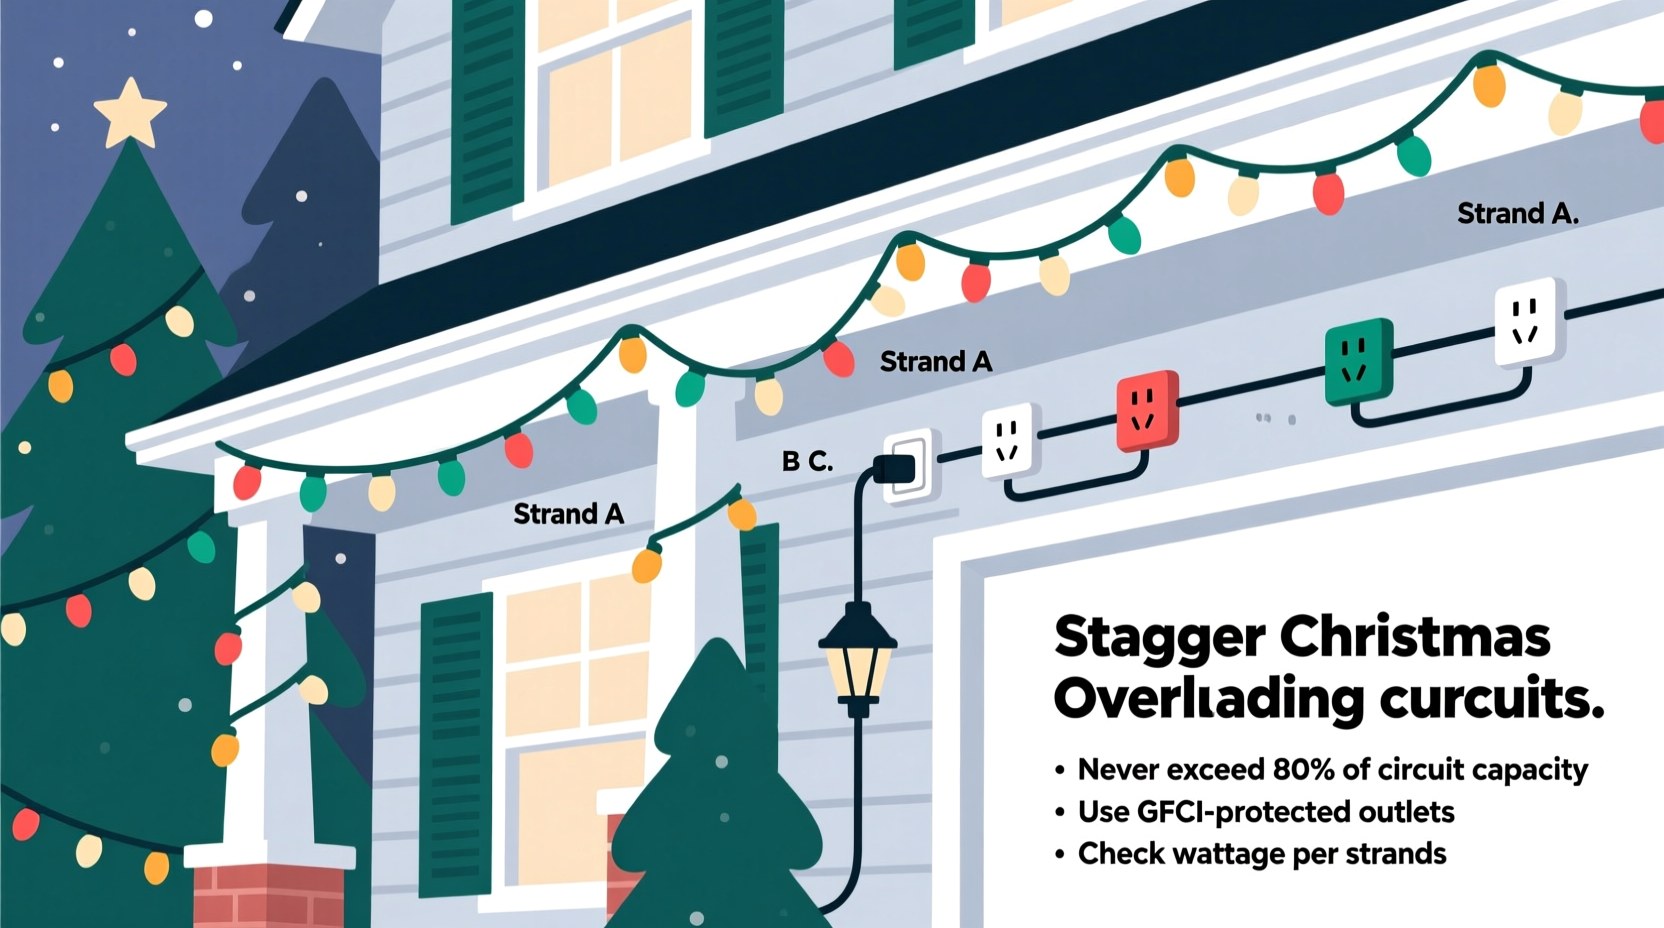
Staggering means offsetting the start points, lengths, and densities of light strands across a single run—like overlapping shingles on a roof. When done correctly, it eliminates visible gaps, softens harsh lines, and creates depth that flat, aligned strings simply can’t replicate. But most people stagger *visually* without staggering *electrically*. They daisy-chain five 25-foot incandescent strands onto one outlet, assuming “it looks full, so it must be fine.” That assumption is dangerous. Incandescent mini-lights draw up to 0.36 amps per 100 bulbs. A standard 15-amp residential circuit supports only 1,800 watts—or roughly 12–14 amps continuously. Exceeding 80% of that (9.6–11.2 amps) risks thermal overload in outlets, extension cords, and internal wiring.
The critical insight: staggering isn’t just about placement—it’s about load segmentation. Each staggered segment should connect to its own power source or dedicated circuit leg—not cascade from a single plug. This distributes amperage across multiple paths, preventing hotspots while allowing higher total light density.
Step-by-Step: Calculating Your Circuit Capacity First
Before hanging a single bulb, determine your hard electrical limits. Follow this sequence:
- Identify the circuit: Locate your home’s breaker panel and identify which breaker controls the outdoor or garage outlet(s) you’ll use. Use a circuit tracer or turn off breakers one by one while testing outlets with a lamp.
- Determine circuit rating: Most exterior circuits are 15-amp, but older homes may have 10-amp or 20-amp. Verify the breaker label.
- Calculate safe continuous load: Multiply amp rating × 120 volts × 0.8 (the National Electrical Code’s 80% continuous-load rule). For a 15-amp circuit: 15 × 120 × 0.8 = 1,440 watts max.
- Inventory all connected loads: Add wattage of anything else on that circuit—garage door opener (500W), outdoor receptacle heaters (1,000W), sump pump (800W), etc. Subtract these from your max. If your garage circuit already runs a 750W opener and 300W workbench light, only 390W remains for lights.
- Convert lights to watts: Check packaging or manufacturer specs. LED mini-lights average 4–7 watts per 100 bulbs; incandescent mini-lights average 20–40 watts per 100 bulbs. C7/C9 bulbs range from 5–10W (LED) to 40–120W (incandescent).
Strategic Staggering Patterns (with Load Mapping)
Once capacity is confirmed, apply these three proven staggering methods—each designed to maximize visual fullness while isolating electrical loads.
Pattern 1: The Tiered Outlet Method (Best for Porches & Entryways)
Use multiple GFCI-protected outdoor outlets spaced vertically or horizontally along your structure. Plug each light strand directly into its own outlet—not into a power strip or multi-outlet adapter.
- How to implement: Mount three weatherproof outlets at different heights on a column or wall (e.g., 3 ft, 6 ft, and 9 ft above ground). Run one 25-ft LED strand from each outlet, staggering start points: first strand starts at bottom edge, second starts 18 inches up, third starts 36 inches up. Overlap coverage zones by 30–40%.
- Load impact: With three 7-watt LED strands (21W total), you use just 1.5% of a 15-amp circuit’s capacity—leaving ample headroom for additional zones.
Pattern 2: The Split-Run Daisy Chain (For Long Eaves & Gutters)
This method uses UL-listed light strings rated for “end-to-end” connection—but intelligently splits the chain into parallel legs instead of one long series.
- How to implement: Start at the midpoint of your eave. Run one 50-ft strand leftward, plugging into an outlet at the far left corner. Run a second 50-ft strand rightward, plugging into an outlet at the far right corner. Both strands begin 12 inches from the midpoint—creating a seamless “V” overlap at center. No daisy-chaining between strands.
- Load impact: Two independent 50-ft LED strands (12W each) draw 24W total—0.2 amps. Compare this to chaining ten 25-ft strands end-to-end (which would exceed UL limits and risk overheating at connectors).
Pattern 3: The Density Gradient (For Trees & Shrubs)
Instead of uniform spacing, vary strand density by zone—using lower-wattage lights where visibility is high and higher-density (but still low-wattage) strings where depth is needed.
- How to implement: Wrap the outer third of a tree with tightly spaced 100-bulb LED mini-strands (6W each). Wrap the middle third with medium-spaced 70-bulb strands (4W each). Wrap the inner third with widely spaced 50-bulb strands (3W each). All strands plug into separate outlets or a heavy-duty, outdoor-rated 3-outlet power hub with individual circuit breakers.
- Load impact: Total = 6W + 4W + 3W = 13W. Even with three such trees, load remains under 40W—well below threshold.
| Staggering Pattern | Best Use Case | Max Safe Strands (15A Circuit) | Key Safety Feature |
|---|---|---|---|
| Tiered Outlet | Porches, columns, railings | Unlimited (per outlet) | Zero daisy-chaining; direct outlet connections |
| Split-Run Daisy Chain | Eaves, gutters, fences | 2–4 independent legs | Parallel load distribution; no single-point failure |
| Density Gradient | Trees, bushes, large shrubs | 3–6 zones per circuit | Wattage tapering prevents cumulative overload |
| Multi-Circuit Hub | Large displays (>500 ft) | Depends on hub rating (e.g., 6× 15A ports) | Individual GFCI protection per port |
Real-World Example: The Henderson Family Porch (2023 Season)
The Hendersons in Portland, Oregon, wanted a “full, glowing” porch for their Victorian home—without rewiring or tripping breakers. Their 1940s house had one 15-amp outdoor circuit feeding two GFCI outlets: one by the front door, one under the eave. Last year, they’d chained nine 25-ft incandescent strands (total 1,800W) and blew the breaker every night after 8 p.m.
This season, they followed the Tiered Outlet Method. They installed a third weatherproof outlet 4 feet above the door using a licensed electrician ($220, 2-hour job), then purchased six UL-listed 25-ft LED mini-light strands (4.8W each). They ran two strands from each outlet, staggering start points by 10\", 24\", and 36\" respectively. Total load: 6 × 4.8W = 28.8W (0.24 amps). They added warm-white net lights (12W) to the railing—plugged into the same third outlet. Total draw: 40.8W. Their porch now glows evenly from dusk to midnight, with zero outages—and their electricity bill dropped $18.75 for December.
“Staggering isn’t decorative—it’s electrical choreography. Every inch of overlap must correspond to a deliberate reduction in amperage per path. If you’re not mapping watts, you’re gambling with insulation integrity.” — Carlos Mendez, NFPA-Certified Lighting Safety Consultant and former UL Field Engineer
Critical Do’s and Don’ts for Safe Staggering
These aren’t suggestions—they’re non-negotiable safeguards backed by NEC Article 411 and UL 588 standards.
- DO verify UL listing on every light string and extension cord—look for the “UL” mark inside the molded plug or on the cord jacket.
- DO replace any strand with frayed wire, cracked sockets, or corroded plugs—even if it still lights up.
- DO unplug lights before adjusting or repairing. Never work on live circuits.
- DON’T use indoor-rated power strips outdoors—even under cover. Moisture ingress causes arcing.
- DON’T exceed 210 feet of total cord length (including light strands) on a single 15-amp circuit. Voltage drop beyond this point causes dimming and overheating at the source end.
- DON’T mix LED and incandescent strands on the same circuit leg. Their differing resistive loads create uneven current draw and stress transformers.
FAQ: Common Staggering Questions Answered
Can I use a smart plug to control staggered strands?
Yes—but only if the smart plug is rated for outdoor use and matches your circuit’s amperage. Most indoor smart plugs max out at 15A/1,800W, but their internal relays aren’t sealed against humidity. For outdoor staggering, use an outdoor-rated smart switch (e.g., Leviton DW15S-1BZ or GE Enbrighten Z-Wave) installed at the outlet box—not plugged in.
How do I stagger lights on a metal roof or gutter without drilling?
Use adhesive-backed, UV-stabilized mounting clips (e.g., Gemmy LightLock or Holiday Coro Grip Clips) rated for -20°F to 150°F. Avoid magnetic clips on aluminum—they lose grip in wind and rain. Space clips every 12–18 inches, and stagger strand entry points by alternating clip rows: top row starts at left, middle row starts 8 inches right, bottom row starts 16 inches right.
What’s the safest way to add more fullness if I’ve hit my circuit limit?
Add a second circuit—not more strands. Hire an electrician to install a dedicated 15-amp GFCI circuit for holiday lighting. Cost averages $350–$600 but pays for itself in safety, reliability, and resale value. It also allows true staggering: one circuit for warm-white perimeter lights, another for cool-white accent strands—controlled independently.
Conclusion: Fullness Is a Function of Planning, Not Power
Staggering Christmas lights for fullness isn’t about cramming more bulbs into the same space—it’s about orchestrating light, electricity, and architecture as interdependent systems. When you stagger thoughtfully, you don’t just avoid overloads; you gain control. Control over brightness gradients, color temperature layers, maintenance access, and seasonal flexibility. You stop fighting your home’s electrical reality and start designing within it. The result isn’t just safer lighting—it’s more intentional, more beautiful, and more joyful. Your neighbors won’t just notice the glow—they’ll sense the care behind it.
Start small this season: pick one area—a doorway, a window frame, a single tree—and apply one staggering pattern with verified load math. Measure your actual circuit draw with a Kill A Watt meter ($25). Document what works. Then expand. Every strand you hang with intention strengthens your confidence—and your home’s holiday spirit.


 浙公网安备
33010002000092号
浙公网安备
33010002000092号 浙B2-20120091-4
Comments
No comments yet. Why don't you start the discussion?