
Hanging Christmas lights on high ceilings can be one of the most frustrating holiday decorating tasks. Traditional methods rely heavily on ladders, which pose safety risks and require multiple people. For homes with vaulted ceilings, cathedral beams, or two-story foyers, reaching the top can feel like an impossible feat. But it doesn’t have to be. With the right tools, techniques, and a bit of ingenuity, you can decorate your tall ceilings safely and efficiently—without stepping foot on a ladder.
This guide explores practical, tested solutions that eliminate the need for unstable platforms while ensuring your lights are evenly spaced, securely fastened, and visually stunning. Whether you're working alone or managing a tight space, these hacks will save time, reduce risk, and deliver professional-looking results.
Why Avoid Ladders? The Hidden Risks
Ladders are commonly used for high-reach tasks, but they come with significant drawbacks—especially during the holidays when distractions abound. According to the U.S. Consumer Product Safety Commission, over 500,000 people visit emergency rooms annually due to ladder-related injuries, many occurring during seasonal decorating.
On tall or sloped ceilings, ladders become even more hazardous. Uneven flooring, slippery surfaces, and overhead obstructions increase instability. Even a minor misstep can lead to falls, damaged property, or tangled light strands that ruin the mood before the party begins.
Beyond safety, ladders are often impractical indoors. They take up floor space, block doorways, and may not extend high enough for cathedral ceilings. For renters or those with delicate flooring, dragging heavy equipment across hardwood or tile is another concern.
“Eliminating ladder use isn’t just about convenience—it’s a critical step in preventing preventable injuries during the holiday season.” — Dr. Alan Pierce, Occupational Safety Specialist
Creative Tools and Techniques for High Ceilings
The key to hanging lights without a ladder lies in extending your reach while maintaining control. Several household and specialty tools can help you achieve this. Below are the most effective options, ranked by accessibility and success rate.
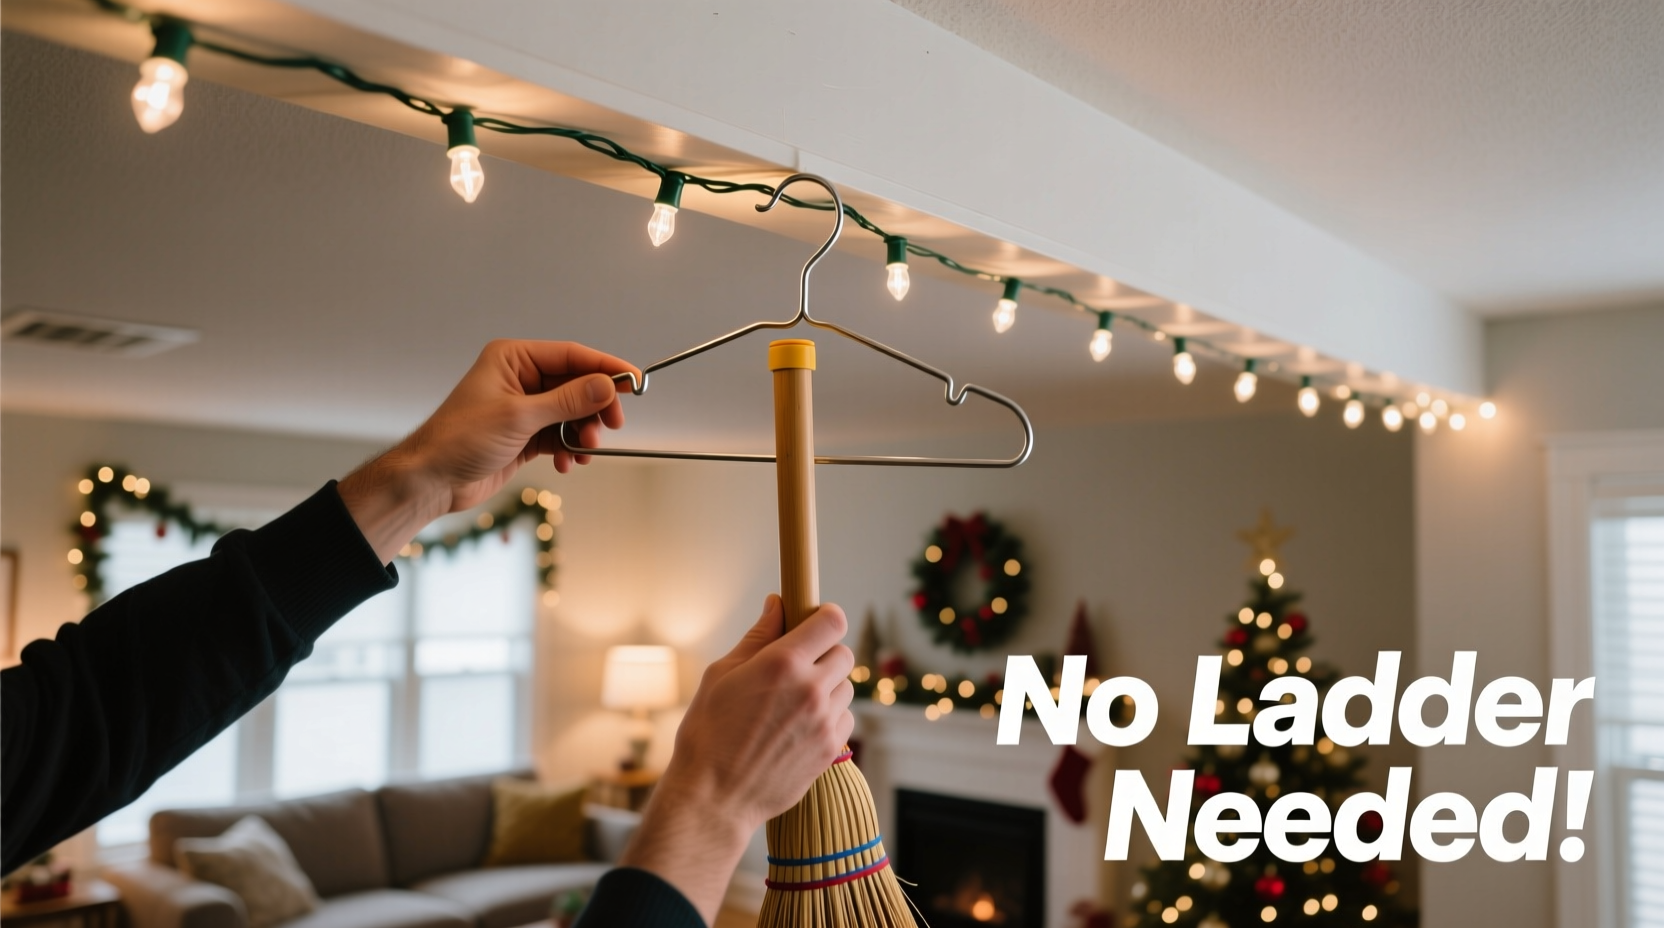
1. Extendable Paint Roller Pole + Attachments
An adjustable paint roller pole (commonly 4–18 feet long) serves as an excellent base for light installation. By removing the roller frame and attaching lightweight hooks or clips, you create a precise tool for guiding wires into place.
To adapt the pole:
- Use a zip tie to secure a plastic S-hook at the end.
- Alternatively, attach a bent wire clothes hanger with strong adhesive tape.
- For tension support, add a small rubber band loop to grip the light strand.
With this setup, you can hook each bulb socket onto crown molding, ceiling beams, or pre-installed anchors from the ground.
2. Magnetic or Adhesive Hooks with Fishing Line
For metal beams or ductwork, magnetic hooks offer a no-drill solution. Pair them with clear fishing line to “pull” light strands into position. Here’s how:
- Attach a small magnet to the end of a fishing line.
- Toss it over the beam or vent cover until it catches.
- Secure the other end of the line to your light strand.
- Gently pull the lights upward and into place.
For non-metal surfaces, use removable adhesive hooks rated for indoor use. These leave no residue and support up to 5 pounds when applied correctly.
3. Drone-Assisted Installation (Advanced)
While unconventional, small indoor drones equipped with grippers or magnets are being used by DIY decorators to drape lights across high spans. Though this method requires practice, it allows pinpoint accuracy without physical strain.
Choose a lightweight drone with obstacle sensors and a stable hover mode. Attach a micro-hook or looped string to its frame, then fly it along the desired path, dropping lines where needed. Once anchor points are set, feed the lights through manually or via pulley.
Note: This technique works best in open, uncluttered spaces and should only be attempted with experience or proper safety measures.
Step-by-Step Guide: Hang Ceiling Lights Without a Ladder
Follow this proven sequence to install Christmas lights safely and efficiently:
- Plan Your Layout
Sketch the path of your lights on paper. Mark starting and ending points, power source location, and any obstacles like fans or chandeliers. - Gather Materials
Collect your lights, extension pole, hooks (magnetic or adhesive), zip ties, fishing line, scissors, and measuring tape. - Test Light Strands
Plug in each strand before installation to ensure all bulbs work. Replace faulty sections early. - Install Anchor Points
Using your pole, place hooks every 12–18 inches along the ceiling edge. For longer runs, add mid-span supports to prevent sagging. - Feed the First Strand
Clip the beginning of the light strand to the first hook. Use the pole to gently push or guide the cord along the route, securing it at each anchor. - Connect Additional Strings
If using multiple strands, connect them end-to-end according to manufacturer guidelines. Avoid exceeding the maximum load for one circuit. - Adjust Spacing and Tension
Walk back through the area to smooth out kinks, align bulbs evenly, and tighten loose sections. - Secure Power Cord
Route the final plug to an outlet using cord clips or baseboard fasteners. Keep walkways clear to prevent tripping hazards.
Comparison: Methods vs. Effectiveness and Safety
| Method | Reach Height | Setup Time | Safety Level | Best For |
|---|---|---|---|---|
| Extendable Pole + Hook | Up to 18 ft | 15–30 min | High | Crown molding, drywall edges |
| Fishing Line & Magnets | Any height | 20–40 min | High | Metal beams, HVAC vents |
| Adhesive Hooks Only | Up to 12 ft | 10–20 min | Medium | Smooth ceilings, temporary decor |
| Drone-Assisted | Unlimited | 45+ min | Medium-High* | Open atriums, complex layouts |
*Requires skill; risk increases in confined spaces.
Real Example: Decorating a Two-Story Foyer Without Assistance
Sarah M., a homeowner in Portland, Oregon, faced the challenge of decorating her 20-foot foyer ceiling each December. With no garage access and narrow staircases, bringing in a ladder was nearly impossible. After years of frustration, she developed a system using a $15 extendable paint pole and adhesive Command™ hooks.
She began by measuring the perimeter of the ceiling trim and cutting her LED string lights to fit. Using the pole, she attached hooks every 15 inches, then fed the strand through like threading a needle. The entire process took under 45 minutes—half the time of previous attempts with a rented ladder.
“I used to dread this task,” she said. “Now I do it solo while listening to holiday music. It’s actually kind of peaceful.”
Essential Checklist for Success
- ✅ Measure ceiling dimensions and plan light layout
- ✅ Test all light strands before installation
- ✅ Choose appropriate hooks (magnetic, adhesive, or mechanical)
- ✅ Use an extendable pole or alternative reach tool
- ✅ Install anchor points at consistent intervals
- ✅ Feed lights smoothly to avoid tangling
- ✅ Secure power cords away from foot traffic
- ✅ Inspect final setup for gaps or loose sections
Frequently Asked Questions
Can I use tape to hang Christmas lights on a high ceiling?
Avoid standard tapes like masking or duct tape—they lose adhesion over time and can damage paint. Instead, use specially designed removable adhesive hooks or products like 3M Command™ strips, which are formulated for temporary mounting and clean removal.
How do I prevent my lights from sagging between anchor points?
Install supports every 12 to 18 inches, especially for heavier incandescent strings. For longer spans, consider adding a thin support wire (like monofilament fishing line) stretched taut between anchors, then clip the lights to it.
Are there fire risks with hanging lights without supervision?
All Christmas lights carry some risk if improperly installed or left on unattended. Use LED lights—they run cooler, consume less energy, and are less likely to overheat. Always follow manufacturer instructions, don’t overload circuits, and use a timer to limit daily operation.
Final Tips for a Flawless Display
Even with the best tools, small details make a big difference. Consider these finishing touches:
- Use uniform light color and bulb size for a cohesive look. Mixing warm white and cool white creates visual inconsistency.
- Hide connectors and plugs behind baseboards or furniture. Cord concealers or raceways blend seamlessly with walls.
- Add dimmers or smart controllers to adjust brightness and create ambiance without physical adjustments.
- Label storage boxes clearly after removal so next year’s setup is just as easy.
“The best holiday displays aren’t the flashiest—they’re the ones that were installed safely, last the full season, and bring joy without stress.” — Rebecca Lin, Interior Stylist & Seasonal Decor Consultant
Conclusion: Decorate Smarter, Not Harder
Hanging Christmas lights on a tall ceiling doesn’t require strength, height, or risky climbs. It requires strategy, the right tools, and a willingness to rethink tradition. By leveraging simple modifications and accessible equipment, you can transform a daunting chore into a manageable, even enjoyable, part of your holiday routine.
Whether you choose an extendable pole, magnetic aids, or a creative hybrid approach, the goal remains the same: a beautiful, safe display that enhances your home without compromising well-being. This season, skip the ladder, protect your floors, and keep both feet firmly on the ground while your lights rise in elegance.


 浙公网安备
33010002000092号
浙公网安备
33010002000092号 浙B2-20120091-4
Comments
No comments yet. Why don't you start the discussion?