
Arriving at the office only to realize you forgot your tie—or worse, that it’s wrinkled and unusable—can throw off even the most composed professional. Whether you're rushing to a client presentation, an impromptu boardroom meeting, or a video call with senior leadership, knowing how to tie a tie quickly and correctly is more than a grooming skill—it's a confidence booster. The good news: with the right technique, a little practice, and some smart preparation, you can master this essential task in under 30 seconds.
This guide walks you through the fastest, most reliable method for tying a necktie on short notice. From choosing the right knot to avoiding common mistakes, we’ll cover everything you need to maintain a polished appearance—even when time is not on your side.
The Four-in-Hand Knot: Your Go-To for Speed and Simplicity
When speed matters, the four-in-hand knot is unmatched. Originating in 19th-century England among horsemen who used it to secure their cravats while riding, it’s now the most widely used tie knot in the world—and for good reason. It’s asymmetrical, sleek, and requires only four simple motions to complete. Unlike bulkier knots like the Windsor or half-Windsor, the four-in-hand lies flat against the collar and takes less than half the time to tie.
The knot works best with standard-width ties (3–3.5 inches) and pairs well with spread or point collars. Because it’s slightly narrower at the base, it’s ideal for individuals with slimmer builds or those wearing tailored dress shirts. Its simplicity makes it perfect for beginners, but its clean finish ensures it never looks amateurish.
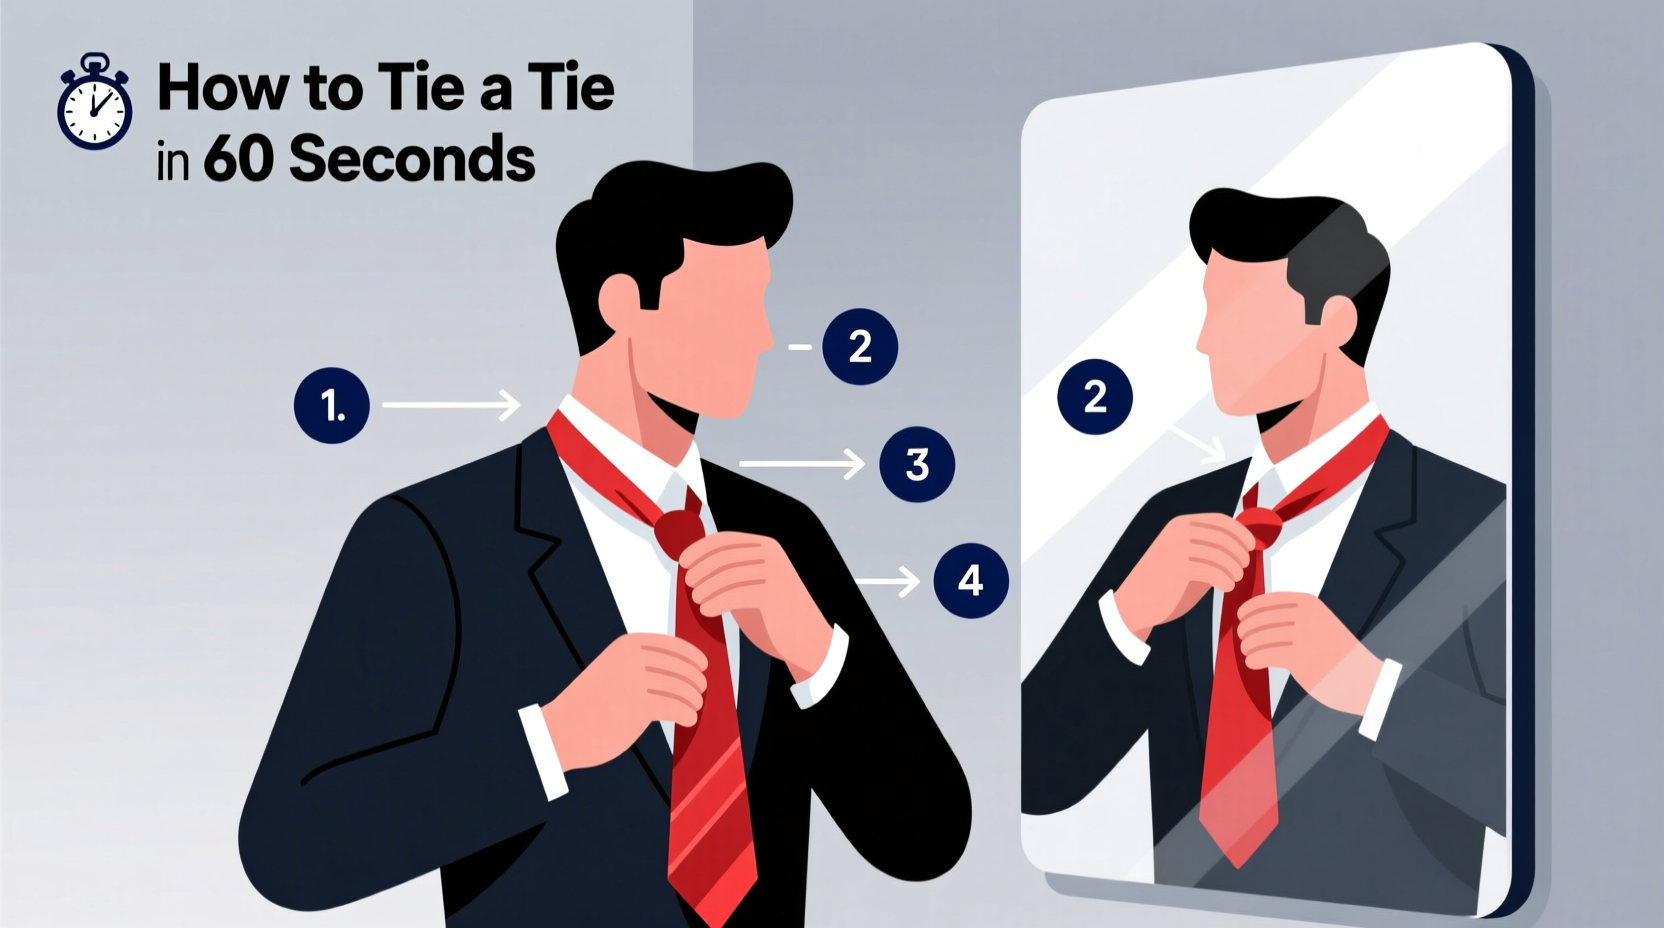
Step-by-Step Guide: Tying a Tie in Under 30 Seconds
Follow this streamlined sequence to tie a flawless four-in-hand knot quickly and efficiently. With repetition, this process becomes second nature.
- Start with the wide end on your right. Drape the tie around your neck with the wide end extending about 12 inches below the narrow end. Adjust this length based on your height and tie length—taller individuals may need the wide end lower.
- Cross the wide end over the narrow end. Bring it horizontally across the front to form an “X” just below your chin.
- Loop the wide end behind the narrow end. Pull it upward through the neck loop from underneath, keeping tension light.
- Bring the wide end down through the front loop. Guide it straight down through the triangle formed between your collar and the tie.
- Tighten and adjust. Hold the knot gently with one hand and pull the narrow end downward with the other to slide the knot up into place. Use your index finger to shape the dimple just below the knot for a crisp look.
With smooth, deliberate movements, this entire process should take no more than 25 seconds. The key is minimizing hesitation between steps—each motion flows naturally into the next.
“Speed comes from muscle memory, not complexity. The fastest professionals don’t use fancy knots—they perfect the basics.” — James Reed, Executive Image Consultant
Preparation Tips for Last-Minute Success
No amount of skill can compensate for a wrinkled, tangled tie pulled from the back of a drawer. Being ready for unexpected meetings starts long before you’re in front of the mirror. Smart preparation reduces decision fatigue and saves precious minutes.
Keep a Pre-Tied Emergency Tie
One of the most effective time-savers is having a pre-tied tie ready to go. Choose a conservative color—navy, charcoal, or burgundy—in a silk or microfiber blend. Fold it neatly and store it in a small garment bag inside your work bag or desk drawer. When needed, simply drape it around your neck and fasten the clip or hook at the back. While purists may object, modern pre-tied ties are nearly indistinguishable from hand-tied versions when worn under a jacket.
Use a Tie Rack or Roll Method for Wrinkle Prevention
Folding ties loosely in drawers causes creases that take time to steam out. Instead, hang them on a wooden or padded tie rack, or roll them from end to end like a scroll. This preserves their shape and allows for quick selection. If you must fold, do so along natural seams and avoid sharp bends.
Label Ties by Occasion
Create a simple system: designate one tie for “urgent meetings,” another for “client presentations,” and a third for “daily wear.” Attach discreet tags or store them in labeled pouches. This eliminates decision-making during high-pressure moments.
Do’s and Don’ts of Quick Tie-Tying
Avoiding common pitfalls ensures your rushed effort still looks intentional and professional. The table below outlines critical behaviors to adopt and avoid.
| Do’s | Don’ts |
|---|---|
| Ensure the tip of the wide end reaches the center of your belt buckle | Let the tie hang too short or too long |
| Use a dimple to add structure just below the knot | Leave the front panel of the tie flat and lifeless |
| Check symmetry in a full-length mirror if possible | Assume the knot is straight without verifying |
| Smooth out wrinkles with your palms after tying | Pull the knot too tight, causing shirt collar distortion |
| Practice tying with one hand free (simulate holding coffee or documents) | Rush so much that the knot ends up crooked or loose |
Real-World Example: The 7:45 AM Crisis
Consider Mark, a project manager at a mid-sized tech firm. One Tuesday, his alarm failed, and he woke up at 7:45 a.m.—just 15 minutes before a mandatory 8:00 a.m. executive review. He threw on his shirt, splashed water on his face, and reached for his tie. Instead of fumbling, he followed a routine he’d practiced for two weeks: grab the navy tie from his tie roll, drape it, and execute the four-in-hand in 22 seconds. He adjusted the collar, smoothed the lapels, and walked into the conference room at 7:58 a.m. No one noticed he’d barely made it—he only registered as punctual, put-together, and prepared.
Mark’s success wasn’t luck. It was the result of anticipating chaos and preparing accordingly. His ability to tie a tie quickly under pressure didn’t just save his morning—it reinforced his reputation as someone who remains calm and capable when deadlines loom.
FAQ: Common Questions About Fast Tie-Tying
Can I tie a tie one-handed?
Yes, with practice. The four-in-hand can be tied using only one hand by anchoring the narrow end with your elbow or tucking it under your arm. This is useful when holding a briefcase, coffee, or phone. Focus on controlling the wide end with precision, and rely on tactile feedback to guide the loops.
How do I prevent my tie from twisting throughout the day?
Twisting often occurs when the tie isn’t properly aligned during the initial drape. Before starting, ensure the back seam runs straight down the center of your neck. Also, check that the fabric isn’t folded over itself. A twist-free tie stays in place longer and maintains a clean silhouette.
Is the four-in-hand appropriate for formal meetings?
Absolutely. While the full Windsor is traditionally seen as more formal, the four-in-hand is universally accepted in corporate environments, especially when paired with a well-fitted suit and crisp shirt. Its moderate size and elegant taper convey professionalism without appearing overly rigid.
Expert-Approved Checklist for Last-Minute Tie Readiness
Stay prepared with this actionable checklist. Review it weekly to ensure you’re always meeting-ready.
- ✅ Keep at least one emergency tie pre-rolled and stored in your work bag
- ✅ Practice the four-in-hand knot until it takes under 25 seconds
- ✅ Store ties vertically or rolled—not folded in drawers
- ✅ Verify tie length: wide end should hit the middle of your belt
- ✅ Maintain a lint roller or wrinkle-release spray in your desk
- ✅ Iron or steam ties in advance, not on the same day
- ✅ Wear button-down collar shirts—they keep ties aligned with less adjustment
“The difference between looking rushed and looking rushed but competent often comes down to one detail: the tie. Get it right, and you command the room.” — Lila Chen, Corporate Etiquette Trainer
Conclusion: Turn Pressure into Presence
Knowing how to tie a tie quickly isn’t about mastering a complex ritual—it’s about reclaiming control in unpredictable moments. In the world of business, appearances shape perceptions, and perception influences opportunity. A neatly tied tie signals attention to detail, self-respect, and respect for the occasion, even when time is against you.
By adopting the four-in-hand knot, preparing in advance, and practicing consistently, you transform what could be a stressful scramble into a moment of quiet confidence. You don’t need perfection—just readiness. Start today: pick your go-to tie, tie it once slowly, then again faster. Repeat tomorrow. Within a week, you’ll have a skill that serves you for decades.


 浙公网安备
33010002000092号
浙公网安备
33010002000092号 浙B2-20120091-4
Comments
No comments yet. Why don't you start the discussion?