
Every holiday season begins with the same frustrating ritual: pulling out last year’s Christmas lights only to find them knotted into an impossible mess. No matter how carefully you thought you stored them, one twist turns into ten, and before long, you’re spending more time wrestling wires than decorating. But there is a better way—one that doesn’t involve cutting, cursing, or giving up entirely. The coat hanger method for untangling Christmas lights is a game-changer. It’s fast, reliable, and uses nothing more than a simple wire hanger and a little patience. This guide walks you through exactly how it works, why it’s effective, and how to avoid tangles next year.
Why Christmas Lights Tangle So Easily
Christmas lights are prone to tangling not because of bad luck, but due to their physical design and storage habits. Long, flexible wires with multiple bulbs create countless opportunities for loops and knots. When packed loosely in a box or stuffed into a bag, even slight movement during storage can cause sections to cross over each other. Once a single knot forms, it tightens as more wire feeds through—like a ratchet mechanism. Over time, this creates dense clusters that resist traditional untangling methods.
Most people try to pull knots apart by hand, which often makes things worse. Yanking on the wire pulls the knot tighter, especially if bulbs get caught in the center. Without a systematic approach, you're left picking at snarls under the tree, wasting precious prep time. The key isn’t brute force—it’s structure. That’s where the coat hanger method comes in.
The Science Behind the Coat Hanger Method
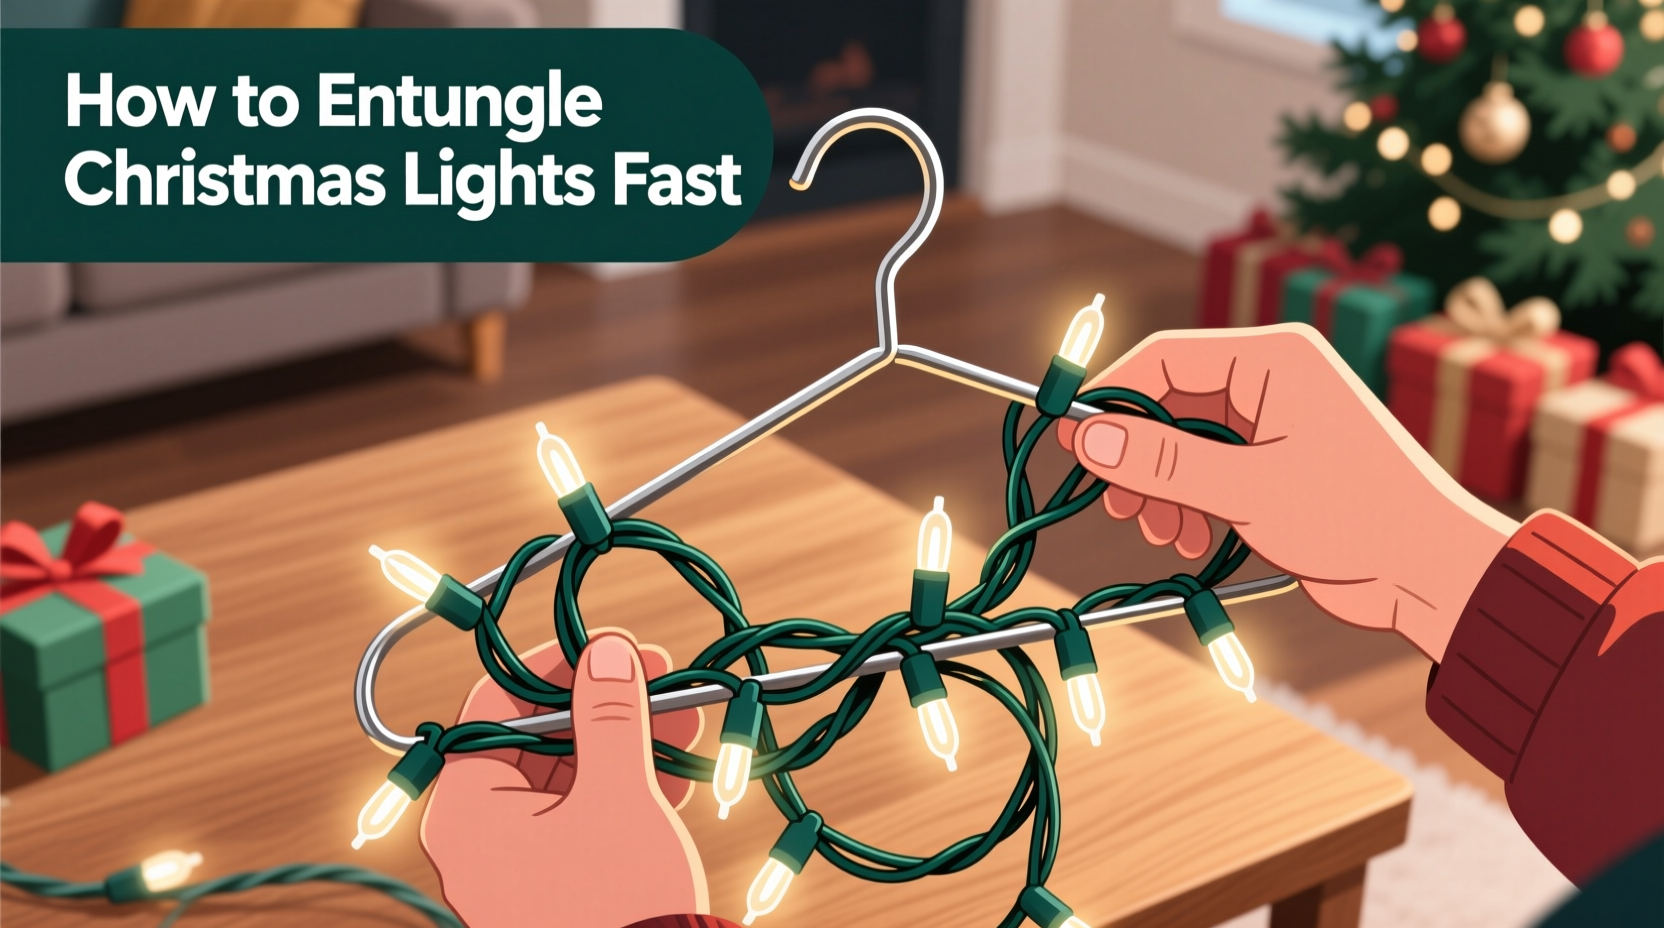
The coat hanger method works because it introduces order to chaos. Instead of letting the entire strand move freely, this technique anchors the lights along a rigid frame, allowing you to isolate and resolve tangles one section at a time. A standard wire coat hanger, when straightened slightly, becomes a makeshift spool that holds the strand in place while you work.
By clipping or looping the light strand onto the hanger at regular intervals, you prevent new knots from forming as you untangle existing ones. Each segment remains fixed, so tension is localized. This eliminates the “domino effect” where fixing one knot accidentally creates two more. Think of it like organizing a tangled garden hose—you wouldn’t try to unkink it while it’s sprawled across the yard. You’d lay it out straight first. The coat hanger does the same for lights.
“Controlled tension is the secret to efficient detangling. Fix one end, manage the middle, and feed the rest slowly.” — Dr. Alan Reeves, Mechanical Engineer and Holiday Decor Specialist
Step-by-Step Guide: How to Untangle Christmas Lights Using a Coat Hanger
This method takes 15–30 minutes depending on severity, but saves hours compared to random pulling. Follow these steps precisely for best results.
- Gather your tools: One wire coat hanger (preferably metal), a pair of gloves (optional, for grip), and a flat workspace like a table or floor.
- Straighten the hanger slightly: Unbend the hook portion just enough to allow easy threading, but leave a small curve at the top to prevent slippage. Do not fully straighten—it needs shape to function.
- Locate the end of the light strand: Find the male plug (the one that goes into the outlet). This will be your starting point. If both ends look similar, check for a fuse compartment—that’s usually on the male end.
- Clip the plug onto the hanger: Hook the plug’s base over the bottom of the hanger. Let the weight of the plug keep it secure.
- Begin feeding the lights upward: Holding the strand just above the plug, gently pull a few inches of wire and loop it over the hanger shaft. Keep each loop loose—not tight.
- Work slowly toward the first knot: As you feed the strand, stop when you reach resistance. Do not force it. This is where the tangle begins.
- Isolate the knot: Leave about 6 inches of slack below the tangle and another 6 inches above. Pinch those points between fingers or use clips to hold them in place on the hanger.
- Manipulate the knot by hand: Use your fingers to gently push, roll, or loosen the strands within the knot. Look for the outermost loop and reverse its path. Avoid pulling—instead, nudge wires back along the route they came.
- Resume looping once clear: After the knot is undone, continue feeding the strand up the hanger in loose loops until you hit the next obstruction.
- Repeat until finished: Continue isolating and resolving tangles. Most strands have 1–3 major snarls. Smaller twists often unravel naturally as tension releases.
- Finish at the female end: Once you reach the opposite plug, secure it to the hanger with a final loop. Now the entire strand is organized and tangle-free.
Real Example: From Frustration to Fast Fix
Last December, Sarah M., a schoolteacher from Vermont, faced her usual post-storage nightmare: three strands of C7 lights hopelessly knotted after being stored in a cardboard box. She’d tried the hand-pull method for 45 minutes, only making it worse. On a friend’s recommendation, she tried the coat hanger method. Using an old metal hanger from her closet, she clipped the plug and began feeding the wire upward. Within 20 minutes, all three strands were completely untangled. “I couldn’t believe it,” she said. “The first knot took five minutes, but once I got the rhythm, the others fell apart almost on their own. I used the same hanger to rewrap them neatly afterward. Best $0 fix I’ve ever made.”
Do’s and Don’ts of Christmas Light Maintenance
| Do | Don’t |
|---|---|
| Use a coat hanger or cardboard reel to wrap and store lights | Stuff lights into bags or boxes without securing them |
| Label each strand by location (e.g., “front porch”) after testing | Mix working and non-working strands together |
| Check for frayed wires or cracked bulbs before storing | Store damp or wet lights (risk of mold and short circuits) |
| Untangle in a well-lit, open area with space to spread out | Try to untangle lights while standing or in cramped spaces |
| Use zip ties or velcro straps (not tape or rubber bands) to bundle | Secure lights with materials that degrade or stretch over time |
How to Store Christmas Lights So They Stay Tangle-Free
Prevention is far easier than correction. Once your lights are untangled, store them properly to avoid repeating the process next year. The coat hanger can double as a storage tool.
- Re-wrap using the hanger: After untangling, leave the strand on the hanger and rewind it in consistent loops from top to bottom.
- Secure the ends: Use a twist tie or velcro strap to hold the female plug against the coil. Wrap the excess cord neatly around the hanger neck.
- Hang vertically in storage: Place the hanger in a closet or garage. Vertical hanging prevents pressure points and keeps the shape intact.
- Or transfer to a dedicated reel: For long-term durability, consider transferring lights to a plastic light-reel organizer. These are designed for seasonal storage and protect against crushing.
FAQ: Common Questions About Untangling Christmas Lights
Can I use a plastic coat hanger for this method?
Plastic hangers are less ideal because they can bend or snap under tension. Metal wire hangers are sturdier and provide smoother gliding for the lights. If you must use plastic, reinforce it with tape at stress points.
What if my lights are already broken or flickering?
Test your strand after untangling. Plug it into an outlet to check for dark sections. If part of the strand doesn’t light, the issue may be a loose bulb, blown fuse, or internal wire break. Replace fuses first (usually located in the male plug), then inspect each bulb. Resolving electrical issues is separate from physical tangles, but doing both at once saves time later.
Will this method work for LED lights too?
Absolutely. In fact, LED strands are often thinner and more flexible, making them even more prone to tangling. The coat hanger method works identically regardless of bulb type. Just handle delicate LED wires with extra care to avoid kinking.
Essential Checklist: Mastering the Coat Hanger Method
Keep this checklist handy when tackling tangled lights:
- ✅ Find the male plug end of the strand
- ✅ Straighten a wire coat hanger slightly (keep the hook)
- ✅ Clip the plug onto the bottom of the hanger
- ✅ Feed the strand upward in loose loops
- ✅ Stop at each knot and isolate it with slack
- ✅ Gently manipulate the knot—do not pull hard
- ✅ Resume looping once the section is clear
- ✅ Secure the final end once fully untangled
- ✅ Test the strand for functionality
- ✅ Rewrap neatly on the hanger for storage
“The coat hanger trick is low-tech but brilliant. It gives you control, visibility, and leverage—all missing when you’re just tugging blindly.” — Marcus Lin, Home Organization Consultant
Conclusion: Save Time, Stress, and Holiday Spirit
Untangling Christmas lights doesn’t have to be an annual battle. With the coat hanger method, you transform a chaotic chore into a manageable, even meditative task. It’s not magic—just smart mechanics applied to a common problem. What matters most is consistency: use this method now, store your lights properly, and next December, you’ll plug them in and walk away, lights glowing perfectly. No fuss, no frustration. That’s the real gift of preparation.


 浙公网安备
33010002000092号
浙公网安备
33010002000092号 浙B2-20120091-4
Comments
No comments yet. Why don't you start the discussion?