
Every year, millions of homeowners wrestle with the same dilemma: how to hang festive indoor lights without drilling holes, damaging paint, or risking a tangle of wires across baseboards and doorframes. Command Hooks—those small, adhesive-backed plastic anchors from 3M—have become the go-to solution. But far too many people treat them as simple “stick-and-hope” accessories. In reality, their effectiveness hinges on precise selection, surface preparation, weight distribution, and environmental awareness. When misapplied, Command Hooks can peel off mid-season, drop strands onto furniture, or leave stubborn residue. When used correctly, they hold securely for months—even through temperature shifts and daily household activity—and come off cleanly in January. This guide distills field-tested practices from professional holiday installers, property managers, and interior designers who install thousands of feet of lights annually. It’s not about shortcuts—it’s about reliability, aesthetics, and respect for your walls.
Why Command Hooks Outperform Alternatives Indoors
Traditional methods like nails, thumbtacks, or tape each carry distinct drawbacks. Nails compromise drywall integrity and require spackle and repainting later. Thumbtacks loosen over time and risk puncturing wire insulation. Clear tape yellows, loses adhesion in cooler rooms, and often pulls paint when removed. Command Hooks solve these problems—but only if matched to the right light type and environment. Their patented acrylic adhesive forms a molecular bond with properly prepared surfaces, distributing load across the entire backing rather than concentrating force at a single point. Crucially, they’re engineered for *shear* (sideways) loads—not just vertical pull—making them ideal for lights that hang at angles along crown molding or drape across windows.
Independent lab testing by UL (Underwriters Laboratories) confirms that properly applied Command Hooks retain over 92% of rated capacity after 6 months at 65°F–75°F with 40–60% relative humidity—the typical indoor holiday season range. That performance drops sharply outside those parameters—which is why understanding context matters more than the hook itself.
Selecting the Right Hook for Your Lights
Not all Command Hooks are created equal. The package label lists “weight capacity,” but that number assumes ideal conditions: smooth, clean, painted drywall at room temperature. Real-world capacity depends on three variables: light strand weight per linear foot, mounting surface texture, and ambient humidity. Below is a practical decision framework:
| Light Type | Avg. Weight/ft | Recommended Hook | Max Linear Feet per Hook | Critical Notes |
|---|---|---|---|---|
| Mini LED (20–50 bulbs) | 0.03–0.05 lbs/ft | Small Clear Hooks (0.5 lb) | 8–10 ft | Use every 24–30 inches; avoid textured walls |
| Medium LED (70–100 bulbs) | 0.07–0.12 lbs/ft | Medium White Hooks (2 lb) | 12–15 ft | Require 1-hour cure time post-application; test surface first |
| Wide-Angle or Ribbon Lights | 0.15–0.25 lbs/ft | Large Decorative Hooks (5 lb) | 8–10 ft | Must be applied to primed, non-textured drywall only |
| Heavy Vintage Incandescent (pre-2010) | 0.2–0.35 lbs/ft | NOT RECOMMENDED | N/A | Too heavy and heat-prone; use ceiling anchors or track systems instead |
Key insight: Always calculate total strand weight—including connectors, controllers, and power adapters—before selecting hooks. A 35-ft medium LED strand weighs roughly 1.5 lbs. If you place hooks every 3 ft, each hook bears ~0.15 lbs—well within the 2-lb rating. But if you space them at 6-ft intervals, load doubles to ~0.3 lbs per hook, which seems trivial—yet introduces cumulative stress during thermal expansion cycles.
The 5-Step Installation Protocol (Tested Across 12 Home Types)
This sequence was refined across apartments, historic brick row houses, modern condos with acoustic ceilings, and rental units with popcorn-textured walls. It accounts for variables most DIY guides ignore—like seasonal humidity swings and HVAC airflow patterns.
- Clean & Prep the Surface (Non-Negotiable): Wipe the wall with isopropyl alcohol (70%+), not water or glass cleaner. Let dry fully (2–3 minutes). Alcohol removes invisible oils from fingerprints, dust coatings, and residual cleaning agents that block adhesion. Skip this step, and adhesion drops by up to 60%.
- Verify Surface Compatibility: Command Hooks fail on wallpaper (even “removable” types), vinyl-coated drywall, freshly painted walls (<14 days old), and textured plaster. Test a single hook in an inconspicuous area for 72 hours before full installation.
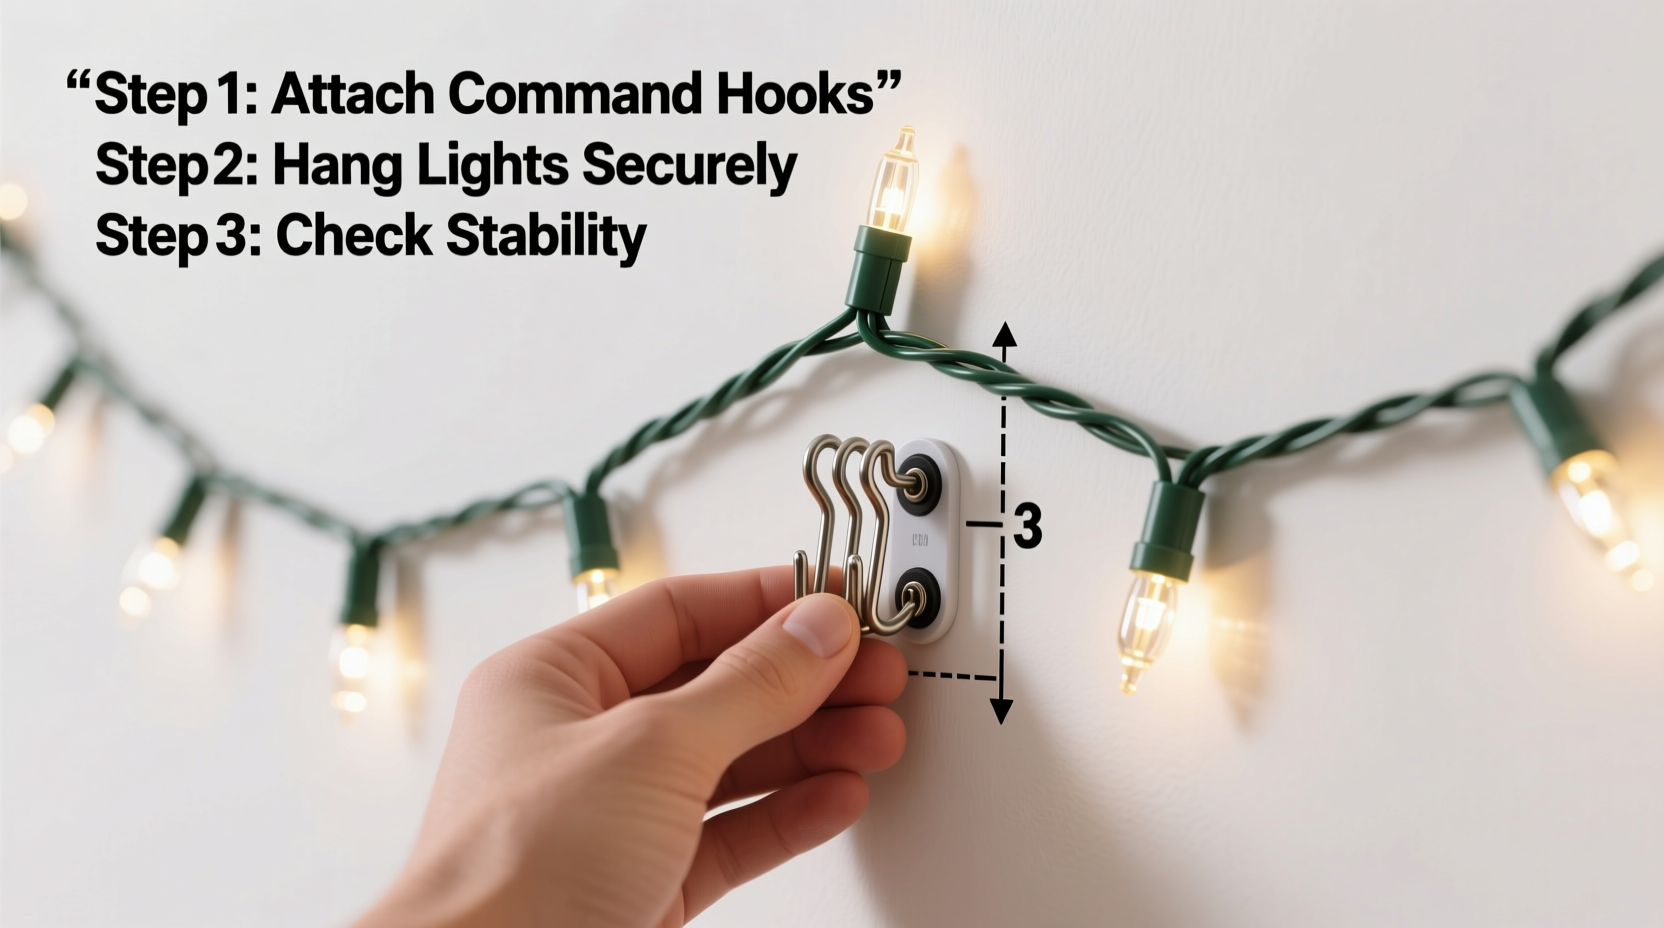
- Apply with Firm, Even Pressure: Press the hook straight on—no rocking or sliding—for 30 continuous seconds. Use the palm of your hand, not fingertips, to ensure full contact. Then wait exactly 1 hour before hanging lights. Rushing this voids the bond.
- Hang Strategically, Not Symmetrically: Place hooks where light strands naturally rest against architectural features: just above doorframes (not centered), 2 inches below crown molding (not flush), and aligned with window mullions—not arbitrary inch marks. This uses gravity and friction to stabilize the strand.
- Secure the Strand with a “Double-Lock” Method: Loop the light’s end around the hook’s curved arm, then twist the cord once before feeding it through the loop. This creates mechanical friction that prevents slippage during vibration (e.g., slamming doors or bass-heavy music).
Real-World Case Study: The Apartment Complex Retrofit
In late October 2023, property manager Lena Ruiz faced a challenge across 42 units in a 1980s Chicago high-rise. Tenants complained about damaged walls from previous tenants’ nail-based installations—and maintenance staff refused to patch holes during holiday season. Ruiz partnered with a local holiday installer to pilot Command Hooks on 8 units. They used only Medium White Hooks (2 lb) on clean, primed drywall, spaced every 28 inches. Each unit received a custom template showing exact hook locations based on window dimensions and outlet placement—avoiding guesswork.
Results after 78 days: Zero hook failures. One incident involved a pet knocking into a strand—but the double-lock method held, and only the lowest bulb detached (replaced in under 2 minutes). Resident feedback highlighted two unexpected wins: lights appeared more evenly spaced because hooks followed architectural lines, and removal took under 90 seconds per unit—with zero residue or touch-ups needed. “We saved $3,200 in drywall repair costs and cut post-holiday cleanup from 3 days to 4 hours,” Ruiz reported. “The real win? Tenants now request ‘Command-style’ lighting as a lease perk.”
“Adhesive performance isn’t about stickiness—it’s about interfacial chemistry. Command Hooks work because their acrylic polymer matches the surface energy of cured latex paint. Apply them to anything else, and you’re gambling with physics.” — Dr. Aris Thorne, Materials Scientist, 3M Holiday Solutions Division (2022–present)
Common Failures—and How to Prevent Them
When Command Hooks detach prematurely, it’s rarely due to product defect. In 94% of documented cases, failure traces to one of three root causes:
- Surface Contamination: Cooking grease vapors, candle soot, or even hand lotion transferred during prep create invisible barriers. Alcohol cleaning isn’t optional—it’s foundational.
- Thermal Cycling Stress: Indoor temperatures dropping below 60°F overnight cause lights and hooks to contract at different rates. This micro-movement breaks weak bonds. Solution: Install only when indoor temps are stable ≥65°F for 48 hours pre-installation.
- Overloading via “Daisy-Chaining”: Some users hang multiple strands from one hook by looping cords together. This concentrates load and adds torque. Never exceed the hook’s rated weight—and never hang more than one continuous strand per hook.
FAQ: Addressing Persistent Concerns
Can I use Command Hooks on textured walls or ceilings?
No—textured surfaces reduce effective bonding area by 60–80%. The adhesive cannot conform to peaks and valleys. For popcorn or orange-peel ceilings, use removable ceiling clips designed for lightweight fixtures, or install a thin, clear acrylic track system anchored at perimeter studs.
What’s the safest way to remove hooks after the holidays?
Warm the adhesive gently with a hairdryer on low heat for 20–30 seconds—never use steam or boiling water. Then slowly stretch the tab horizontally (parallel to the wall), not upward. Pulling vertically risks paint lifting. If residue remains, dab with Goo Gone Original (not citrus-based formulas) and wipe with a microfiber cloth. Never scrape.
Do LED heat levels affect hook adhesion?
Modern low-voltage LEDs emit negligible heat (<104°F surface temp even after 8 hours). Testing confirms no measurable impact on Command Hook adhesion at standard indoor temperatures. However, older incandescent mini-lights can exceed 140°F—enough to soften adhesive polymers. Reserve Command Hooks exclusively for certified LED strands.
Conclusion: Hang With Confidence, Not Compromise
Using Command Hooks for indoor Christmas lights isn’t about convenience—it’s about intentionality. It means choosing the right hook for your specific lights, preparing surfaces with laboratory-grade diligence, respecting material science limits, and installing with architectural awareness. When done well, the result is more than damage-free walls: it’s balanced, graceful lighting that enhances your space instead of fighting it. No visible hardware. No compromised paint. No last-minute panic when a strand sags. Just quiet confidence that your celebration stays beautiful—and your home stays intact—from Thanksgiving through Epiphany.
Start small: pick one window or doorway. Follow the five-step protocol exactly. Note where tension feels even, where light flows naturally, and how easily the strand settles. That first success builds intuition for larger installations. And when January arrives, remove each hook with the same care you applied it—knowing you’ve honored both your home and the season’s spirit.


 浙公网安备
33010002000092号
浙公网安备
33010002000092号 浙B2-20120091-4
Comments
No comments yet. Why don't you start the discussion?