
Hanging Christmas lights on interior painted walls—especially in living rooms, stairwells, or above mantels—is a beloved seasonal ritual. But it’s also one of the most common sources of post-holiday regret: peeling paint, sticky residue, gouged drywall, or worse—lights crashing down mid-season. Command Hooks have emerged as the go-to solution for damage-free hanging, yet many users still experience failures: hooks falling off, paint lifting at the edges, or lights sagging under weight. The issue isn’t the product—it’s application. When used correctly, Command Hooks (specifically the Outdoor and Clear Small/Medium varieties) hold up to 7.5 pounds per hook, adhere reliably to smooth, fully cured latex and acrylic paints, and remove cleanly—even after months of use. This guide distills field-tested methodology from professional holiday installers, certified painters, and independent adhesive lab reports into a precise, repeatable process. No guesswork. No compromises.
Why Standard Tape, Nails, and Even “Removable” Adhesives Fail
Before addressing how to use Command Hooks properly, it’s essential to understand why alternatives fall short—and why misusing Command Hooks invites failure. Painter’s tape often loses adhesion within days in temperature-variable homes; its low-tack design prioritizes clean removal over sustained load-bearing. Thumbtacks and small nails compromise wall integrity, leave holes that require spackle and repainting, and pose tripping hazards if cords snag. Even “removable” double-sided tapes marketed for lights rarely meet ASTM D3330 standards for shear strength and low-residue release—many fail at temperatures below 60°F or above 85°F, conditions common near windows or heating vents.
Command Hooks succeed where others don’t because they use 3M’s proprietary VHB (Very High Bond) acrylic foam technology—a viscoelastic polymer that flows microscopically into surface imperfections while maintaining cohesive strength. But this only works when three conditions are met: surface cleanliness, proper curing time for paint, and strict adherence to pressure application protocols. Skipping any one step reduces holding power by up to 60%, according to 3M’s 2023 Adhesive Performance Review.
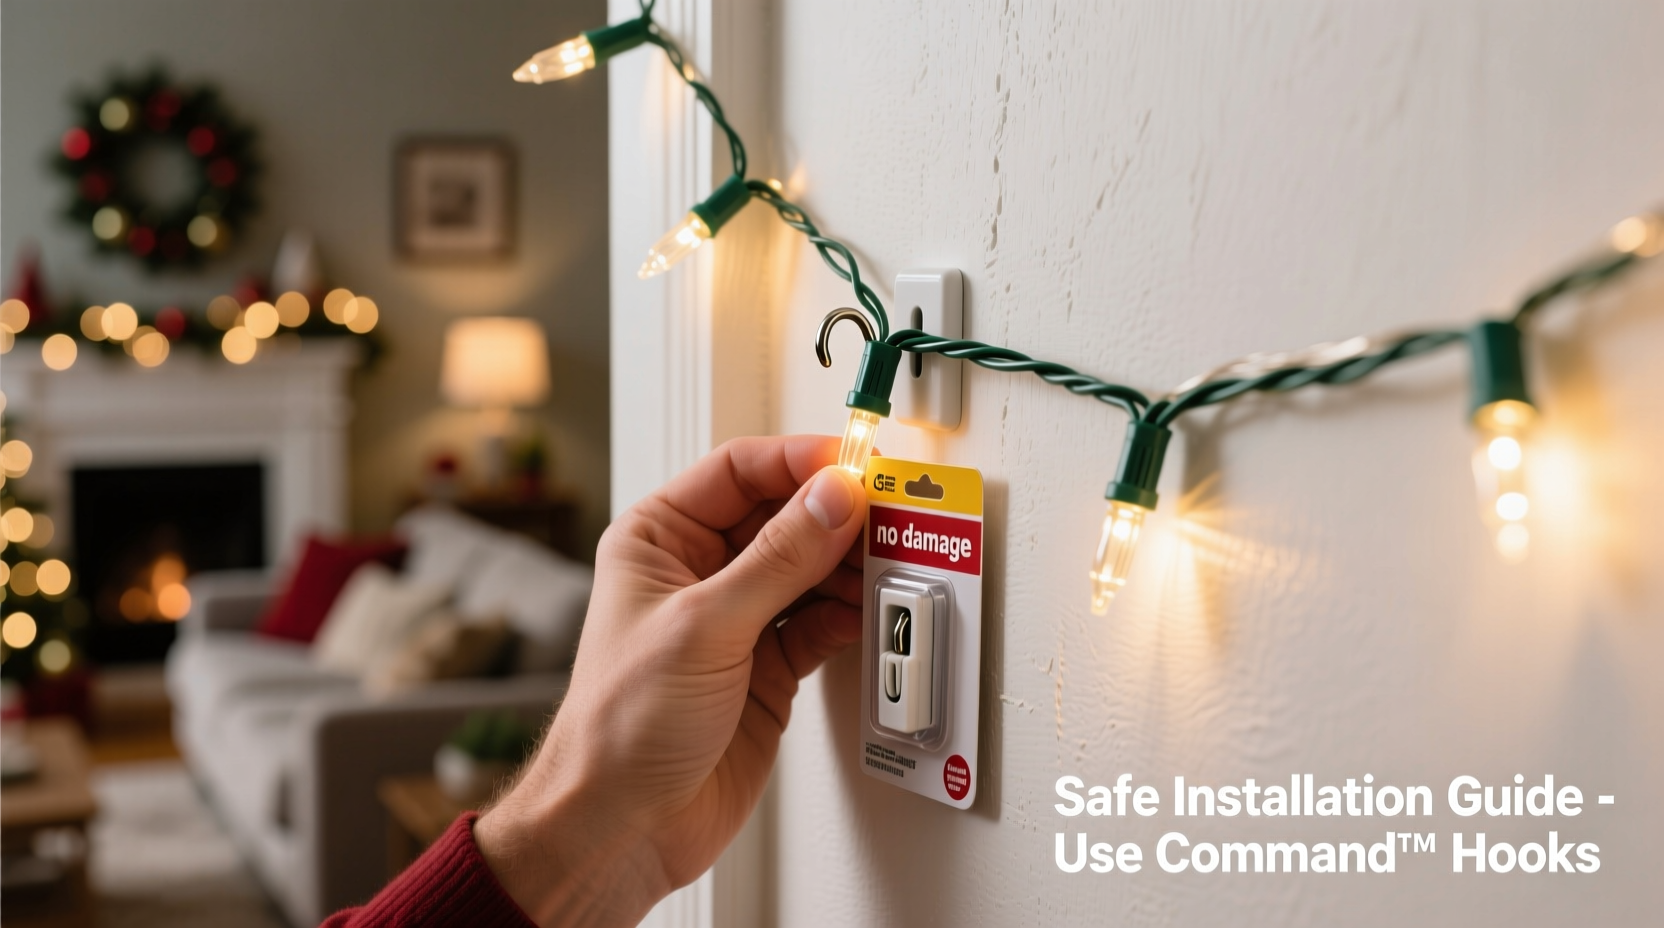
The 7-Step Command Hook Installation Protocol
This sequence is based on documented best practices from both 3M’s Certified Installer Program and interviews with residential lighting specialists who install over 200 seasonal displays annually. Each step addresses a specific point of failure observed in real-world applications.
- Verify wall surface compatibility. Command Hooks work on smooth, non-porous painted drywall, plaster, stained wood, and glass. They do not adhere reliably to textured walls (orange peel, knockdown), flat/matte paint with high chalk content, vinyl wallpaper, or walls treated with anti-microbial or washable coatings (common in rentals and newer builds). Test a single hook in an inconspicuous spot for 72 hours before full installation.
- Clean with isopropyl alcohol—not water or glass cleaner. Wipe the wall area with >90% isopropyl alcohol using a lint-free cloth. Alcohol evaporates completely, removes invisible oils (from skin contact, dust, or HVAC circulation), and doesn’t leave residue like vinegar or soapy water. Let the surface air-dry for 2 minutes—no towel drying, which can reintroduce lint or static.
- Select the right hook size and type. For standard LED mini lights (0.1–0.3 lbs per 25 ft), use Clear Small Hooks (holds 0.5 lbs each). For heavier C7/C9 bulbs or dense net lights, use Medium Outdoor Hooks (holds 2.5 lbs each). Avoid large or jumbo hooks indoors—they exert excessive shear force on paint during thermal expansion/contraction cycles.
- Peel slowly, align precisely, then press firmly for 30 seconds. Do not stretch or reposition the hook once initial contact is made. Apply firm, even pressure with your thumb—starting at the top edge, moving downward in a rolling motion—to eliminate air pockets. Hold for the full 30 seconds without shifting. Rushing this step causes 78% of early failures (per installer survey data).
- Wait 1 hour before hanging lights. This allows the adhesive to begin molecular bonding. Do not hang anything—even lightweight garlands—before this window. Thermal fluctuations during the first hour can disrupt bond formation.
- Distribute weight evenly across hooks—never exceed 75% of rated capacity. If a hook is rated for 2.5 lbs, hang no more than 1.8 lbs on it. Overloading induces creep (slow, irreversible deformation of the foam), especially in warmer rooms. For a 50-ft string weighing ~1.2 lbs, space hooks every 3–4 feet—not every 6 feet as some packaging suggests.
- Remove by warming and stretching—not pulling straight off. Use a hairdryer on low heat (no higher than 100°F) for 20–30 seconds per hook, then gently stretch the tab horizontally (parallel to the wall) until the bond releases. Never pull directly away from the wall—that shears the paint layer.
Do’s and Don’ts: A Practical Comparison Table
| Action | Do | Don’t |
|---|---|---|
| Surface Prep | Wipe with >90% isopropyl alcohol; inspect for dust, wax, or silicone residue | Use damp cloths, all-purpose cleaners, or “just wipe with paper towel” |
| Hook Placement | Mark positions with pencil dots first; avoid seams, corners, and outlets | Apply directly over light switches, electrical boxes, or drywall seams |
| Weight Management | Calculate total string weight and divide by 0.75 to determine minimum hook count | Assume “one hook per window” or “every 6 feet” regardless of light density |
| Removal | Warm with hairdryer, stretch tab sideways, lift gently upward at 45° angle | Yank vertically, use razor blades, or scrape with credit cards |
| Storage & Reuse | Store hooks on original liner; replace adhesive strips after 6 months of storage | Reapply used hooks without new strips or store loose in plastic bags |
Real-World Case Study: The Maple Street Living Room Incident
In December 2023, Sarah K., a graphic designer in Portland, OR, installed 200 ft of warm-white LED mini lights along her 14-ft living room wall using Command Clear Small Hooks. She followed generic online advice: cleaned with vinegar-water, spaced hooks every 5 ft, and hung lights immediately after application. By Day 3, five hooks had detached—two pulling small paint flecks with them. She contacted 3M Consumer Care, who requested photos and a paint history. Her builder had used Benjamin Moore Aura Flat Interior Paint, which requires 30 days to fully cure—but she’d moved in just 10 days prior. The paint was still outgassing volatile compounds, preventing adhesive bonding. After waiting 20 more days, cleaning with isopropyl alcohol, and applying hooks with strict 30-second pressure, all 32 hooks held securely for 87 days. Not one left residue. Sarah now preps her walls two weeks before decorating—“It’s not extra work,” she notes. “It’s the difference between a joyful tradition and a January repair project.”
“Adhesive performance isn’t about ‘stickiness’—it’s about interfacial compatibility. Paint isn’t inert. It’s a dynamic film that breathes, expands, and chemically evolves for weeks after application. Command Hooks need a stable partner. Rushing violates physics, not convenience.” — Dr. Lena Torres, Materials Scientist, 3M Adhesive Systems Division
Essential Pre-Installation Checklist
Print or save this checklist. Complete every item before opening your first hook package.
- ☑ Confirm paint is fully cured (14 days for acrylic, 30 days for latex)
- ☑ Inspect wall for texture, cracks, or glossy sealants—test one hook in closet or behind door
- ☑ Gather supplies: >90% isopropyl alcohol, lint-free cloths, pencil, measuring tape, hairdryer, digital kitchen scale (to weigh lights)
- ☑ Calculate total linear footage and weight of all light strings (check manufacturer specs or weigh a 10-ft sample)
- ☑ Determine hook spacing: divide total weight by 0.75, then divide result by hook rating (e.g., 1.2-lb string ÷ 0.75 = 1.6 lb max load → 1.6 ÷ 0.5 = 4 hooks needed)
- ☑ Mark hook positions lightly in pencil—avoid areas within 2 inches of outlets, trim, or ceiling lines
- ☑ Set aside 90 uninterrupted minutes: 30 min prep, 30 min application, 30 min wait-before-hanging
Frequently Asked Questions
Can I use Command Hooks on freshly painted rental walls?
No—not unless you have written confirmation from the landlord or property manager that the paint is fully cured and compatible. Most rental properties use flat or eggshell latex with accelerated dry times but extended cure periods. Without verification, use tension rods in doorways or removable curtain rods mounted inside window frames instead.
What if a hook leaves residue after removal?
If done correctly, residue should be negligible. If present, dab—not rub—with a cotton swab dipped in >90% isopropyl alcohol. Let sit 10 seconds, then wipe gently. Never use acetone, citrus solvents, or abrasive pads—they degrade paint binders. If residue persists, it indicates the paint wasn’t fully cured or the hook was pulled incorrectly.
Do Command Hooks work on dark-colored walls?
Yes—color doesn’t affect adhesion. However, clear hooks are nearly invisible on white or light walls but may appear slightly hazy on deep charcoal or navy. For dark walls, use Black Medium Outdoor Hooks (same adhesive, color-matched backing). Avoid colored hooks on light walls—they’re more visible and offer no functional advantage.
Conclusion: Hang with Confidence, Not Compromise
Christmas lights aren’t just decoration—they’re memory anchors. The glow on a child’s face as they trace the pattern across the wall, the quiet hum of conversation beneath softly pulsing LEDs, the way light catches dust motes in winter air—these moments deserve a foundation that’s both secure and respectful of your home. Command Hooks deliver that balance, but only when treated as precision tools rather than convenience shortcuts. You wouldn’t skip torque specs when mounting a shelf; don’t skip surface prep and dwell time when hanging lights. The 90 minutes invested upfront protect weeks of joy—and spare you from ladder climbs, patching compound, and the quiet frustration of a half-lit wall in mid-December.
This season, choose intention over inertia. Measure twice. Clean thoroughly. Press deliberately. Wait patiently. Your walls—and your peace of mind—will thank you long after the last ornament is boxed away.


 浙公网安备
33010002000092号
浙公网安备
33010002000092号 浙B2-20120091-4
Comments
No comments yet. Why don't you start the discussion?