
Temporary lighting—whether for holiday decor, event staging, gallery openings, or rental apartment upgrades—demands flexibility, speed, and zero permanent alteration. Command Strips have become the go-to solution for renters, DIYers, and professional installers alike. But their effectiveness hinges entirely on correct application: not just *where* you stick them, but *how*, *what* you’re hanging, and *what conditions* the installation faces. Misuse leads to sagging strings, sudden drops, or worse—residue that defeats the “damage-free” promise. This guide distills field-tested practices from lighting technicians, property managers, and interior stylists who rely on Command Strips weekly—not as a hack, but as a calibrated tool.
Why Command Strips Work (and When They Don’t)
Command Strips use a proprietary acrylic-based adhesive that forms a strong yet removable bond with smooth, clean surfaces. Unlike tape or glue, it relies on molecular adhesion—not mechanical grip—so surface texture, temperature, humidity, and substrate compatibility are non-negotiable variables. The adhesive cures over 24–72 hours, gradually reaching full strength. Crucially, it’s engineered to release cleanly when pulled straight down with steady pressure—not yanked sideways or twisted.
They excel where traditional mounting fails: glass windows, painted drywall, tile backsplashes, metal doors, and laminated furniture. But they fail predictably on porous, uneven, or compromised surfaces—unsealed brick, textured stucco, cracked paint, dusty laminate, or vinyl wallpaper. Temperature matters too: installation below 50°F (10°C) or above 105°F (40°C) significantly reduces initial tack and long-term hold. Humidity above 80% can interfere with curing.
Choosing the Right Strip for Your Light Fixture
Not all Command Strips are interchangeable. Weight capacity alone is misleading—light fixtures introduce dynamic loads: vibration from foot traffic, air currents from HVAC, thermal expansion of wires, and occasional bumping. A 3-lb string of fairy lights isn’t static; its effective load increases under movement. Use this decision framework:
| Fixture Type & Weight | Recommended Strip | Max Static Load | Critical Notes |
|---|---|---|---|
| Fairy light strings (15–30 ft, LED) | Medium Duty (White) | 3.5 lbs per pair | Use 2–3 pairs spaced evenly; avoid tight bends near strips |
| Plug-in pendant lamp (fabric cord, 4–6 lb) | Large Picture Hanging (Black) | 16 lbs per pair | Requires dual-strip support—one for cord, one for canopy; never hang by cord alone |
| LED strip light (2m, aluminum channel) | Heavy Duty Outdoor (Gray) | 7.5 lbs per pair | Mandatory for metal channels; indoor version lacks UV resistance and thermal stability |
| Small battery-powered puck light | Mini Hooks (Clear) | 0.5 lbs per hook | Only for ultra-light fixtures; test pull before loading |
| Wall-mounted sconce (plug-in, 8–10 lb) | NOT RECOMMENDED | N/A | Too much torque risk; requires structural anchoring |
Always verify weight *including* cord, plug, transformer, and any added diffusers or shades. When in doubt, downgrade to a heavier-duty strip—not upgrade. Overloading is the top cause of failure.
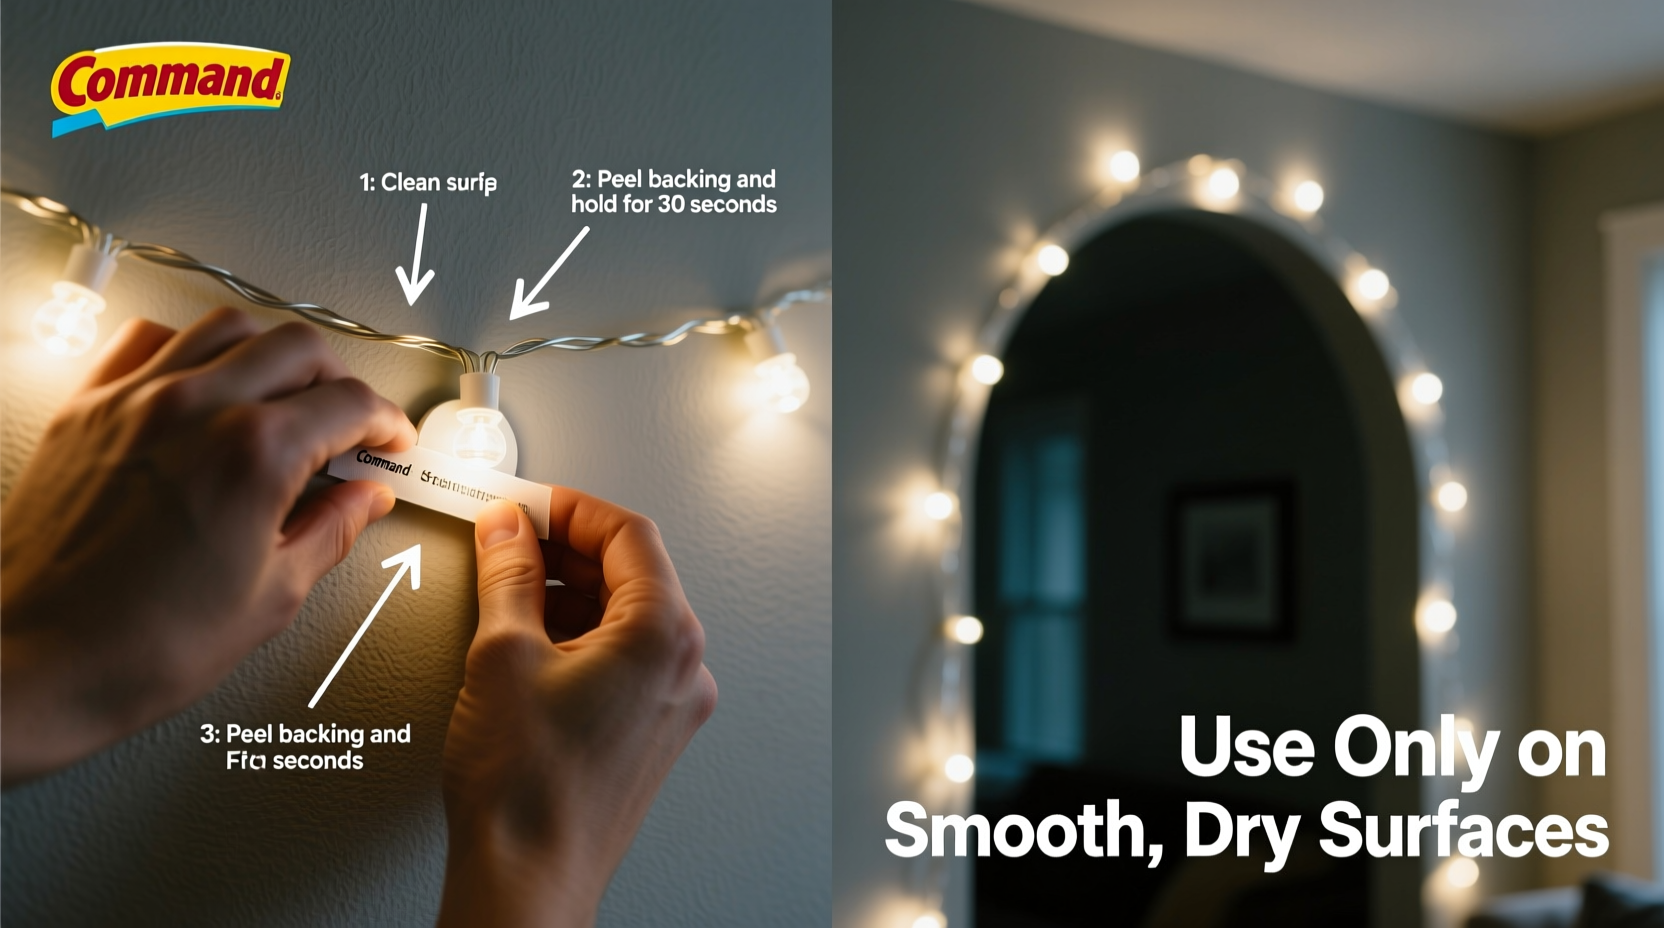
Surface Preparation: The Non-Negotiable First Step
Over 80% of Command Strip failures trace back to inadequate surface prep—not adhesive weakness. Painted drywall isn’t “ready” just because it looks clean. Here’s the exact protocol professionals follow:
- Clean with isopropyl alcohol (70%+), not water or glass cleaner. Alcohol cuts oils, waxes, and invisible residues without leaving film. Wipe in one direction only—never circular motions—to avoid smearing.
- Let surface dry completely—minimum 5 minutes. Any moisture disrupts adhesion at the molecular level.
- Lightly sand glossy surfaces with 220-grit paper. Not to remove paint—just to micro-scratch the top layer for better grip. Wipe again with alcohol after sanding.
- Test adhesion first. Apply one strip, wait 1 hour, then gently tug downward. If it lifts easily, re-clean. If it holds, proceed.
This step takes 12 minutes. Skipping it saves no time—it guarantees rework.
A Real-World Installation: Holiday String Lights in a Rental Apartment
Maya, a graphic designer renting in Chicago, needed warm ambient lighting for her living room wall ahead of a holiday open house. Her landlord prohibited nails, and she couldn’t use tape (left residue on her beige matte-paint walls). She chose 25-ft warm-white LED fairy lights with a lightweight plastic plug-in transformer.
She followed the process precisely: cleaned the wall with alcohol, waited, applied three Medium Duty Command Strips spaced 18 inches apart along the top edge of her built-in bookshelf. She pressed each strip firmly for 30 seconds, then hung the lights’ cord—not the bulbs—over the top shelf, letting the string drape naturally. She avoided tucking cords behind shelves or pinching them against sharp edges. After 24 hours, she gently tested tension at each anchor point. The lights stayed secure for six weeks, including two weekend gatherings with open windows and HVAC cycling. When removed, she peeled straight down per instructions—zero residue, no paint lift.
What made it work? Not luck: strict adherence to surface prep, using strips rated for *cord weight* (not bulb count), spacing anchors to distribute load, and avoiding thermal stress points near heating vents.
Step-by-Step: Installing Plug-In Pendant Lights Temporarily
For lightweight plug-in pendants (e.g., fabric-cord lamps with ceramic or woven shades under 6 lbs), Command Strips offer a viable alternative to ceiling hooks—when done correctly. Follow this sequence:
- Identify mounting location: Choose a smooth, flat section of wall or beam—not near doorways or high-traffic zones where cords may be snagged.
- Mark anchor points: Use a level. For pendants, you need two anchor points: one for the cord’s upper loop (near ceiling line), and one for the shade’s upper rim or canopy bracket (lower, 12–18\" down).
- Clean both spots with alcohol; let dry fully.
- Apply Heavy Duty Outdoor Strips (not Indoor): One pair at the upper cord anchor, one pair at the lower canopy anchor. Press firmly for 30 seconds per strip.
- Wait 24 hours before hanging anything. Do not rush this.
- Hang the cord first: Loop it through the upper anchor, ensuring slack allows gentle sway—not taut tension.
- Then attach the canopy: Align the lower anchor so the shade hangs plumb. Adjust only by loosening and repositioning—not by pulling on the cord.
- Final check: Gently sway the fixture side-to-side. No movement at anchors means proper load transfer.
“Command Strips aren’t magic—they’re physics with patience. The 24-hour cure window isn’t optional; it’s when the polymer chains align and bond. Skip it, and you’ve got sticky tape, not structural support.” — Lena Torres, Lighting Technician & Certified 3M Application Specialist
Do’s and Don’ts: What Pros Never Compromise On
- DO replace strips every 6–12 months, even if they look fine. Adhesive degrades with UV exposure and thermal cycling.
- DO orient strips vertically (top-to-bottom peel direction) on walls—this matches natural gravity release force.
- DO use Command’s “Removal Tabs” when available. They prevent accidental stretching or tearing of the adhesive backing.
- DON’T layer multiple strips to increase capacity. Stacking creates uneven pressure and premature shear failure.
- DON’T hang near heat sources: radiators, recessed lighting housings, or direct sun on south-facing windows. Heat softens the adhesive.
- DON’T use on cold surfaces (<50°F). The adhesive won’t flow properly into microscopic surface valleys.
FAQ
Can I reuse Command Strips after removal?
No. Once removed, the adhesive loses structural integrity and dust contamination renders it ineffective. Always use fresh strips for new installations. Save used strips only for low-stakes tasks like holding paper templates—not lighting.
What if the strip leaves residue?
Residue indicates improper removal. Pull straight down—not sideways—and use Command’s Adhesive Remover or 91% isopropyl alcohol on a lint-free cloth. Rub gently in one direction. Avoid acetone or citrus solvents—they can damage paint or finishes.
Will Command Strips hold up in humid bathrooms?
Only with Heavy Duty Outdoor Strips—and only on non-porous surfaces like tile or glass. Avoid painted drywall, wood, or grout lines. Even then, limit to low-wattage, sealed LED fixtures. Never use near showers or steam vents.
Conclusion
Command Strips transform how we think about temporary lighting—not as a compromise, but as an intentional, reversible design choice. Their reliability isn’t inherent; it’s earned through disciplined preparation, precise product selection, and respect for material science. Whether you’re illuminating a pop-up shop, dressing a rental for sale, or adding warmth to your home without drilling a single hole, success lies in treating these strips not as convenience tape, but as engineered fasteners with defined limits and clear protocols. Start small: test one strip on a discreet area. Observe how it behaves over 72 hours. Then scale up with confidence—not guesswork.


 浙公网安备
33010002000092号
浙公网安备
33010002000092号 浙B2-20120091-4
Comments
No comments yet. Why don't you start the discussion?