
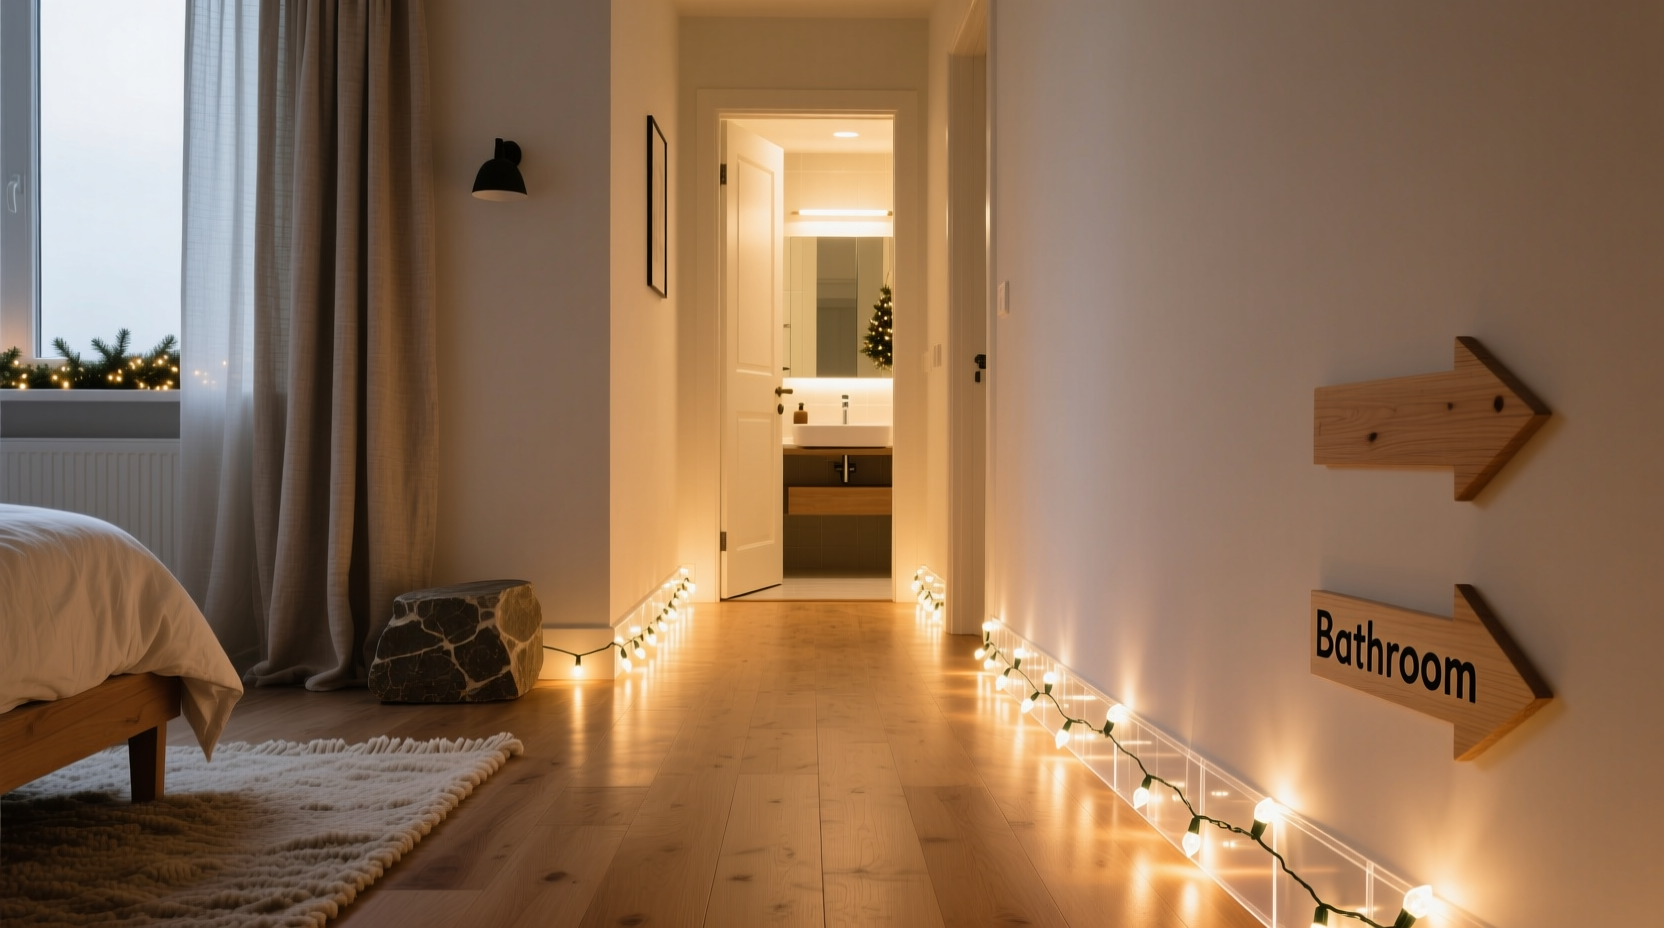
Navigating a dark hallway in the middle of the night is more than just inconvenient—it can be dangerous. Tripping over furniture, stubbing toes on doorframes, or waking up fully due to bright overhead lighting are common issues for many households. Instead of installing permanent fixtures or relying on plug-in nightlights, there's a smarter, more sustainable solution: repurposing leftover Christmas lights.
Every year, millions of strands of holiday lights are stored away after December 26, only to gather dust until the next season. But these small, low-wattage bulbs are ideal for creating a soft, continuous glow along high-traffic nighttime routes. With careful planning and basic DIY skills, you can transform festive decor into a practical, energy-efficient nightlight path that guides your way safely and gently.
Why Use Christmas Lights for a Nightlight Path?
Traditional nightlights emit a concentrated beam from one location, often leaving shadows or blind spots. In contrast, Christmas lights offer distributed illumination—multiple small points of light spaced evenly across a path. This creates a subtle, ambient trail that’s easier on the eyes and reduces disorientation during nighttime movement.
LED Christmas lights, in particular, are energy efficient, cool to the touch, and available in warm white tones that mimic natural candlelight. They consume as little as 0.04 watts per bulb and can run all night without increasing electricity bills. Plus, using what you already own supports sustainability by reducing waste and avoiding additional purchases.
“Distributed low-level lighting significantly improves spatial awareness in darkness without triggering full alertness.” — Dr. Lena Pruitt, Sleep Environment Researcher, University of Colorado Boulder
Step-by-Step Guide: Building Your Nightlight Path
Creating a reliable nightlight path requires thoughtful placement, secure installation, and attention to safety. Follow this detailed process to ensure long-term functionality and peace of mind.
- Assess the Route: Walk from your bedroom to the bathroom in complete darkness. Note obstacles, turns, steps, or thresholds. Measure the total distance to determine how many feet of lights you’ll need.
- Select the Right Strand: Choose LED mini-lights with a warm white (2700K–3000K) color temperature. Avoid multicolored sets, which can disrupt melatonin production. Ensure the strand has at least 50 bulbs and a steady-on setting (no flashing).
- Test Before Installing: Plug in the strand to confirm all bulbs work. Replace any dead sections if possible, or set aside for future repair.
- Plan Light Spacing: For optimal visibility, place bulbs every 6–12 inches. On straight floors, space them wider; near corners or stairs, cluster slightly denser.
- Install Along Baseboards or Trim: Use removable adhesive clips or silicone putty to secure the wire. Never nail or staple, as this damages insulation and creates fire hazards.
- Route Power Safely: Position the outlet access so the cord doesn’t cross walkways. Use cord covers if necessary. Plug into a surge protector or smart outlet for added control.
- Conceal Excess Wire: Coil extra length behind furniture or inside a decorative box. Keep tension minimal to prevent strain on connections.
- Test in Real Conditions: Turn off all other lights and walk the path barefoot. Adjust spacing or brightness if areas feel too dim or uneven.
Material Comparison: Choosing the Best Setup
Not all Christmas lights perform equally well in this application. The table below compares common types based on key criteria for nightlight use.
| Light Type | Energy Use | Heat Output | Durability | Best For |
|---|---|---|---|---|
| LED Mini Lights | Very Low (0.04W/bulb) | Minimal | High | Long-term indoor paths |
| Incandescent Mini Lights | High (0.4W/bulb) | Significant | Low-Medium | Short-term trials only |
| Battery-Powered LEDs | Low | Minimal | Medium | Renters or temporary setups |
| Solar String Lights (Indoor Use) | Zero (after charge) | Minimal | Low | Sunny rooms with daytime exposure |
For most homeowners, LED mini lights powered by an outlet provide the best balance of efficiency, longevity, and brightness consistency. Battery-operated versions offer flexibility but require frequent replacements, making them less ideal for daily use.
Real-Life Example: A Family’s Safer Night Routine
The Thompson family in Portland, Oregon, struggled with nighttime bathroom trips after their youngest child began sleepwalking. Their hallway had no windows and only a single ceiling light, which would wake everyone when turned on. After experimenting with several nightlight models, they decided to try repurposing old Christmas lights from storage.
They measured the 22-foot path from the master bedroom to the shared bathroom and used two 100-bulb warm white LED strands. The lights were secured along baseboards using clear adhesive clips, routed through a smart plug programmed to turn on at 8 PM and off at 7 AM. Within days, both parents reported fewer stumbles, and the child felt more confident moving independently at night.
“It’s like having a glowing guide,” said Sarah Thompson. “The light is soft enough not to ruin our sleep, but bright enough to see where we’re going. We even left it up year-round.”
Safety and Maintenance Checklist
To ensure your nightlight path remains effective and hazard-free, follow this essential checklist:
- ✅ Use only indoor-rated lights (look for UL certification)
- ✅ Inspect wires monthly for fraying, kinks, or exposed copper
- ✅ Secure cords so they don’t create tripping risks
- ✅ Avoid placing lights near water sources (e.g., directly outside showers)
- ✅ Keep connections elevated and dry
- ✅ Test functionality weekly, especially in homes with elderly or young residents
- ✅ Replace flickering or dimming strands promptly
- ✅ Unplug during extended absences or home renovations
Frequently Asked Questions
Can I leave Christmas lights on all night?
Yes—if they are LED and designed for indoor use. Modern LED strings generate minimal heat and are safe for continuous operation. Always check manufacturer guidelines and avoid covering wires with rugs or fabric.
What if my strand stops working mid-path?
This is common with older sets where one dead bulb interrupts the entire circuit. Consider upgrading to “parallel-wired” LEDs, which stay lit even if one bulb fails. Alternatively, install redundant sections in critical zones like stair entries.
Are smart plugs worth using with this setup?
Absolutely. Smart plugs allow scheduling, remote control, and integration with voice assistants. You can set lights to activate only between 10 PM and 6 AM, conserve energy, and receive alerts if the device loses power.
Enhancing Functionality with Smart Features
Take your nightlight path further by integrating automation. Connect your strand to a motion sensor outlet so lights illuminate only when movement is detected. This extends bulb life and saves energy while maintaining convenience.
Some advanced users pair their setup with a smart home system. For example, Philips Hue or Lutron Caseta can trigger the path lights when a bedroom door opens after sunset. Others use geofencing to activate the system when a family member’s phone enters the home perimeter late at night.
For renters or those avoiding wall modifications, consider battery-powered tape lights adhered under floating shelves or along stair edges. These can be powered by the same Christmas light transformers if voltage matches, offering a discreet alternative.
Conclusion: Turn Holiday Leftovers Into Year-Round Safety
Repurposing leftover Christmas lights into a bedroom-to-bathroom nightlight path is more than a clever hack—it’s a meaningful upgrade to household safety and comfort. By leveraging existing resources, you reduce clutter, lower energy consumption, and create a personalized lighting solution tailored to your home’s layout.
This project takes under two hours, costs nothing if materials are already on hand, and delivers benefits that last far beyond the holiday season. Whether you're helping children navigate the dark, supporting aging parents, or simply avoiding another stubbed toe, a well-designed light path makes nighttime movement safer and less disruptive.


 浙公网安备
33010002000092号
浙公网安备
33010002000092号 浙B2-20120091-4
Comments
No comments yet. Why don't you start the discussion?