
Outdoor Christmas displays have evolved far beyond simple plug-and-play strings of lights. Today’s most engaging setups respond to presence—illuminating pathways as guests approach, triggering animated figures when children walk by, or cycling through light sequences only when someone is nearby. Motion sensors are the quiet conductors behind this magic: energy-efficient, intuitive, and surprisingly accessible for DIY installers. But deploying them outdoors demands more than just screwing in a sensor and hoping for the best. Temperature swings, moisture, false triggers from wind-blown foliage, and incompatible controllers can turn a festive vision into a frustrating loop of flickering lights and dead batteries. This guide distills field-tested practices—from electricians, lighting integrators, and municipal display coordinators—into actionable steps that prioritize reliability, safety, and seasonal joy.
Why Motion Activation Makes Sense for Outdoor Displays
Motion-based activation isn’t just a novelty—it solves real operational challenges. Traditional timers run lights on fixed schedules, often illuminating empty yards for hours. Smart plugs with app-based scheduling add flexibility but still lack contextual awareness. Motion sensors bridge that gap by introducing responsiveness without constant monitoring. According to the U.S. Department of Energy, holiday lighting accounts for an estimated 6.6 TWh of electricity annually—roughly equivalent to the annual power use of 500,000 homes. When motion sensors limit operation to active viewing windows (e.g., 5–10 p.m. only when people are present), energy use drops by 40–70% compared to all-night operation, depending on foot traffic density.
Beyond efficiency, motion adds narrative dimension. A snowman that “wakes up” as you step onto the porch, synchronized carol snippets triggered near the mailbox, or gentle path lighting that flows ahead of a walker—all deepen guest engagement. As lighting designer Lena Ruiz explains after installing over 200 residential and civic displays:
“The moment a display stops being passive decoration and starts reacting to human presence, it becomes memorable. That shift—from ‘look at this’ to ‘this is responding to you’—is where real holiday warmth begins.” — Lena Ruiz, Certified Lighting Designer & Founder, LuminaFest Installations
Selecting the Right Motion Sensor for Outdoor Use
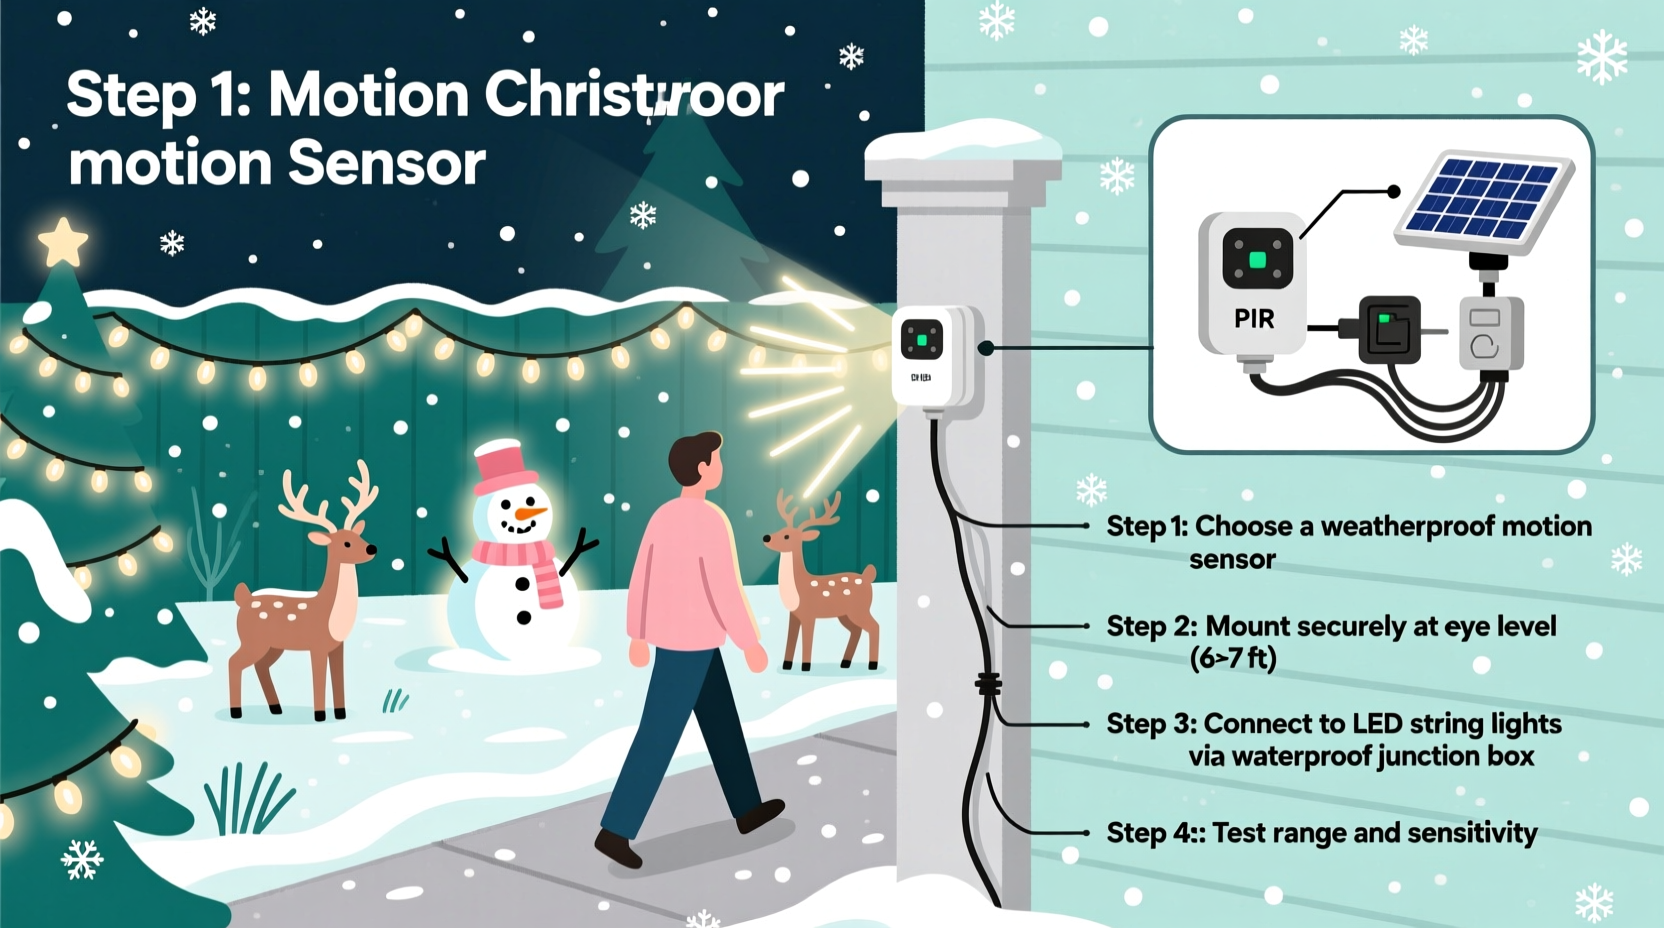
Not all motion sensors are built for December conditions. Indoor PIR (passive infrared) units fail quickly when exposed to frost, condensation, or UV degradation. For outdoor Christmas applications, three technical criteria are non-negotiable:
- IP Rating of IP65 or higher: Ensures full dust protection and resistance to low-pressure water jets (critical for rain, sleet, and snow).
- Operating temperature range of –20°C to +50°C (–4°F to +122°F): Confirms functionality during subzero nights and unseasonably warm days.
- Adjustable sensitivity and time delay: Allows fine-tuning to ignore small animals (<5 kg), passing cars, or swaying branches while retaining responsiveness to adults and children.
Two sensor types dominate reliable outdoor deployment:
| Sensor Type | Best For | Key Limitation | Lifespan (Avg.) |
|---|---|---|---|
| Hardwired PIR with 120V AC relay output | Large displays (30+ amps), permanent installations, multi-zone control | Requires licensed electrician for main panel integration | 8–12 years |
| Wireless battery-powered PIR (with 24V DC or 120V AC smart switch pairing) | Seasonal setups, renters, portable displays, low-voltage LED arrays | Battery replacement every 6–9 months; signal interference in dense neighborhoods | 3–5 years (sensor); batteries require seasonal maintenance |
Step-by-Step Integration: Wiring, Power, and Controller Compatibility
Integrating motion sensing requires aligning three layers: the sensor itself, the power delivery system, and the lighting controller. Skipping verification at any layer causes cascading failures. Follow this sequence precisely:
- Verify load compatibility: Measure your display’s total wattage (add all bulb, projector, and motor specs). Ensure the sensor’s relay rating exceeds that load by ≥25%. Example: A 600W display needs a sensor rated for ≥750W (or 6.25A at 120V).
- Choose the control point: Decide whether the sensor will interrupt line voltage (cutting power to entire display) or trigger a low-voltage input on a smart controller (e.g., via 0–10V or dry contact). The latter preserves sequencing, music sync, and dimming functions.
- Mount with intention: Install sensors 6–8 feet high, angled downward at 15–25°, and shielded from direct rain exposure (e.g., under eaves or within weatherproof enclosures). Never mount facing south in snowy climates—sun glare on icy surfaces creates false triggers.
- Test before finalizing: With all lights disconnected, use a multimeter to confirm the sensor’s output toggles correctly. Then connect a single test light and observe behavior across multiple days—including dusk/dawn transitions and varying weather.
- Program logic tiers: If using a programmable controller (like Light-O-Rama or xLights), configure motion as a *trigger*, not a master switch. Set rules like: “If motion detected AND time is between 4:30 p.m. and 10:30 p.m. AND ambient light <10 lux → start Sequence A.” This prevents daytime activation and respects neighborhood lighting ordinances.
Real-World Case Study: The Elm Street Neighborhood Display
In Portland, Oregon, the Elm Street Homeowners Association installed a community-wide motion-activated display spanning six front yards. Their goal: reduce energy use by 50% while increasing visitor interaction. They deployed eight IP66-rated PIR sensors (hardwired to GFCI-protected circuits), each controlling a zone of RGB LED net lights, inflatable figures with internal motors, and two synchronized speakers.
Initial testing revealed three critical issues: false triggers from raccoons, inconsistent activation due to fogged sensor lenses, and audio desync when multiple zones fired simultaneously. The team resolved these by:
- Adding 12-inch PVC shrouds around each sensor to narrow the detection cone and block ground-level movement;
- Applying anti-fog coating (designed for camera lenses) to sensor windows biweekly;
- Introducing a 0.8-second stagger between zone activations using a simple Arduino Nano as a central sequencer.
Result: Energy use dropped 58% versus last year’s timer-based setup. Visitor surveys showed a 92% increase in “felt welcomed” responses, and zero electrical incidents over 47 nights of operation. Most importantly, children began “testing” the sensors deliberately—running in patterns to choreograph light waves—transforming passive viewing into participatory play.
Weatherproofing, Maintenance, and Common Pitfalls
Winter is unforgiving to electronics. Even IP-rated sensors degrade if installation shortcuts are taken. Below is a concise checklist for resilience:
- ✅ Seal all conduit entries with silicone-rated outdoor caulk (not standard silicone—use GE Silicones’ WeatherPROOF series)
- ✅ Wrap wire nuts in self-fusing silicone tape *before* placing in junction boxes
- ✅ Mount sensors on vibration-dampening rubber grommets to prevent micro-fractures from wind sway
- ✅ Clean lens weekly with microfiber + isopropyl alcohol (never glass cleaner—ammonia degrades polycarbonate)
- ✅ Test battery-powered units every Sunday evening; replace batteries preemptively on Thanksgiving Day
Avoid these frequent missteps:
- Ignoring voltage drop: Long wire runs (>50 ft) from sensor to lights cause dimming or relay chatter. Use 12-gauge wire for 120V runs over 30 ft, or step down to 24V DC distribution with local relays.
- Overlooking ambient light interference: Many PIRs misread reflected light off snow-covered lawns or white siding. Use models with adjustable lux thresholds or add physical baffles.
- Skipping GFCI protection: Outdoor circuits without ground-fault protection violate NEC Article 411.4 and risk electrocution. Hardwired sensors must be on GFCI-protected breakers or outlets.
- Assuming “smart” means self-configuring: Wi-Fi sensors often lose connection during winter firmware updates or ISP outages. Always include a manual override switch (e.g., a weatherproof toggle) wired in parallel.
FAQ: Troubleshooting Motion-Activated Displays
Why does my sensor trigger randomly at night but not during the day?
This points to an ambient light sensor conflict. Most outdoor PIRs combine motion detection with a photocell that disables activation in daylight. If the photocell is shaded (by snow, icicles, or overhanging branches) or degraded by UV exposure, it may falsely read darkness. Clean the photocell window and verify its coverage isn’t obstructed. If the issue persists, bypass the photocell by connecting the sensor’s “DAY/NIGHT” jumper to the “NIGHT ONLY” position—or replace the unit.
Can I use one motion sensor to control multiple independent displays?
Yes—but only if your controller supports multi-channel triggering or you use a relay expansion module. A single PIR’s output typically handles one load. To control three separate displays (e.g., porch, tree, garage), wire the sensor’s output to a 3-channel relay board (rated for your total load), then route each relay output to a dedicated display circuit. Never daisy-chain sensors or overload a single relay beyond its rated amperage.
My lights flicker when the sensor activates—what’s causing it?
Flickering usually indicates inrush current overwhelming the relay contacts. LED drivers and motorized inflatables draw 3–5× their rated current for the first 100ms at startup. Use relays rated for “motor load” or “LED driver load,” not generic “resistive load” specs. For large displays, install soft-start modules (e.g., Lutron DVSTV-153P) between the relay and load to ramp up power gradually.
Conclusion: Bringing Thoughtful Magic to Your Yard
Motion-activated Christmas displays succeed not because they’re technically complex, but because they’re thoughtfully human-centered. They conserve energy without sacrificing spectacle. They reward curiosity with light and sound. And they transform static decoration into shared, embodied experience—where a child’s giggle literally sparks a cascade of color across the neighborhood. None of this requires advanced degrees or six-figure budgets. It demands attention to detail: choosing components rated for real winter, verifying electrical compatibility before the first wire is stripped, and respecting the physics of light, heat, and motion. Start small—a single pathway sensor linked to your favorite string lights. Observe how neighbors pause, how pets investigate, how your own routines shift to linger longer outside. Then expand with intention. Because the most meaningful holiday displays don’t just shine brightly. They shine *back*.


 浙公网安备
33010002000092号
浙公网安备
33010002000092号 浙B2-20120091-4
Comments
No comments yet. Why don't you start the discussion?