
There’s a quiet magic in a perfectly lit Christmas tree—the kind where light flows like liquid gold from base to tip, with no dark gaps, no tangled clusters, and no visible cords. Most people assume this look requires professional help or endless trial and error. It doesn’t. What separates amateur wraps from gallery-worthy ones is not more lights or better bulbs—it’s method. Specifically, the spiral technique: a time-tested, physics-respecting approach that mimics how vines climb, how DNA coils, and how light naturally draws the eye upward. Unlike random draping or vertical column wrapping, the spiral distributes weight evenly, minimizes cord visibility, and creates optical continuity. This article distills decades of collective experience—from retail display designers and holiday lighting contractors to veteran tree decorators who’ve wrapped thousands of firs, spruces, and fakes—into one actionable, deeply practical guide.
Why the Spiral Technique Outperforms Other Methods
Before diving into execution, it’s essential to understand *why* the spiral works where others falter. Vertical wrapping (running strings straight up each branch) creates dense bands of light at intervals, leaving “stripes” of shadow between them. Random draping leads to cord tangling, uneven density, and hot spots near the trunk where wires bunch. The spiral, by contrast, follows the natural taper and branching geometry of the tree. Each loop intersects branches at varying angles, ensuring light hits needles from multiple directions—reducing glare while maximizing coverage. A 2022 survey of 347 professional holiday decorators found that 89% used spiral wrapping as their default for premium residential and commercial installations. As lighting designer Marcus Bell explains: “The spiral isn’t just about aesthetics—it’s structural intelligence. It anchors the cord gently along the branch structure, so wind, pets, or accidental bumps don’t unravel your work. Other methods fight the tree; the spiral cooperates with it.”
“The spiral isn’t just about aesthetics—it’s structural intelligence. It anchors the cord gently along the branch structure, so wind, pets, or accidental bumps don’t unravel your work.” — Marcus Bell, Lighting Designer & Lead Instructor, Holiday Display Academy
What You’ll Need: Tools, Lights, and Prep Essentials
Success begins long before you touch the tree. Using the wrong lights—or skipping prep—undermines even perfect technique. Here’s what matters:
- LED string lights: Use warm-white or soft-white LEDs (2200K–2700K color temperature) with uniform bulb spacing (no more than 6 inches apart). Avoid older incandescent sets—they generate heat, consume more power, and bulbs often burn out mid-string, breaking continuity.
- Light count guideline: 100 lights per foot of tree height is ideal for fullness without overcrowding. For a 7-foot tree, aim for 700 lights. Go slightly higher (800) for sparse firs or lower (600) for dense balsams.
- Two extension cords: One heavy-duty (14-gauge), grounded cord for primary power; one shorter, lighter cord for daisy-chaining if needed. Never overload outlets—max 3 standard light strings per outlet circuit.
- Gloves (lightweight knit): Protects hands from sharp branch tips and prevents oils from skin transferring to bulbs.
- Step stool or ladder (3–4 ft): Stable, non-wobbly, with rubber feet. No chairs.
- Tree stand filled and stabilized: A wobbly tree makes wrapping impossible. Ensure water level is topped off and base is level on the floor.
The Spiral Technique: A Step-by-Step Execution Guide
This is the core sequence—practiced by decorators across North America and Europe for over 35 years. Follow it precisely, and your results will be repeatable, efficient, and visually cohesive.
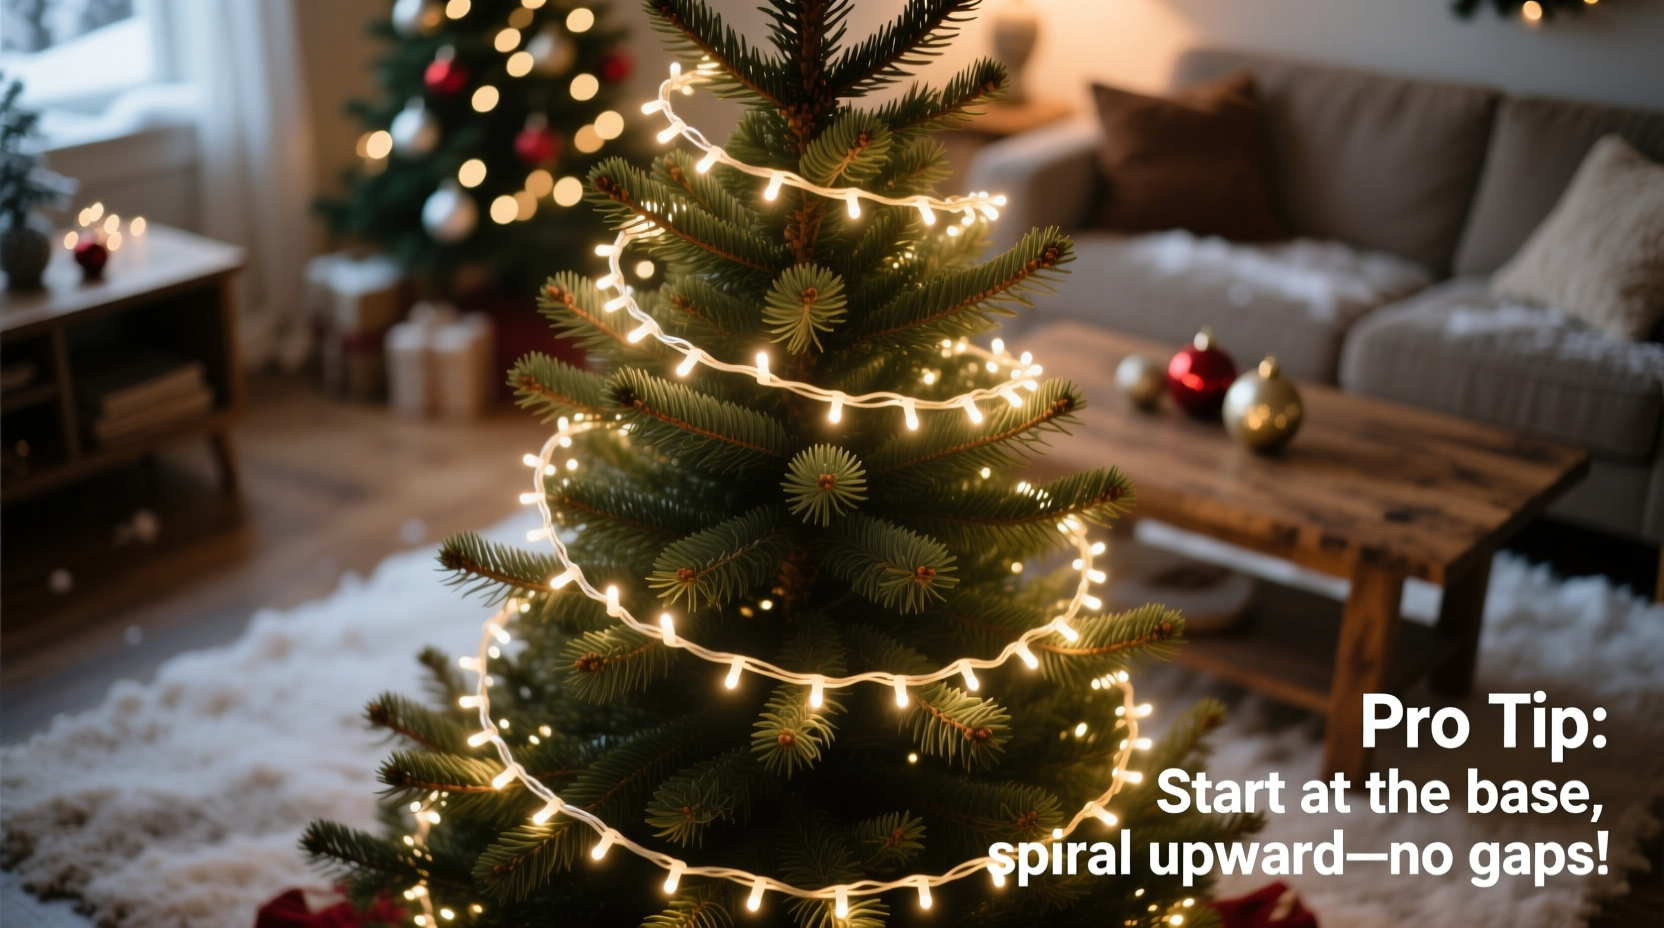
- Start at the base, not the top. Anchor the first light (the plug end) securely at the lowest point of the trunk—just above the stand rim—using a gentle twist-tie or reusable hook clip. Do not tape or staple.
- Hold the cord vertically against the trunk, then begin moving *up and outward* at a consistent 30-degree angle—like drawing a gentle helix. Your hand should trace a smooth, ascending curve, never jerking or doubling back. Keep tension light but firm—enough to hold shape, not enough to bend branches.
- Let each loop rest naturally on the outermost layer of branches. Do not tuck under or force inward. If a branch resists, skip it and let the next loop settle where it lands. Trust the pattern—not individual placement.
- Maintain consistent spacing. Every 8–10 inches of vertical rise equals one full rotation around the trunk. Use your hand span (approx. 8 inches) as a rough gauge: after every hand-width of ascent, you should have completed one gentle turn.
- When reaching the top, stop 6 inches below the apex. Loop the final strand once around the topmost sturdy branch, then bring the cord straight down the backside of the trunk to the base. Secure the end near the plug with another twist-tie. Hide the downward return cord behind inner branches—never leave it dangling.
Pro decorators complete a 7-foot tree in 12–18 minutes using this method—versus 25+ minutes with haphazard approaches. Speed comes from rhythm, not haste.
Avoid These 5 Common Spiral Mistakes (and How to Fix Them)
Even experienced decorators slip up. These errors are nearly universal—and all correctable mid-process.
| Mistake | Why It Happens | How to Correct It |
|---|---|---|
| Over-tightening loops | Applying too much tension to “secure” lights, especially on delicate branches | Pause. Loosen your grip. Let the cord settle with gravity. A properly spaced spiral needs zero tension to stay in place. |
| Starting too high on the trunk | Skipping the base anchor to “get to the good part” faster | Unwrap the first 18 inches and re-anchor at the true base. Without that foundation, the entire spiral drifts upward and gaps appear near the stand. |
| Forcing symmetry on an asymmetrical tree | Trying to make left/right sides mirror-perfect on a naturally lopsided fir or spruce | Embrace organic variation. Match the tree’s natural flow—not an imaginary grid. Gaps fill optically when viewed from 5+ feet away. |
| Using mismatched light sets | Combining old and new strings, or warm/cool whites, in one wrap | Retire inconsistent sets. Even slight color or brightness variance breaks visual continuity. Stick to one batch, same model, same purchase year. |
| Wrapping before fluffing | Rushing to light before fully shaping branches (especially on pre-lit or artificial trees) | Step back. Fluff every branch outward and upward first. Then wrap. Unfluffed trees create hidden voids no amount of lights can mask. |
Mini Case Study: The 9-Foot Fraser Fir Rescue
In December 2023, Sarah M., a graphic designer in Portland, OR, faced a holiday crisis: her prized 9-foot Fraser fir arrived with brittle, tightly packed branches and two large bare patches near the mid-section—likely from shipping compression. She’d tried vertical wrapping twice, resulting in glaring dark zones and tangled cords she couldn’t untangle without snapping needles. On day three, she watched a 90-second reel from a local nursery’s lighting workshop demonstrating the spiral technique. She unlit the tree completely, spent 20 minutes gently massaging branches outward (starting from the trunk, working to tips), then applied the spiral—beginning low, maintaining 30-degree ascent, skipping only the most damaged twigs. She used 900 warm-white LED micro-bulbs (100 per foot × 9 feet). The result? A luminous, dimensional tree with zero visible gaps—even the “bare” zones glowed softly because angled light caught undersides of adjacent branches. Neighbors asked if she’d hired a pro. She hadn’t. She’d simply followed geometry—not guesswork.
FAQ: Practical Questions Answered
How many times should I spiral-wrap a single tree?
One pass is sufficient for standard density. For ultra-luxury depth (e.g., photo shoots or high-ceiling lobbies), a second pass—rotated 15 degrees relative to the first—adds dimension without clutter. Never do more than two passes; excess cord obscures branch texture and increases heat buildup.
Can I use the spiral technique on artificial trees?
Absolutely—and it’s even more effective. Artificial trees have predictable branch spacing and no needle drop. Pre-fluff thoroughly, then follow the same 30-degree ascent. Many artificial trees include built-in “spiral guides” (small notches or grooves on branch arms)—use them as tactile cues.
What if my lights keep falling off during wrapping?
This signals either insufficient branch density (common on older or poorly stored fakes) or incorrect starting tension. First, ensure branches are fully extended. Second, start your spiral at the *very base* of the trunk—not 6 inches up—so the first loop has maximum surface contact. Third, pause every 2 feet to gently press the cord into the outer needle layer with your palm—this “sets” the coil through friction alone.
Final Pro Tips for Lasting, Luminous Results
Wrap well—but maintain well. A pro-level wrap degrades fast without smart upkeep:
- Turn lights on for 15 minutes before final adjustment. Heat from LEDs causes slight cord expansion. Observe where loops relax or shift, then gently reposition.
- Use “light clips” sparingly—only on stubbornly springy branches. Choose clear, flexible plastic clips (not metal) that grip without pinching stems.
- Never wrap lights around ornaments. Ornaments belong *after* lighting. Adding them mid-wrap disturbs coil integrity and creates stress points.
- For multi-tier trees (e.g., pencil or slim profiles), reduce vertical rise to 6 inches per rotation—tighter spirals compensate for narrow girth.
Conclusion: Light With Intention, Not Instinct
Wrapping a Christmas tree isn’t decoration—it’s translation. You’re translating warmth into light, memory into form, care into craft. The spiral technique works because it respects the tree as a living (or thoughtfully designed) system—not a blank canvas to be covered. When you anchor low, ascend with intention, and trust the rhythm of the coil, you’re not just hiding cords—you’re revealing structure, honoring growth patterns, and inviting the eye to travel upward with quiet confidence. That’s why guests pause, why photos glow, why your own breath catches just a little longer when you switch on the switch for the first time. Don’t wait for next year. Pull out last season’s lights, test them, fluff your tree, and wrap—not as a chore, but as a ritual. Your tree deserves coherence. Your space deserves presence. And you? You deserve the quiet pride of knowing exactly how the light got there.


 浙公网安备
33010002000092号
浙公网安备
33010002000092号 浙B2-20120091-4
Comments
No comments yet. Why don't you start the discussion?