
There’s something undeniably nostalgic about draping tinsel over a Christmas tree. The shimmering strands catch the light, casting a soft glow that transforms an ordinary evergreen into a festive centerpiece. Yet, for many, the process of applying tinsel feels more like a battle than a tradition—endless tangles, uneven coverage, and hours spent trying to fix what should be simple. The good news? Wrapping a tree in tinsel doesn’t have to be chaotic. With the right tools, technique, and mindset, you can achieve that classic, magazine-worthy look with ease.
The key lies not in speed, but in strategy. Tinsel is delicate, reflective, and unforgiving when applied haphazardly. Done well, it enhances every ornament and light. Done poorly, it overwhelms the tree or creates a metallic mess. This guide walks through the precise method for wrapping your tree in tinsel—step by step, strand by strand—so you can enjoy the sparkle without the stress.
Choose the Right Tinsel for Your Tree
Not all tinsel is created equal. Before you even begin hanging a single piece, consider the type of tinsel you're using. Modern tinsel comes in various materials, lengths, and finishes, each suited to different tree styles and aesthetics.
Traditional silver or gold PVC tinsel remains popular for its high reflectivity and durability. However, newer options include holographic, matte-finish, and eco-friendly biodegradable tinsel made from cellulose. While vintage aficionados swear by the old-school sparkle, modern alternatives offer reduced shedding and easier handling.
Length matters too. Most tinsel comes in 3-foot or 6-foot strands. Longer strands reduce the number of attachment points and minimize gaps, but they’re harder to control. Shorter strands offer precision but require more time and effort to distribute evenly.
| Tinsel Type | Best For | Avoid If |
|---|---|---|
| PVC (Plastic) | Bright, traditional look; durable for reuse | You want eco-friendly decor |
| Cellulose (Biodegradable) | Eco-conscious homes; less static | You plan to reuse it yearly |
| Holographic/Color-Shifting | Modern, playful trees | You prefer classic silver/gold elegance |
| Metallic Mesh (Ribbon-style) | Full coverage with fewer strands | You want individual strand definition |
Prepare Your Tree and Workspace
No amount of skill can compensate for poor preparation. A successful tinsel application begins long before the first strand touches the tree. Start by ensuring your tree is fully assembled, fluffed, and securely anchored. Whether artificial or real, branches should be spread naturally to allow access to inner limbs.
If using an artificial tree, take time to separate each branch tip. Overlapping or compressed sections create blind spots where tinsel clumps or disappears. Fluffing also ensures light reflects evenly across the surface—a crucial factor when working with reflective materials.
Next, install your lights. Never apply tinsel over bare branches if you plan to add lights later. Once tinsel is in place, weaving strings of bulbs through it becomes nearly impossible without disturbing the arrangement. Use warm white or clear lights to complement—not compete with—the tinsel’s shine.
Clear the surrounding area. Tinsel sheds, floats, and sticks to clothing, so work in a space you can clean easily. Lay down a sheet or large towel to catch fallen pieces. Keep pets and small children away during application; loose tinsel poses a choking hazard and tends to attract curious hands.
“Tinsel is like seasoning—it enhances everything else on the tree, but only if applied with restraint and balance.” — Clara Mendez, Holiday Stylist & Former Department Store Display Designer
Step-by-Step Guide to Wrapping a Tree in Tinsel
With your tree prepped and supplies ready, follow this systematic approach to achieve professional-level results.
- Gather Supplies: Have on hand your chosen tinsel (pre-cut into manageable lengths), gloves (to prevent oils from hands sticking to strands), scissors, and a ladder or step stool for taller trees.
- Divide the Tree into Zones: Mentally split the tree into thirds—top, middle, and bottom. Work from top to bottom, just as you would when decorating with ornaments.
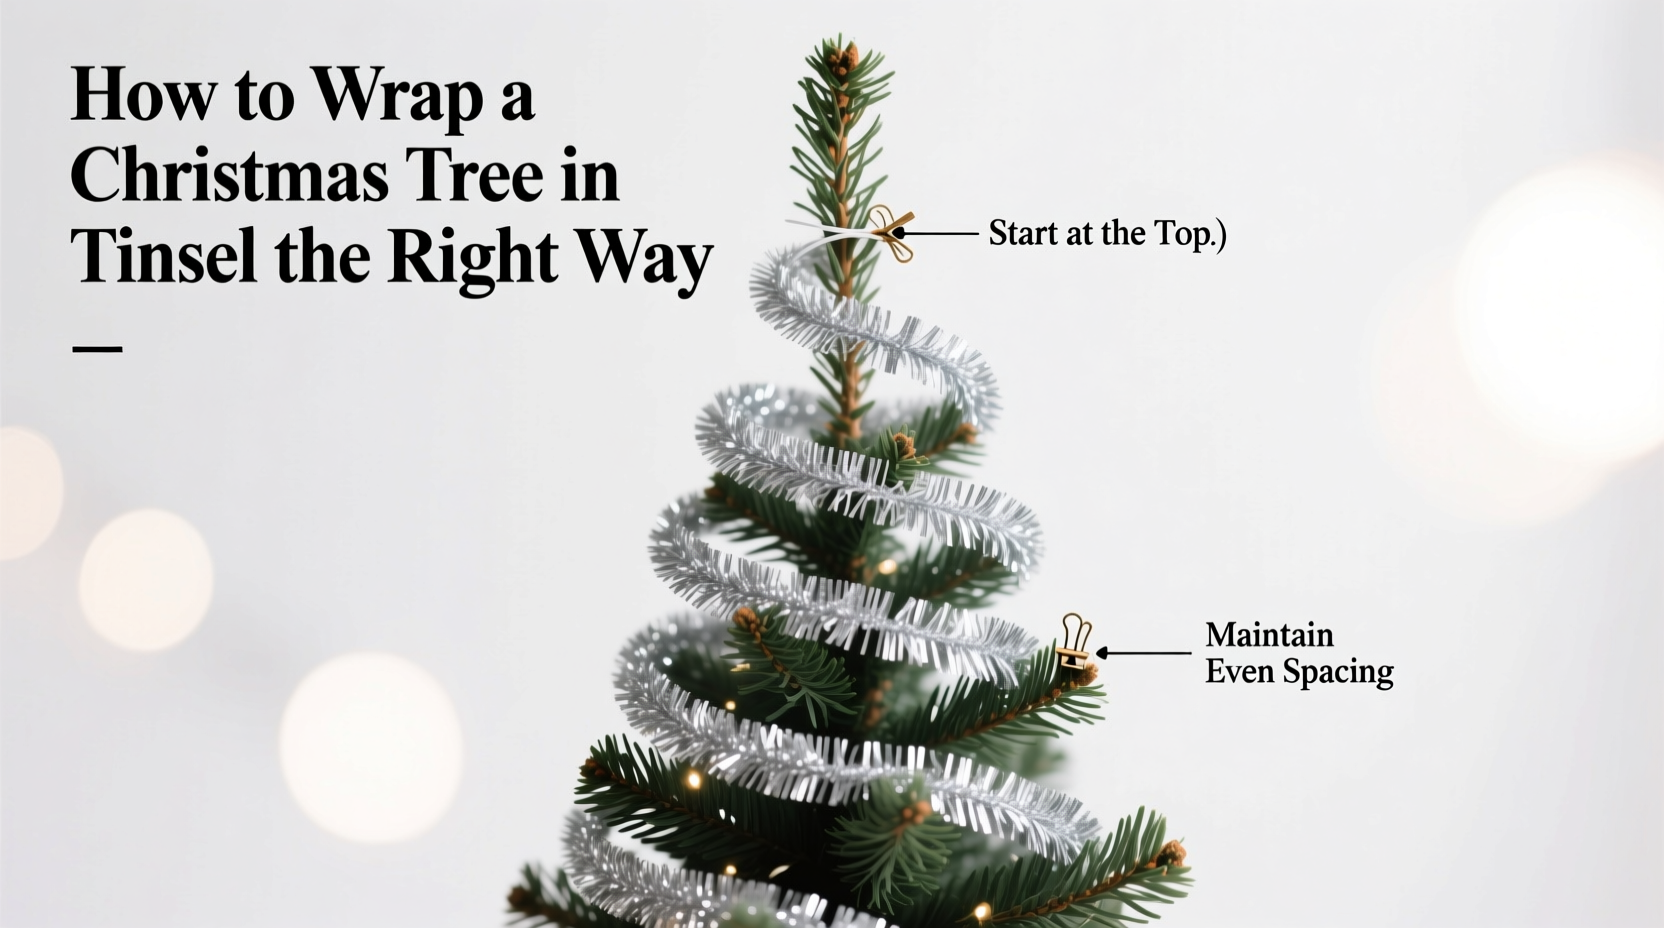
- Begin at the Top: Take one strand of tinsel and gently drape it from the uppermost tip, letting it cascade down toward the center. Do not stretch or pull—allow it to fall naturally along the branches.
- Weave, Don’t Hang: Instead of simply tossing strands over branches, gently weave them through the foliage. Insert the tinsel between clusters of needles or pine sprigs, letting 2–3 inches extend outward. This secures it in place and prevents sagging.
- Alternate Directions: To avoid a “helicopter” effect—where all strands spin in the same direction—rotate your wrapping pattern. Apply one strand clockwise, the next counterclockwise. This creates balanced visual movement.
- Distribute Evenly: Place strands approximately 6–8 inches apart within each zone. Resist the urge to overcrowd. Tinsel should accent, not dominate. Step back frequently to assess coverage.
- Focus on Depth, Not Just Surface: Push some strands deeper into the interior branches. This adds dimension and allows light to reflect from within, creating a glowing core effect.
- Finish the Base: At the bottom tier, use slightly longer drapes to draw the eye downward. Avoid covering the tree stand completely—leave a clean 2–3 inch border visible for stability and aesthetics.
Avoid These Common Tinsel Mistakes
Even experienced decorators fall into traps that ruin an otherwise beautiful display. Recognizing these pitfalls ahead of time saves time, frustration, and rework.
- Overloading the tree: Too much tinsel overwhelms ornaments and lights, turning elegance into clutter.
- Using damaged or tangled strands: Unravel and inspect each piece before use. Knotted tinsel never lays flat.
- Starting from the bottom: Gravity works against you. Lower strands get weighed down, pulling others out of alignment.
- Neglecting symmetry: Random placement creates visual noise. Maintain consistent spacing and directional flow.
- Touching tinsel after application: Oils from fingers dull the finish and increase static cling.
One of the most frequent errors is treating tinsel like garland. Unlike beaded chains or popcorn strings, tinsel isn’t meant to spiral around the tree. It’s designed to hang vertically, mimicking icicles. When wrapped horizontally, it loses its intended effect and appears messy.
Real Example: Transforming a Family Tradition
The Rivera family had always struggled with tinsel. Every December, their 8-foot artificial tree became a battleground. Maria, the matriarch, remembered her mother’s perfectly adorned tree growing up—but her own attempts ended in frustration. Strands stuck together, lights got buried, and by Christmas Eve, half the tinsel ended up on the floor.
Last year, Maria decided to try a new method. She watched a tutorial, bought biodegradable silver tinsel in 3-foot strands, and committed to preparing the tree thoroughly. She fluffed every branch, installed lights first, and divided the tree into zones. Working alone on a quiet Sunday morning, she followed the weave-and-cascade technique, stepping back after every few strands.
The result was striking. The tree sparkled without glare, ornaments stood out, and light reflected from within. Her grandchildren called it “the magical tree.” More importantly, the process took less time than previous years—and no one argued. Maria now starts her holiday prep with tinsel, treating it as a meditative ritual rather than a chore.
Expert Tips for Long-Lasting Results
Preserving your tinsel—and your sanity—for future seasons requires smart storage and gentle handling.
- Remove tinsel carefully after the holidays. Gently unwind each strand; never yank.
- Clean lightly with a microfiber cloth if dusty, but avoid water or cleaning solutions.
- Store in acid-free tissue paper inside a rigid container. Avoid plastic bags, which trap moisture and encourage brittleness.
- Label containers by color and length for quick access next year.
“Tinsel has a memory. If stored crumpled, it will remember that shape. Treat it like fine jewelry—fold with care.” — Julian Park, Museum Exhibit Designer & Holiday Display Consultant
Frequently Asked Questions
How much tinsel do I need for my tree?
A general rule is 1 foot of tinsel per inch of tree height. For example, a 6-foot (72-inch) tree needs about 72 feet of tinsel, typically 12 strands of 6 feet each. Adjust based on desired density—light accent vs. full coverage.
Can I use tinsel on a real Christmas tree?
Yes, but with caution. Real trees dry out, increasing fire risk. Avoid placing tinsel near candles or hot lights. Also, sap can stick to tinsel, making removal difficult. Use disposable or low-cost tinsel if opting for a natural tree.
Why does my tinsel keep falling off?
This usually happens when strands aren’t woven into branches or when static repels them. Try lightly misting the tree (not the tinsel) with water from a spray bottle before application—this reduces static. Also, ensure strands are nestled between dense foliage, not resting on tips.
Final Checklist: Tinsel Application Success
- ✅ Tree is fully assembled and fluffed
- ✅ Lights are installed and tested
- ✅ Tinsel is pre-cut into 3–6 foot strands
- ✅ Work area is clear and protected
- ✅ Gloves and step stool are ready
- ✅ You’re starting from the top, working down
- ✅ Strands are woven, not draped loosely
- ✅ Coverage is even, not excessive
- ✅ You’ve stepped back to check balance
Conclusion: Shine with Confidence This Season
Wrapping a Christmas tree in tinsel shouldn’t feel like wrestling a metallic octopus. With thoughtful preparation, deliberate technique, and respect for the material, you can achieve that timeless, luminous look with calm and confidence. The goal isn’t perfection—it’s harmony. Let the tinsel enhance your tree, not overpower it. Let it catch the light, echo memories, and add a whisper of vintage charm to your modern celebration.
This holiday season, slow down. Enjoy the rhythm of weaving each strand. Listen to carols, sip cocoa, and make it a moment—not a task. When done right, tinsel doesn’t just decorate a tree. It wraps your home in warmth, nostalgia, and quiet joy.


 浙公网安备
33010002000092号
浙公网安备
33010002000092号 浙B2-20120091-4
Comments
No comments yet. Why don't you start the discussion?