
Decorating a spiral staircase for the holidays can elevate your home’s festive atmosphere. The elegant curve of the railing offers a dramatic canvas for Christmas lights, but it also presents unique challenges. Without careful planning, you risk creating tangled loops, uneven spacing, tripping hazards, or even electrical risks. Done right, however, the result is a stunning visual centerpiece that draws admiration from guests and family alike.
The key lies in preparation, precision, and adherence to safety standards. This guide walks through every phase—from selecting the right lights to securing them properly—so you can achieve a professional-looking display that's both beautiful and safe.
Assess Your Spiral Staircase and Lighting Needs
Before purchasing any lights, evaluate the structure of your staircase. Spiral staircases vary significantly in diameter, height, number of turns, and baluster (vertical support) spacing. These factors directly impact how many lights you'll need and how they should be installed.
Measure the total vertical rise from the bottom to the top of the staircase. Then, measure the circumference at mid-rail level. Multiply this by the number of full rotations the staircase makes. For example, if your staircase completes 1.5 turns and has a mid-rail circumference of 6 feet, you’ll need lights to cover approximately 9 linear feet along the curve. Add an extra 10–15% to account for overlaps and anchoring points.
Consider whether you want to wrap the lights around the handrail, attach them to the balusters, or drape them downward between supports. Each method affects visibility, safety, and installation complexity.
Selecting the Right Lights and Materials
Not all Christmas lights are suitable for spiral staircases. The ideal choice balances brightness, durability, flexibility, and safety.
- LED vs. Incandescent: LED lights consume less energy, produce minimal heat, and last longer—critical when wrapping confined spaces where overheating could be a concern.
- Wire Gauge and Flexibility: Opt for thinner, more pliable wires that bend easily around curves without kinking. Look for “flex-wire” or “ultra-soft strand” options.
- Length and Bulb Spacing: Choose strands with consistent bulb spacing (typically 4” or 6”) to maintain uniformity. Avoid mixing different spacing patterns on the same run.
- Plug Configuration: End-to-end connectable strands simplify power distribution, but don’t exceed the manufacturer’s recommended limit (usually 3–5 sets).
“Using low-voltage LED strings on a spiral staircase reduces fire risk and allows tighter bends without damaging internal wiring.” — Daniel Reeves, Residential Lighting Safety Consultant
Avoid heavy-duty commercial-grade lights unless your staircase is exceptionally large. Their stiffness makes clean wrapping difficult and increases strain on mounting points.
Step-by-Step Installation Guide
Follow this sequence to install your lights efficiently and safely, minimizing tangles and maximizing visual appeal.
- Gather Supplies: Christmas lights, clear plastic cable ties (UV-resistant if near windows), non-damaging adhesive clips (e.g., 3M Command™), gloves, ladder, measuring tape, and a helper if possible.
- Test Lights First: Plug in each strand before installation to check for dead bulbs or faulty connections.
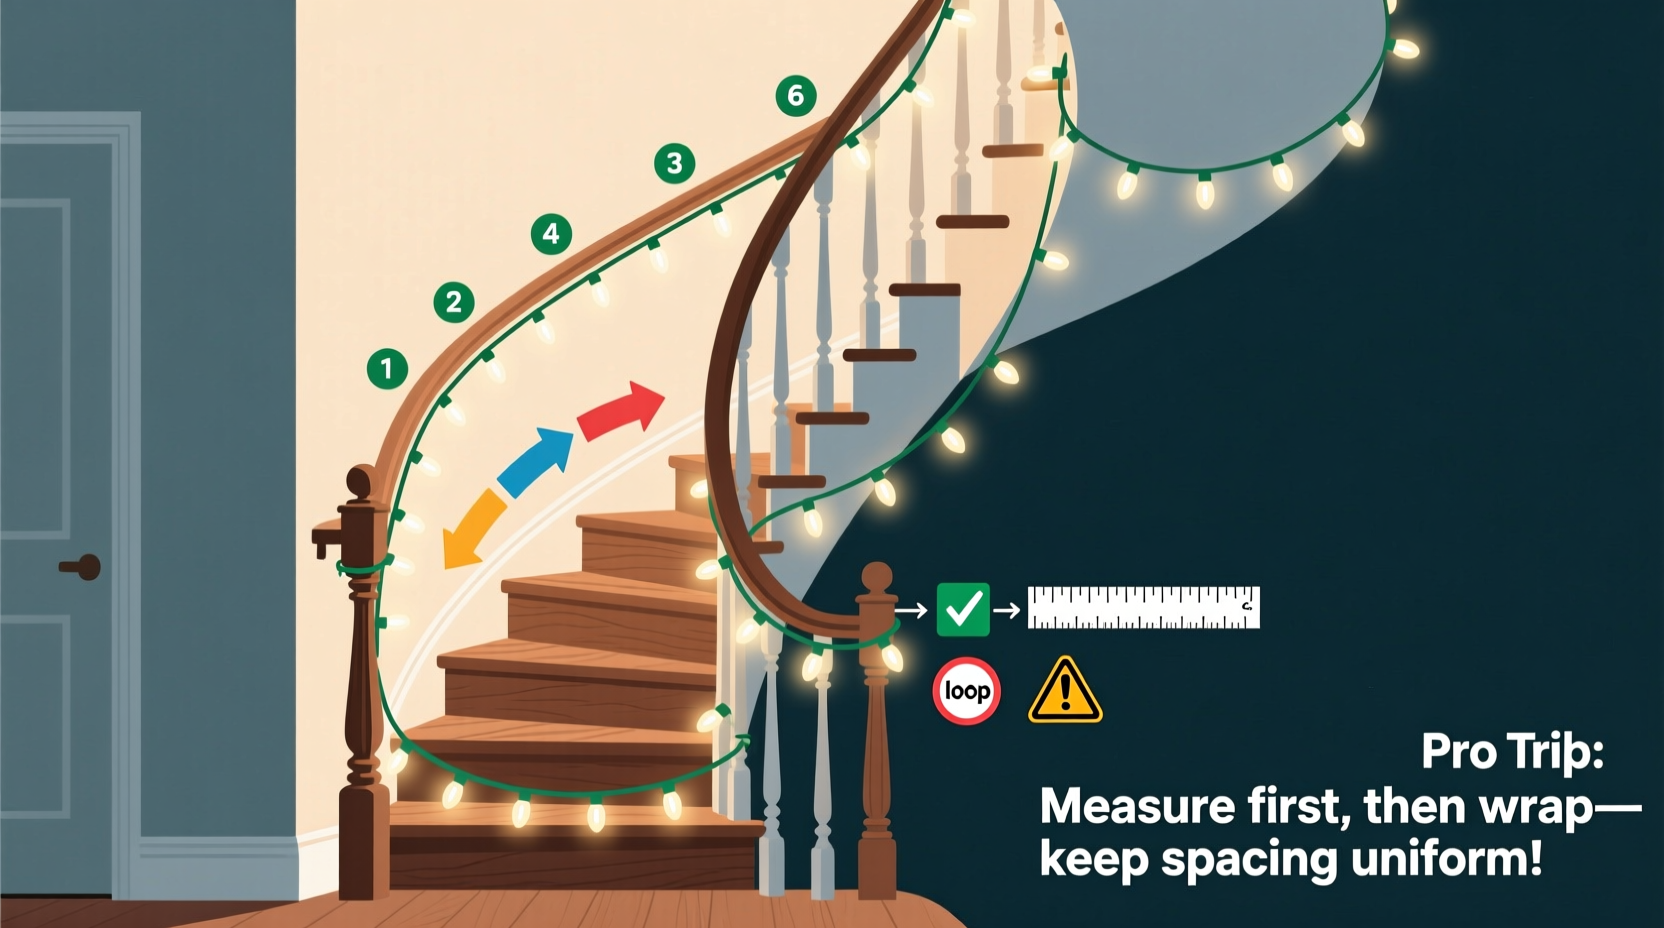
- Determine Starting Point: Begin at the bottom of the staircase. This ensures gravity assists rather than fights the process as you work upward.
- Establish a Guideline: Use a piece of string taped lightly to the rail at even intervals to visualize spacing before committing with lights.
- Begin Wrapping: Start with the first bulb about 6 inches from the base. Wrap the wire around the handrail in a continuous spiral motion, maintaining consistent tension.
- Secure Every 6–8 Inches: After placing each bulb, fasten the wire behind it using a cable tie or adhesive clip. Do not overtighten—this can crush wires or damage finishes.
- Manage Directional Changes: At landings or directional shifts, use a small loop (no larger than 2 inches) to transition smoothly. Avoid sharp bends exceeding 90 degrees.
- Terminate Neatly: End at the top with enough cord to reach an outlet or junction box. Conceal excess with cord covers or decorative sleeves.
- Inspect Entire Run: Walk up and down to check for loose sections, sagging, or protruding ties. Trim excess tie material flush to avoid snags.
- Final Power Test: Once fully secured, plug in and observe operation under dark conditions. Replace any flickering bulbs immediately.
Safety Best Practices and Hazard Prevention
A poorly installed light display isn’t just unattractive—it can pose real dangers. Follow these guidelines to eliminate common risks.
| Do | Don’t |
|---|---|
| Use lights rated for indoor use only unless specifically labeled for damp/wet locations. | Run cords across walkways or stair treads where they can cause trips. |
| Secure all connections off the ground and away from foot traffic. | Overload outlets or power strips; use a surge-protected extension cord if needed. |
| Inspect wires for fraying, cracking, or exposed copper before installation. | Nail or staple wires to wood or drywall—this damages insulation and creates fire hazards. |
| Turn off lights when leaving the house or going to sleep. | Leave damaged strands in place “just for now”—replace them immediately. |
| Use adhesive clips designed for décor; they hold firmly but remove cleanly. | Create loops larger than 3 inches—they collect dust, look messy, and increase fall risk. |
Ensure that no section of the staircase becomes obstructed. Maintain at least 36 inches of clear passage width, especially if the staircase is a primary route between floors. If children or elderly individuals use the stairs regularly, consider installing temporary night-lights beneath the railing instead of relying solely on decorative lighting.
Real-World Example: A Narrow Urban Townhouse Staircase
In a Brooklyn brownstone renovation project, homeowner Lena Tran wanted to highlight her newly restored cast-iron spiral staircase during the holiday season. The staircase was tight—only 3.5 feet wide—with 2.5 turns over two stories. Her initial attempt used standard C7 incandescent lights, which proved too rigid and created visible gaps due to inconsistent wrapping.
She consulted a local lighting designer who recommended switching to mini LED strings with 4-inch spacing and using transparent adhesive clips spaced every 7 inches. By pre-stretching the strands and marking clip positions with chalk dots, Lena achieved a smooth, even spiral pattern that followed the curvature flawlessly.
Crucially, the electrician advised installing a dedicated GFCI outlet in the adjacent closet to power the display safely. All cords were routed along the wall behind a baseboard cover, eliminating trip hazards. The final result received praise from neighbors and inspired similar installations in the historic district.
Checklist: Pre-Installation Preparation
Before starting, verify the following items are ready:
- □ Measured total rail length including spiral turns
- □ Selected appropriate LED light strands with uniform spacing
- □ Purchased UV-resistant cable ties or removable adhesive clips
- □ Tested all light sets for functionality
- □ Identified safe power source with accessible outlet
- □ Cleared pathway around staircase for safe ladder use
- □ Enlisted helper for two-person installation (recommended)
- □ Reviewed local fire code guidelines for holiday lighting (if applicable)
Frequently Asked Questions
Can I leave Christmas lights on a spiral staircase unattended?
No. As a general safety rule, never leave decorative lights running when no one is home or while sleeping. Even LED lights can fail unexpectedly, and nearby combustible materials like drapes or dried greenery increase risk. Use a programmable timer to turn lights off automatically after peak viewing hours (e.g., 11 PM).
How do I prevent lights from sagging over time?
Sagging usually results from inadequate anchoring. Ensure clips or ties are placed frequently enough—every 6 to 8 inches—and that they grip both the wire and a stable part of the railing. Avoid stretching the strand too tightly, which can cause warping. Instead, maintain gentle tension throughout installation.
What should I do if my staircase has uneven baluster spacing?
When balusters vary in distance, focus on maintaining consistent light placement along the handrail rather than aligning with supports. Use smaller loops or S-shaped bends to adjust positioning subtly. Alternatively, mount lights directly to the underside of the handrail using discreet clips for a floating effect that bypasses baluster irregularities.
Conclusion: Create a Safe, Stunning Holiday Display
Wrapping Christmas lights around a spiral staircase doesn’t have to be frustrating or dangerous. With thoughtful planning, the right materials, and attention to detail, you can transform a functional architectural feature into a breathtaking seasonal statement. The elegance of a perfectly spiraled light trail mirrors the natural flow of the staircase itself, enhancing its design while spreading holiday cheer.
Safety must remain central—every decision from bulb type to mounting method impacts both aesthetics and well-being. By avoiding hazardous loops, ensuring even spacing, and securing connections responsibly, you protect your home and loved ones while enjoying the full beauty of the season.


 浙公网安备
33010002000092号
浙公网安备
33010002000092号 浙B2-20120091-4
Comments
No comments yet. Why don't you start the discussion?