
Wrapping columns or banisters with Christmas lights is one of the most effective ways to bring festive warmth to your home’s interior or exterior. When done well, it enhances architectural features and creates a glowing focal point during the holidays. But when executed poorly—too tight, too loose, or unevenly spaced—the result can look sloppy and diminish the overall impact. Achieving a balanced, secure, and visually pleasing wrap requires planning, the right materials, and attention to detail. This guide walks you through every step, from selecting the proper lights to securing them safely, ensuring your display shines with professional precision.
Choose the Right Lights for the Job
The first decision in wrapping any vertical structure is selecting the appropriate type of Christmas lights. Not all strings are created equal—some are better suited for outdoor use, others for indoor; some are designed specifically for wrapping, while others work best for draping or hanging.
For columns and banisters, LED mini lights are generally the top choice. They produce less heat than incandescent bulbs, reducing fire risk, especially on wooden railings or near flammable materials. They’re also more energy-efficient and have a longer lifespan, which matters if you plan to reuse them year after year.
Consider light string length carefully. Most standard strands are 25 feet with 100 bulbs, but for wrapping, you’ll want to calculate based on both height and circumference. A good rule of thumb: for every foot of height, you’ll need about 3–4 feet of lights to achieve a full spiral wrap with even spacing.
Measure and Plan Before You Begin
Rushing into wrapping without measuring leads to gaps, bunching, or running out of lights halfway up. Take time to assess the structure.
For a column, measure its height and circumference. Multiply the height by 3.5 to estimate how many feet of lights you'll need for a spiral wrap with approximately 4-inch spacing between loops. For example, a 7-foot-tall column would require roughly 24.5 feet of lights (7 × 3.5). Round up to ensure full coverage.
Banisters present a different challenge due to their slope and varying angles. Measure the total linear length along the handrail from bottom to top. Then determine whether you want a single, double, or triple wrap. A double wrap means using two strands side-by-side for fuller coverage, effectively doubling your light requirement.
“Proper measurement prevents frustration and wasted materials. I always tell my clients: measure twice, plug in once.” — Daniel Reyes, Holiday Lighting Designer & Owner of Luminary Displays Co.
Step-by-Step Guide to Wrapping Columns and Banisters
With your materials ready and measurements confirmed, follow this proven method for an even, secure wrap.
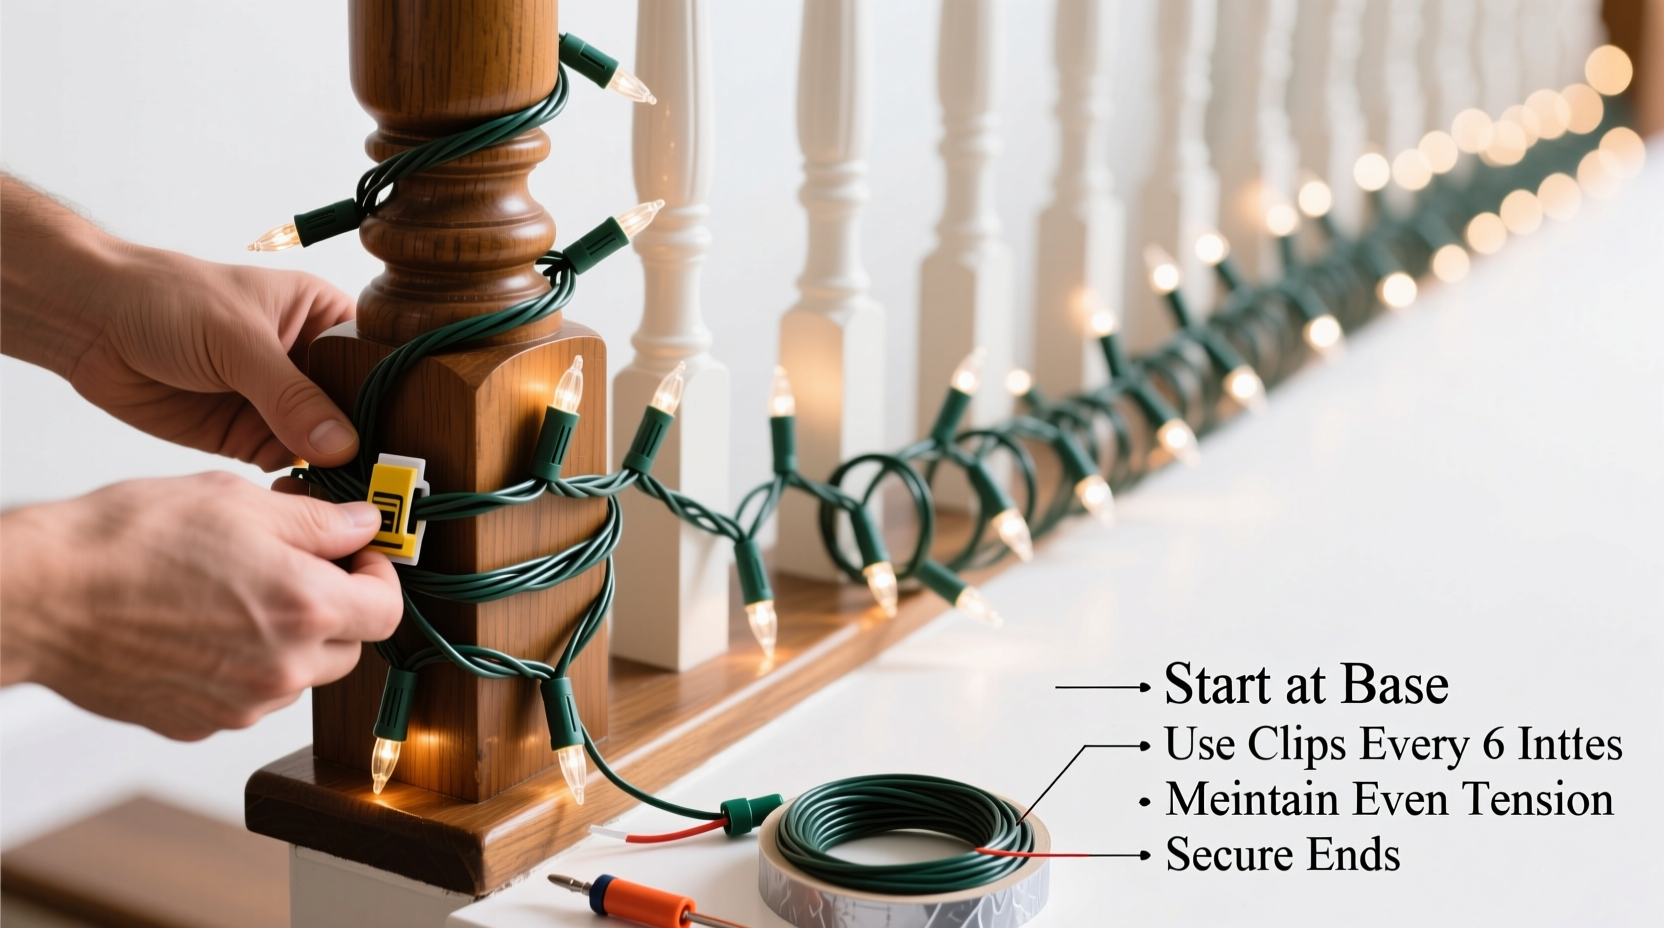
- Start at the Bottom: Always begin at the base of the column or the lowest point of the banister. This ensures gravity works with you, not against you, as you move upward.
- Secure the Plug End: Use a small zip tie, twist tie, or removable adhesive clip to anchor the male plug end to the underside of the base. Never leave it dangling—this reduces tripping hazards and strain on the cord.
- Create Even Loops: Hold the string taut and wrap upward in a spiral motion. Keep consistent tension—neither too tight nor too loose. For columns, aim for 3 to 4 inches between each loop. On banisters, adjust spacing slightly depending on curvature, but maintain visual rhythm.
- Use Gentle Anchoring Methods: Every 12 to 18 inches, secure the strand with a clear plastic clip, zip tie, or adhesive mounting tab. Avoid nails, staples, or tape that could damage surfaces or degrade over time.
- Manage Connections: If multiple strands are needed, connect them only at the ends (not mid-wrap) to avoid bulky junctions. Use female-to-female connectors sparingly and only if rated for outdoor use and properly insulated.
- Finish at the Top: Once you reach the top, coil excess cord neatly and secure it out of sight. Plug in the strand to test before finalizing placement.
When working with banisters, pay special attention to corners and newel posts. Wrap around the post separately, treating it like a short column, then continue down the next section of railing. Maintain continuity in spacing so the eye perceives a seamless flow.
Best Practices and Common Mistakes
Achieving a polished look isn’t just about technique—it’s also about avoiding common pitfalls that undermine safety and aesthetics.
| Do | Don’t |
|---|---|
| Use clips or ties rated for outdoor use—especially for exterior installations exposed to moisture and temperature shifts. | Staple or nail lights directly into wood—this damages both the cord insulation and the structure, creating safety hazards. |
| Maintain consistent spacing to create rhythm and balance in the design. | Let cords hang loosely between wraps—this causes sagging and detracts from the clean look. |
| Test all strands before installation to catch burnt-out bulbs or faulty connections early. | Overload electrical circuits—follow manufacturer guidelines on maximum connectable strands. |
| Use warm white or color-coordinated lights to complement your décor scheme. | Mix bulb types or colors haphazardly—this creates visual clutter. |
Real Example: Wrapping a Grand Staircase Banister
Sarah Thompson, a homeowner in Portland, Oregon, wanted to elevate her Victorian-style home’s holiday curb appeal by wrapping the 18-foot curved staircase banister leading to her front porch. She initially tried freehand wrapping with standard C7 lights but ended up with uneven spacing and several sections where the cord slipped down overnight.
She started over using 50-foot LED mini light strands, clear plastic rail clips, and a simple strategy: she measured the total length (22 feet), decided on a double wrap for density, and marked every 4 inches along the railing with removable chalk dots. Using a ladder and a helper, she followed the marks as guides, clipping each loop securely. The second strand was installed parallel to the first, offset slightly to fill gaps.
The result was a rich, glowing ribbon of light that followed the curve gracefully. Neighbors commented on the professional appearance, and Sarah reported that the lights stayed perfectly in place throughout the season—even during heavy rain and wind.
Essential Tools and Materials Checklist
To wrap columns or banisters successfully, gather these items before starting:
- LED mini light strands (measured to fit)
- Clear plastic clips, adhesive mounts, or zip ties
- Measuring tape
- Ladder or step stool (for taller columns)
- Removable marker or chalk (for marking spacing)
- Gloves (to protect hands and improve grip)
- Extension cord (outdoor-rated if applicable)
- Voltmeter or light tester (optional, for checking strand integrity)
Having everything on hand prevents interruptions and keeps the process efficient. Store leftover clips and tools in a labeled container for quick access next season.
Safety Considerations for Indoor and Outdoor Installations
Safety should never be compromised for aesthetics. Electrical hazards, trip risks, and structural damage are real concerns when installing holiday lighting.
Always check that your lights are UL-listed and rated for the environment—indoor-only strings should never be used outside. Outdoor-rated lights have thicker insulation and weather-resistant sockets. Even then, protect all connections with waterproof outlet covers or silicone sealant caps.
Never run cords across walkways unless covered with a cord protector. On banisters, ensure the plug end is secured away from foot traffic. For multi-story installations, consider using a timer or smart plug to reduce runtime and prevent accidental overnight operation.
If wrapping painted or delicate surfaces, avoid adhesives that might peel paint. Instead, use soft fabric ties or removable hook-and-loop fasteners designed for temporary decor.
Frequently Asked Questions
How far apart should I space each loop when wrapping?
For a balanced look, space loops 3 to 4 inches apart. Closer spacing (2 inches) works for smaller columns or a denser effect, while wider spacing (6 inches) may suffice for very tall or thick structures where visibility from a distance is key.
Can I use Command™ strips to hold lights in place?
Yes, but only use versions explicitly rated for outdoor use and cold temperatures. Standard indoor strips may fail in winter conditions. Always test adhesion on a small area first, especially on porous or textured surfaces.
What should I do if my lights go out after a few days?
First, check the fuse located in the male plug—many strings have replaceable fuses. If that’s intact, inspect for loose bulbs or damaged wires. Use a light tester to identify dead sections. Consider switching to commercial-grade strings with shunt technology, which keeps the rest of the strand lit even if one bulb fails.
Final Tips for a Lasting, Professional Display
The difference between amateur and expert-level holiday lighting often comes down to preparation and consistency. Take the time to plan your layout, invest in quality materials, and don’t rush the process. Step back frequently to view your progress from multiple angles—what looks even up close might appear unbalanced from across the room.
After installation, schedule a weekly check during the season to tighten any loosened clips, replace burnt bulbs, and clear debris like leaves or snow buildup. At season’s end, remove lights carefully, coil them gently around a spool or cardboard, and store in labeled, compartmentalized bins to preserve their condition.
“The best holiday displays aren’t the brightest—they’re the ones that feel intentional. Precision in wrapping shows care and craftsmanship.” — Lena Park, Residential Lighting Consultant
Bring Your Home to Life This Holiday Season
Wrapping columns or banisters with Christmas lights doesn’t have to be a frustrating chore. With the right approach, it becomes a rewarding way to highlight your home’s character and spread seasonal cheer. By following these detailed steps, avoiding common errors, and prioritizing both aesthetics and safety, you can create a display that looks professionally installed—and lasts reliably through December and beyond.


 浙公网安备
33010002000092号
浙公网安备
33010002000092号 浙B2-20120091-4
Comments
No comments yet. Why don't you start the discussion?