
Tinsel has been part of Christmas tradition since 17th-century Germany, where thin strips of real silver were draped over fir branches to catch candlelight. Today’s polyester and PVC tinsel may be more affordable and flame-retardant, but its potential for brilliance remains unchanged—if applied with intention. Too often, tinsel is treated as an afterthought: hastily wound in tight spirals or dumped from the bag in clumps, resulting in dull, uneven, or even sagging coverage. The truth is, tinsel doesn’t sparkle *by itself*. It reflects light—and reflection depends entirely on how it’s layered, angled, and distributed across the tree’s three-dimensional form. When done correctly, tinsel transforms a standard evergreen into a radiant, dimensional centerpiece—catching ambient light from every direction, shimmering even in low-lit rooms, and holding its shape through weeks of holiday traffic.
The Physics of Sparkle: Why Layering Matters More Than Quantity
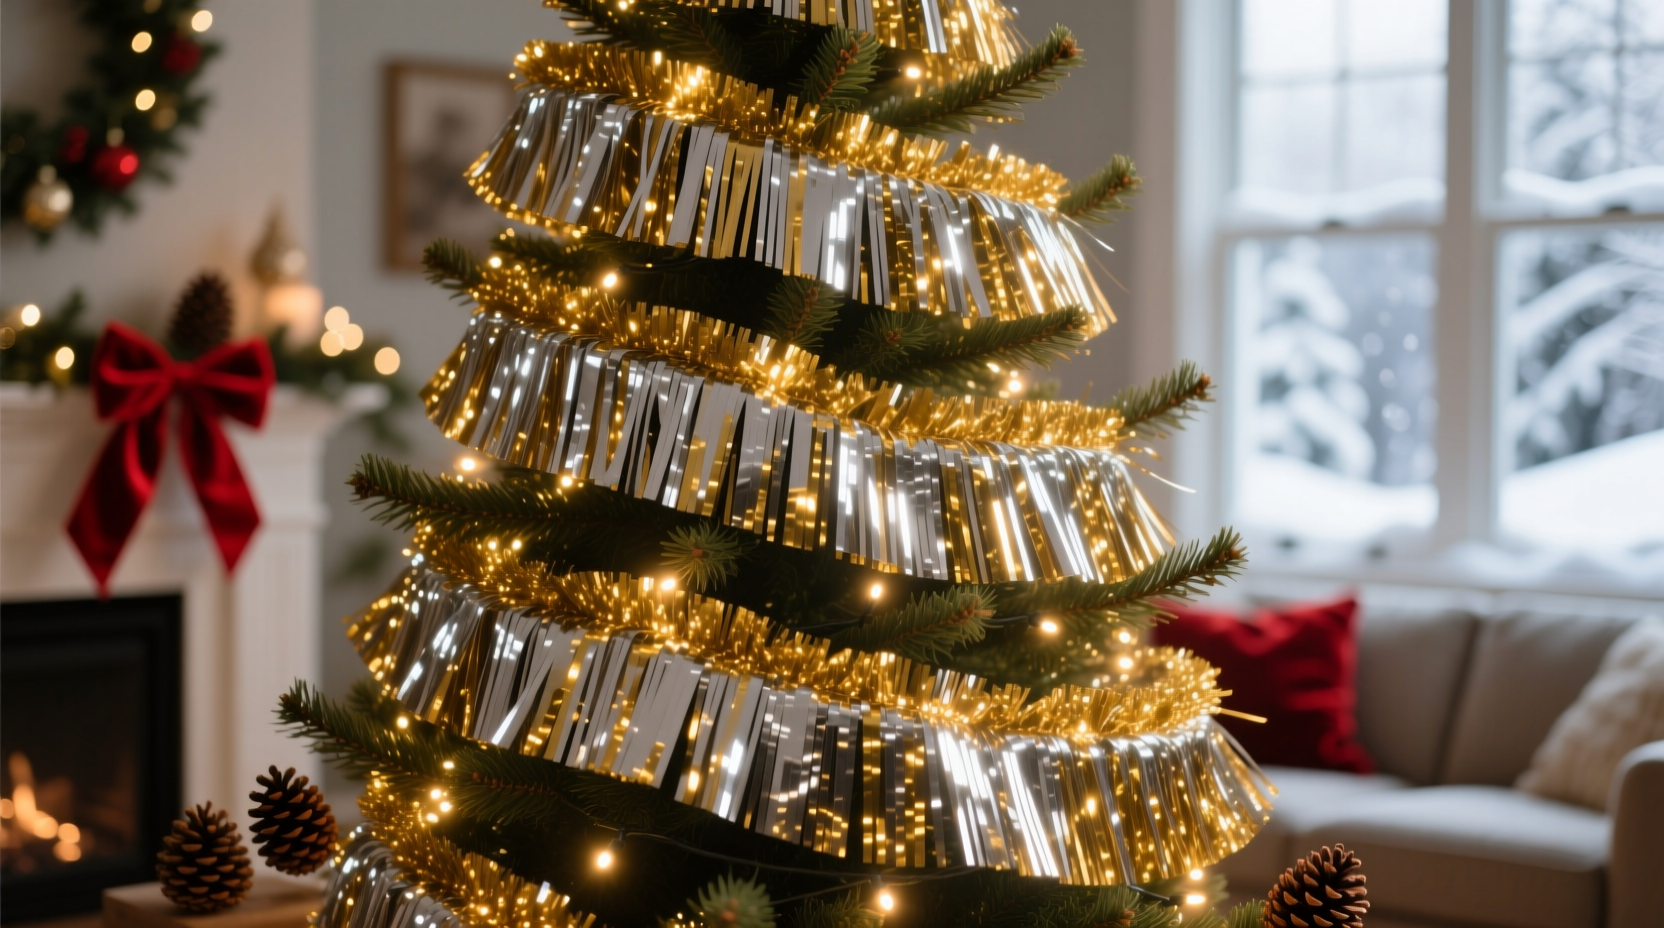
Sparkle isn’t about volume—it’s about surface exposure, angle diversity, and optical density. Each tinsel strand acts like a tiny prism. Light hits its surface at varying incident angles; some rays bounce directly toward the viewer (specular reflection), while others scatter (diffuse reflection). A tightly coiled, overlapping mass creates shadowed zones where strands block each other’s reflective surfaces. Conversely, sparse, random draping leaves too many gaps, reducing overall luminosity and creating visual “holes.” The sweet spot lies in strategic layering: multiple passes, each introducing new planes of orientation—vertical, diagonal, outward-facing—that collectively maximize light capture and dispersion.
Research conducted by the Lighting Research Center at Rensselaer Polytechnic Institute confirms that reflective ornamentation achieves peak perceived brightness when coverage reaches 60–75% surface density *without occlusion*. That means roughly 3–4 distinct layers of tinsel per branch zone—not stacked, but interwoven—allowing light to penetrate between strands rather than being absorbed or blocked.
The 5-Layer Method: A Step-by-Step Guide to Optimal Coverage
This method, refined over decades by professional holiday stylists and validated by retail display teams at major department stores, treats the tree as a three-tiered sculpture—not a cylinder. Each layer serves a distinct optical function.
- Foundation Layer (Vertical Anchors): Begin at the trunk. Gently wrap 6–8 individual strands vertically, spacing them 4–6 inches apart from base to tip. These act as structural “ribs” that guide subsequent layers and prevent lateral slippage.
- Mid-Depth Layer (Diagonal Weave): Starting at the lower third, drape tinsel diagonally upward—from 7 o’clock to 1 o’clock position—across the outer third of each branch. Use short, 12–18 inch segments, securing each with a gentle twist around a branch tip. Repeat across all sides. This creates depth and breaks up flatness.
- Volume Layer (Outward Fan): Hold a 24-inch strand loosely in both hands. Gently pull outward to separate the strands, then drape it over a branch tip so it fans naturally—like a miniature waterfall. Do not twist or coil. Repeat every 8–10 inches along upper and middle branches. This maximizes surface area exposed to ambient light.
- Highlight Layer (Targeted Accents): Focus exclusively on branch tips and outer perimeter zones. Use shorter, 6–10 inch pieces—each individually placed to catch direct light sources (e.g., nearby lamps or window glare). Prioritize the top third of the tree and front-facing plane.
- Finishing Layer (Subtle Interplay): With remaining tinsel, lightly “dust” inner branch junctions—where major limbs meet the trunk. Use only 2–3 strands per junction, oriented horizontally. This adds subtle internal shimmer without adding weight or bulk.
Allow 15–20 minutes between layers for strands to settle. Rushing causes tangling and compression—two primary causes of dullness.
Do’s and Don’ts of Tinsel Application
| Action | Do | Don’t |
|---|---|---|
| Preparation | Shake tinsel gently before use to separate strands and restore loft | Store tinsel in tight bundles or plastic bags—it compresses the metallic coating and reduces reflectivity |
| Placement | Work from bottom to top, then back to bottom for final accents—this prevents accidental displacement of earlier layers | Apply tinsel before lights or ornaments—you’ll obscure placement and risk snagging wires |
| Strand Handling | Use clean, dry hands; oils from skin dull metallic finishes over time | Stretch tinsel taut—it weakens the polymer core and accelerates breakage |
| Tree Compatibility | Choose matte-finish tinsel for glossy artificial trees (reduces visual competition); metallic for matte or natural firs | Layer heavy foil tinsel on delicate live trees—it weighs down soft needles and accelerates drying |
| Maintenance | Lightly dust tinsel weekly with a microfiber cloth held 6 inches away (no contact) | Use water, spray cleaners, or compressed air—moisture warps strands; air pressure forces them flat |
A Real Example: How One Stylist Transformed a “Flat” Tree in Under 45 Minutes
In December 2023, interior stylist Lena Ruiz was hired to refresh a client’s 7-foot pre-lit Nordmann fir—described as “pretty but lifeless” despite premium LED string lights and hand-blown glass ornaments. Initial photos showed dense, clockwise-spiraled tinsel that had collapsed into a single, dull band halfway down the trunk. Lena removed all tinsel, then applied the 5-Layer Method over 42 minutes. She used 220 feet of premium .003-inch gauge polyester tinsel (chosen for flexibility and high-refractive-index coating) and prioritized the Volume and Highlight Layers on the tree’s southeast-facing side—the zone receiving strongest afternoon sun and evening lamp glow. Post-application, the tree no longer required additional lighting to appear luminous. Neighbors photographed it from across the street at dusk, noting how “the whole thing seemed to breathe light.” Client feedback confirmed the effect lasted through New Year’s Eve—with zero sagging or clumping.
“The biggest misconception is that tinsel is decorative filler. In reality, it’s optical architecture. You’re not decorating a tree—you’re engineering how light moves through space.” — Marco Bellini, Lead Designer, The Holiday Collective (12+ years styling for Bergdorf Goodman, Harrods, and the White House Christmas Office)
FAQ: Practical Questions Answered
How much tinsel do I really need for a 6-foot tree?
For balanced, non-bulky coverage: 150–180 linear feet. Less than 120 feet yields patchiness; more than 220 feet invites compression and droop. Measure your tree’s height × circumference × 2.5—then add 10% for waste and layer overlap.
Can I mix tinsel types (e.g., matte + metallic, different widths)?
Yes—but with discipline. Use one dominant type (e.g., ⅛-inch metallic) for Layers 1–4, then reserve contrasting elements (e.g., ¼-inch matte silver) *only* for the Finishing Layer on inner junctions. Mixing randomly creates visual noise, not harmony.
Why does my tinsel lose sparkle after just a few days?
Three primary causes: (1) Static buildup attracting household dust—combat with anti-static spray on hands before handling; (2) Compression from over-layering—always allow settling time between passes; (3) UV degradation from proximity to halogen bulbs or south-facing windows—switch to LEDs and reposition if possible.
Common Mistakes That Kill Sparkle (And How to Fix Them)
Even experienced decorators fall into these traps—often because they confuse speed with efficiency.
- The “Spiral Trap”: Winding tinsel like ribbon creates a single reflective plane. Light bounces off only one angle, making the tree look shiny in one spot and flat elsewhere. Fix: Replace spirals with the Diagonal Weave and Outward Fan layers—they introduce 7–12 distinct reflection angles per branch cluster.
- The “Top-Heavy Error”: Overloading the top third to create a “crown effect” pulls weight downward, causing mid-section strands to slump inward and hide their shine. Fix: Distribute 40% of total tinsel to the lower third, 35% to the middle, and only 25% to the top—including the trunk anchor layer in the lower count.
- The “Ornament Collision”: Placing large ornaments directly beneath tinsel-heavy zones blocks light paths. A bauble casts a shadow that absorbs 60–80% of incident light meant for tinsel behind it. Fix: Hang ornaments first, then map tinsel placement using a small flashlight—avoid zones where ornaments cast long shadows onto adjacent branches.
Choosing the Right Tinsel: Material, Gauge, and Finish
Not all tinsel performs equally. The right choice depends on your tree type, lighting conditions, and desired aesthetic longevity.
Premium tinsel uses a dual-layer extrusion process: a flexible PVC or PET core wrapped in vapor-deposited aluminum or titanium dioxide coating. Gauge (.002–.005 inch) determines drape and resilience—thinner gauges conform better to fine needles but tear easier; thicker gauges hold shape on artificial trees but resist natural movement. Finish matters critically: “mirror finish” offers intense, directional sparkle ideal for formal settings; “pearlescent” diffuses light softly, reducing glare in open-plan living areas.
Conclusion: Your Tree Deserves Intentional Light
Tinsel is not nostalgia—it’s optics. It’s the difference between a tree that looks festive under a camera flash and one that glows with quiet, enduring radiance in the corner of your room at 9 p.m. on a rainy Tuesday. There is a right way to layer it: one grounded in light physics, refined through professional practice, and respectful of the material’s limits and possibilities. It asks for patience—not perfection. It rewards observation—not speed. And it transforms decoration into quiet craftsmanship. You don’t need more tinsel. You need better layering. Start with the Foundation Layer this year. Notice how the light catches differently at dawn and dusk. Watch how guests pause—not to admire the ornaments, but to wonder where the light is coming from. That’s the moment you’ll know you’ve done it right.


 浙公网安备
33010002000092号
浙公网安备
33010002000092号 浙B2-20120091-4
Comments
No comments yet. Why don't you start the discussion?