
Drawing a human face can feel intimidating at first. The proportions, symmetry, and subtle details often seem overwhelming—especially when starting out. But with the right approach, anyone can learn to draw a face confidently and accurately. This guide breaks down the process into manageable, repeatable steps using foundational techniques trusted by art instructors and illustrators. Whether you're sketching for fun or building a portfolio, these methods will help you create balanced, expressive faces from memory or observation.
Understanding Facial Proportions: The Foundation of Realism
The key to drawing a believable face lies in proportion. Most beginner mistakes stem not from poor technique but from misaligned features. A widely used method in classical drawing teaches that the human head can be divided into zones that guide where eyes, nose, mouth, and ears should fall.
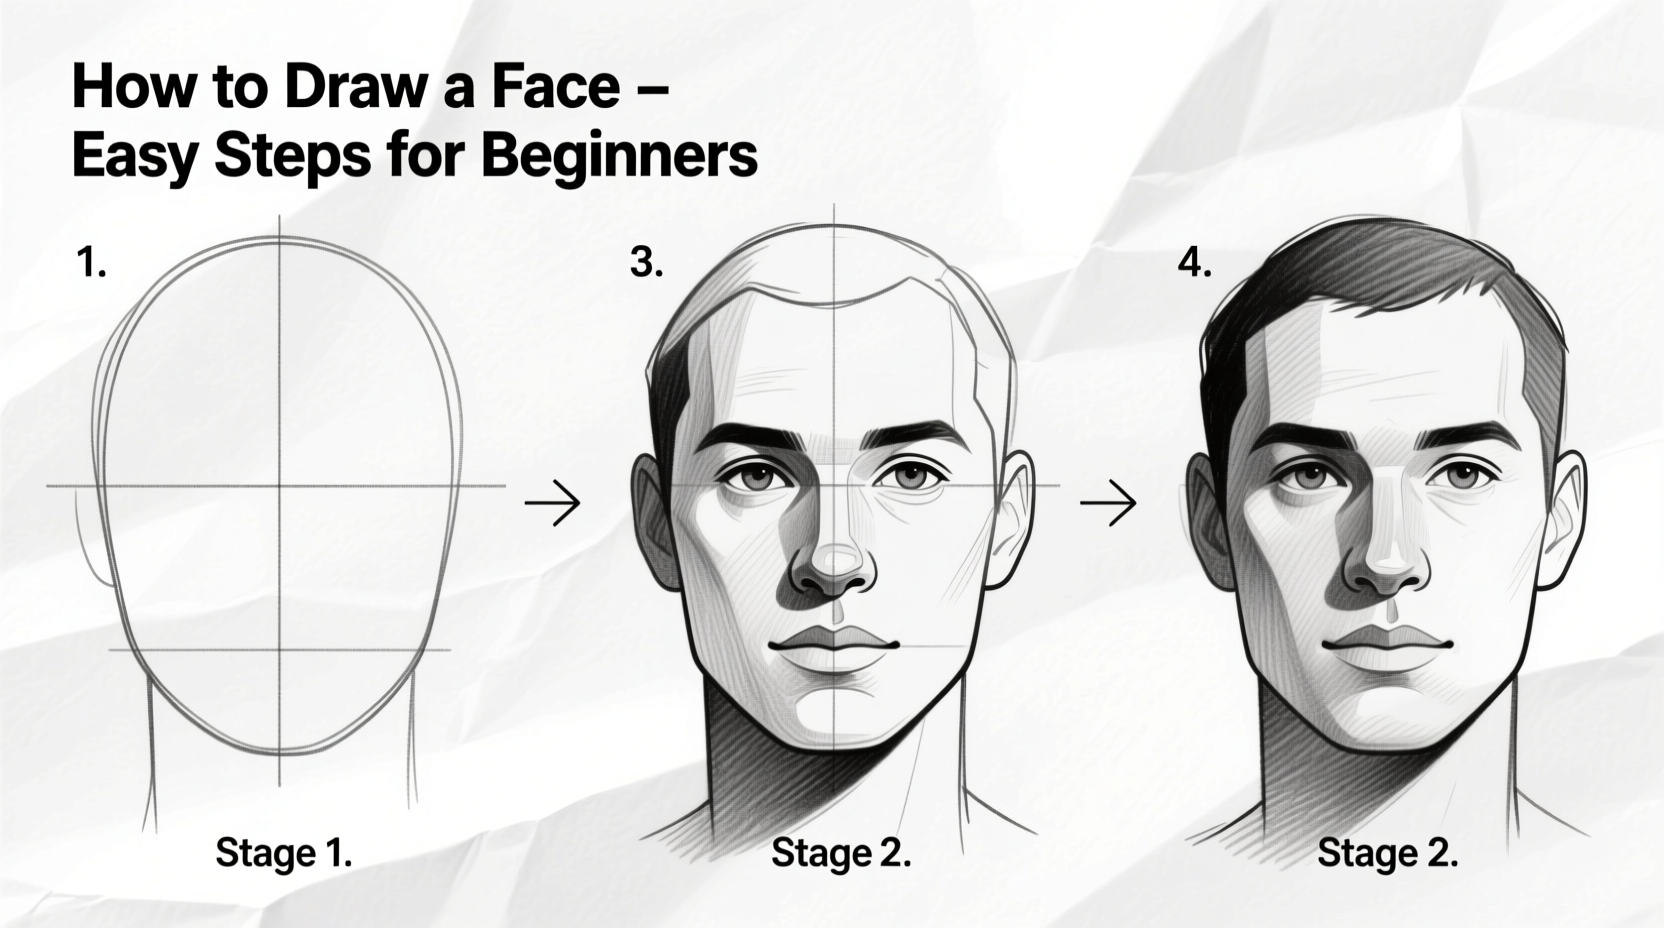
Start by visualizing the head as an oval. Divide it horizontally with a center line across the middle—that’s where the eyes go. Another horizontal line one-fifth down from the chin marks the base of the nose. The mouth sits halfway between the nose and the chin. Ears extend from the eye line to the nose line.
This grid system prevents common errors like placing eyes too high or spacing them too far apart. It also allows room for stylistic variation later, once fundamentals are mastered.
Step-by-Step Guide to Drawing a Face
- Draw the basic shape: Sketch a vertical oval. Avoid perfect circles—they make the face look flat. Slightly taper the chin for realism.
- Add the center line: Draw a vertical line down the middle to check symmetry. Features should mirror each other on both sides.
- Place the eye line: Draw a horizontal line through the center of the oval. This is where the eyes sit.
- Mark the nose and mouth lines: One-fifth down from the chin, draw a line for the bottom of the nose. Halfway between that and the chin, add a line for the mouth.
- Position the ears: From the eye line to the nose line, lightly mark ear placement on both sides.
- Sketch the eyes: Draw almond shapes along the eye line, spaced about one eye-width apart. Add pupils and upper/lower lids.
- Shape the nose: Use soft curves starting at the eye line, extending downward. Keep it light—you can refine later.
- Draw the mouth: Follow the mouth line. The width of the mouth typically aligns with the center of each eye.
- Define the hairline: Begin at the top third of the head. Hair grows from a line above the forehead, not the very top.
- Erase guidelines and refine: Once satisfied, darken final lines and gently erase construction marks.
“Proportion is more important than detail. A perfectly placed eye matters more than a beautifully shaded eyelid.” — Rafael Silva, Art Instructor at Metropolitan School of Fine Arts
Common Mistakes and How to Avoid Them
Even experienced artists revisit basics. Beginners often struggle with consistency, but awareness of typical pitfalls speeds up improvement.
| Mistake | Why It Happens | Solution |
|---|---|---|
| Eyes too far apart | Guessing instead of measuring | Use the \"one eye-width\" rule between eyes |
| Nose too low | Placing nose at chin midpoint | Remember: nose base is one-fifth up from chin |
| Asymmetrical features | Focusing on one side first | Work both sides simultaneously using the center line |
| Flat-looking face | No tonal variation | Add light shading under jaw, nose, and eye sockets |
Practice Checklist for Consistent Progress
- ✔ Start every drawing with a light oval and center line
- ✔ Use horizontal guides for eyes, nose, and mouth
- ✔ Measure feature spacing with your pencil or ruler tool
- ✔ Draw both eyes at the same time to maintain symmetry
- ✔ Practice facial angles: front, three-quarter, and profile views
- ✔ Spend 10 minutes daily on quick face sketches (gesture drawing)
- ✔ Review your work weekly to track improvement
Consistency beats intensity. Ten focused minutes daily will yield better results than one long session per week. Over time, muscle memory develops, and proportions become intuitive.
Real Example: From Frustration to Confidence
Jamie, a 24-year-old hobbyist, struggled for months trying to draw faces from memory. Every attempt looked distorted or cartoonish. After discovering the proportional grid method, she began practicing with a structured routine: five days a week, 15 minutes per session, using only ovals and guide lines. Within three weeks, her drawings showed noticeable balance. By week six, friends were asking her to sketch portraits. “I stopped trying to make it ‘pretty’ and started focusing on getting the lines right,” she said. “That small shift changed everything.”
Her story reflects a universal truth in learning art: precision precedes expression. Master the structure, and creativity flows naturally within it.
Expanding Beyond the Front View
Once comfortable with the front-facing face, challenge yourself with angled perspectives. The three-quarter view—where the face turns slightly to one side—is common in portraits and adds depth.
In this angle, the near eye appears larger, and the far eye may partially disappear behind the nose. The nose extends into the space of the opposite cheek. The jawline becomes more defined, tapering toward the chin. Maintain the same proportional logic, but adjust for foreshortening: features closer to the viewer appear larger.
For profiles, focus on the curve of the forehead, the protrusion of the nose, and the alignment of the lips and chin. The ear should align vertically with the nose bridge and eyebrow.
FAQ: Common Questions About Drawing Faces
How long does it take to learn to draw a face well?
With regular practice, most beginners see significant improvement within 4–6 weeks. Mastery takes longer, but drawing a recognizable, well-proportioned face is achievable in a month of consistent effort.
Do I need special pencils or paper?
No. A standard HB or 2B pencil and notebook paper are enough to start. As you progress, softer pencils (like 4B–6B) help with shading, but fundamentals matter more than tools.
What if my drawings still look uneven?
Flip your drawing upside down or use a mirror. This tricks your brain into seeing the image objectively, making imbalances easier to spot. Correct them lightly before redrawing.
Final Thoughts: Start Simple, Build Confidence
Drawing a face doesn’t require innate talent—just patience, structure, and repetition. By breaking the face into geometric shapes and relying on consistent proportions, even total beginners can produce impressive results quickly. The goal isn’t perfection on the first try, but steady progress through mindful practice.
Every master artist started with wobbly ovals and misplaced eyes. What set them apart was persistence. Pick up your pencil today. Draw one face. Then another tomorrow. In a few weeks, you’ll look back at your early attempts with pride—and clarity about how far you’ve come.


 浙公网安备
33010002000092号
浙公网安备
33010002000092号 浙B2-20120091-4
Comments
No comments yet. Why don't you start the discussion?