
For many, salon visits for hair extensions come with recurring costs and scheduling hassles. Tape-in extensions offer a seamless, natural-looking solution that can be applied at home with precision and care. When done correctly, they blend effortlessly with your natural hair, adding volume and length without damage. The key lies in understanding the process, using the right tools, and maintaining them properly. This guide walks you through every stage—from choosing the right set to flawless application and long-term upkeep—so you can achieve salon-quality results on your own.
Why Choose Tape-In Extensions?
Tape-in extensions are among the most popular types of semi-permanent hair extensions due to their lightweight design and minimal stress on natural hair. Unlike clip-ins or wefts sewn into braids, tape-ins lie flat against the scalp, making them nearly undetectable. They’re made of real or high-quality synthetic hair with a medical-grade adhesive strip pre-attached to thin wefts. These strips sandwich small sections of your natural hair, securing the extension in place without clips, heat, or glue.
Their reusability is another major advantage. With proper care, a single set can last up to six to eight weeks per application and be reused two to three times before needing replacement. This makes them cost-effective over time, especially when maintained well and applied correctly.
Your Application Checklist
Before starting, gather all necessary tools and create a clean, well-lit workspace. Being prepared prevents interruptions and ensures a smooth process.
- High-quality tape-in hair extensions (matched to your hair)
- Fine-tooth comb and sectioning clips
- Professional-grade applicator brush or microfiber cloth
- Isopropyl alcohol (90% or higher) or residue remover
- Mirror (preferably a handheld one for back-of-head visibility)
- Heat-resistant styling tools (if needed post-application)
- Extension maintenance shampoo and conditioner (sulfate-free)
“Tape-ins are ideal for beginners because they require no heat or special equipment. But cleanliness is non-negotiable—if the hair isn’t residue-free, the bond will fail.” — Lana Reyes, Celebrity Stylist & Extension Specialist
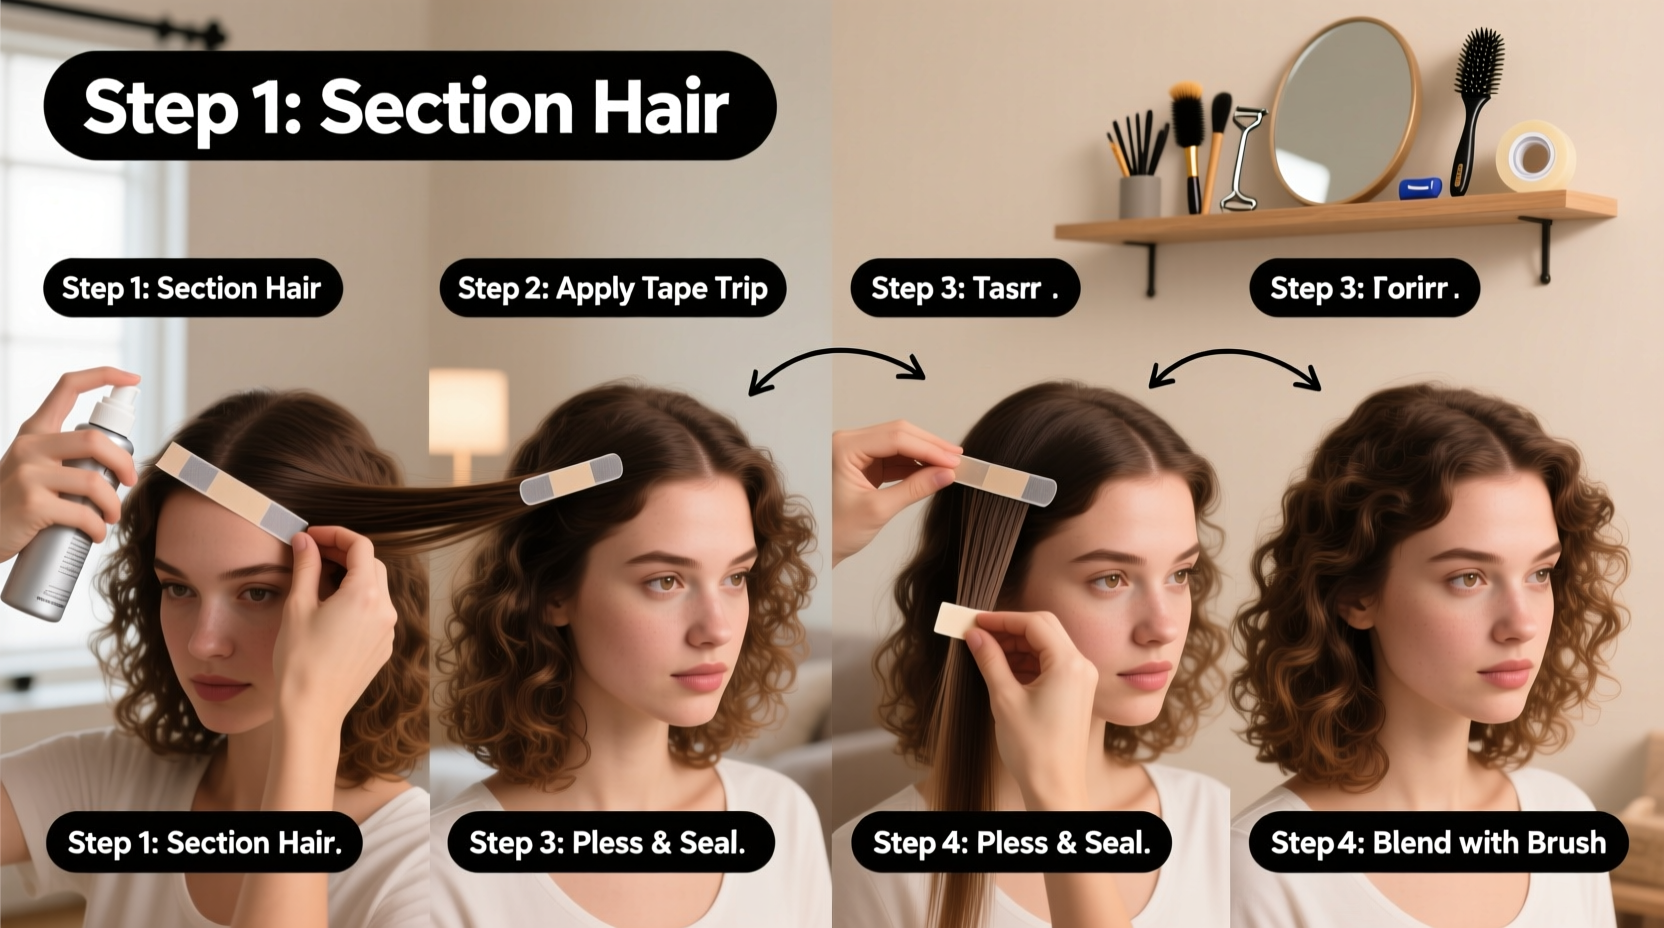
Step-by-Step Guide to Applying Tape Hair Extensions
Proper application ensures longevity, comfort, and invisibility. Follow these steps carefully for optimal results.
- Wash and dry your hair thoroughly. Use a clarifying, sulfate-free shampoo to remove oils, product buildup, and residues. Rinse completely and blow-dry your hair straight. Do not apply any conditioners, serums, or heat protectants—they can interfere with adhesion.
- Section your hair. Part your hair down the middle from forehead to nape. Clip the top half up. Then divide the bottom layer into four equal sections: left-back, right-back, left-front, right-front. Continue working in small, manageable subsections.
- Prepare the tape wefts. Remove one extension from its protective backing. Handle only the weft (the fabric edge), avoiding touching the adhesive surface with fingers, as skin oils reduce stickiness.
- Apply the first row. Take a thin horizontal section of natural hair about 1 inch above the nape. Carefully lift it and place the exposed adhesive side of the extension underneath. Press the second tape piece (with adhesive facing up) over the natural hair to “sandwich” it. Gently press down for 10–15 seconds to secure the bond.
- Repeat with spacing. Move forward, placing each new weft at least 1 inch away from the previous one and parallel to your hairline. Never stack extensions directly on top of each other—this creates bulk and tension.
- Work upward in layers. After completing the bottom row, release the next layer of clipped hair and repeat the process. Aim for 2–3 rows on each side, depending on desired fullness. Avoid placing extensions too close to the crown or temples, where movement and sweat can weaken bonds.
- Blend and style. Once all extensions are placed, gently brush your hair downward using a soft-bristle extension brush. Style as usual with flat irons or curling wands, keeping heat tools at least 1 inch away from the tape bonds to prevent melting.
Do’s and Don’ts of Tape Extension Care
How you treat your extensions after application determines their lifespan and appearance. Refer to this table to avoid common mistakes.
| Do’s | Don’ts |
|---|---|
| Wash hair every 15–20 wears using sulfate-free products | Use shampoos with sulfates or silicones |
| Sleep with hair in a loose braid or ponytail | Sleep with tangled hair loose |
| Brush from ends upward daily with a looped extension brush | Yank or pull on the tape area when brushing |
| Re-tape or reposition extensions every 6–8 weeks | Leave extensions in longer than 8 weeks |
| Store unused wefts flat with protective paper | Expose tape strips to dust or moisture |
A Real-Life Example: Sarah’s First DIY Success
Sarah, a 32-year-old teacher from Portland, had always wanted fuller hair but hesitated to visit salons due to budget constraints. After researching online, she purchased a 20-piece human hair tape-in set in a shade matching her dark brown base. She followed the preparation steps meticulously: washed her hair twice with clarifying shampoo, dried it completely, and sectioned it precisely.
She applied the extensions over two hours on a Sunday morning, taking breaks to avoid fatigue. At first, she struggled with the back sections but used a second mirror to correct alignment. After blending with a wide-tooth comb, she styled her hair in soft waves. The result? A voluminous, natural look that colleagues complimented throughout the week. Six weeks later, she safely removed the set, cleaned the tapes with alcohol, and stored them for reuse—saving over $300 compared to salon pricing.
Frequently Asked Questions
Can I wash my hair normally with tape extensions?
Yes, but with caution. Tilt your head back when washing to prevent water from pooling at the roots. Use sulfate-free shampoo and avoid heavy conditioners near the scalp. Always rinse thoroughly and air-dry or diffuse gently—never rub the bonds with a towel.
How do I remove tape extensions safely?
Use a designated tape removal solution or a small amount of olive oil applied directly to the bond. Wait 2–3 minutes for the adhesive to loosen, then gently slide the top weft away from your natural hair. Never pull or tug. Once removed, clean residual adhesive with an alcohol wipe and store the wefts properly for future use.
Will tape-ins damage my natural hair?
When applied and maintained correctly, tape-ins cause minimal damage. However, improper placement (too close to the scalp), infrequent maintenance, or aggressive brushing can lead to breakage or traction alopecia. Always follow recommended timelines and consult a professional if unsure.
Final Tips for Long-Term Success
Tape-in extensions are a flexible, affordable way to transform your look—but success depends on consistency. Re-evaluate placement every few weeks; shifts in hair growth may require adjustments. Keep extra tape refills on hand so you can reapply cleanly without waiting months.
Also, consider rotating your extension wear. Wearing them 3–4 days a week instead of daily reduces stress on both the bonds and your natural hair. When not in use, store them flat in a cool, dry place away from sunlight.
“The beauty of tape-ins is their simplicity. But simplicity doesn’t mean carelessness. Treat them like part of your haircare routine, not just a quick fix.” — Marcus Lin, Master Colorist & Extension Technician
Take Control of Your Hair Journey
Mastering DIY tape hair extensions empowers you to enhance your style on your terms—without dependency on appointments or high costs. With patience, attention to detail, and consistent care, you’ll achieve results that look professionally done. Whether you’re preparing for a special event or simply want everyday confidence, this skill opens doors to endless styling possibilities.


 浙公网安备
33010002000092号
浙公网安备
33010002000092号 浙B2-20120091-4
Comments
No comments yet. Why don't you start the discussion?