
In today’s digital-first world, carrying cash or even a physical wallet is becoming less necessary. With Google Pay, Android users can make seamless, secure transactions across retail stores, apps, and websites—without ever reaching for their cards. Yet, despite its convenience, many still underutilize the platform or hesitate due to concerns about setup complexity or security. This guide demystifies Google Pay, walking you through every essential step to use it confidently and efficiently.
How Google Pay Works on Android
Google Pay (formerly Google Wallet) is a digital wallet platform that allows you to store debit cards, credit cards, loyalty passes, transit tickets, and even digital gift cards on your Android device. When making a purchase, your phone communicates with a payment terminal using Near Field Communication (NFC) technology, transmitting a virtual account number instead of your actual card details.
This tokenization process ensures your real card information is never shared with merchants, significantly reducing fraud risk. Google Pay supports contactless payments at over 90% of U.S. retailers and integrates smoothly with thousands of mobile apps and e-commerce sites.
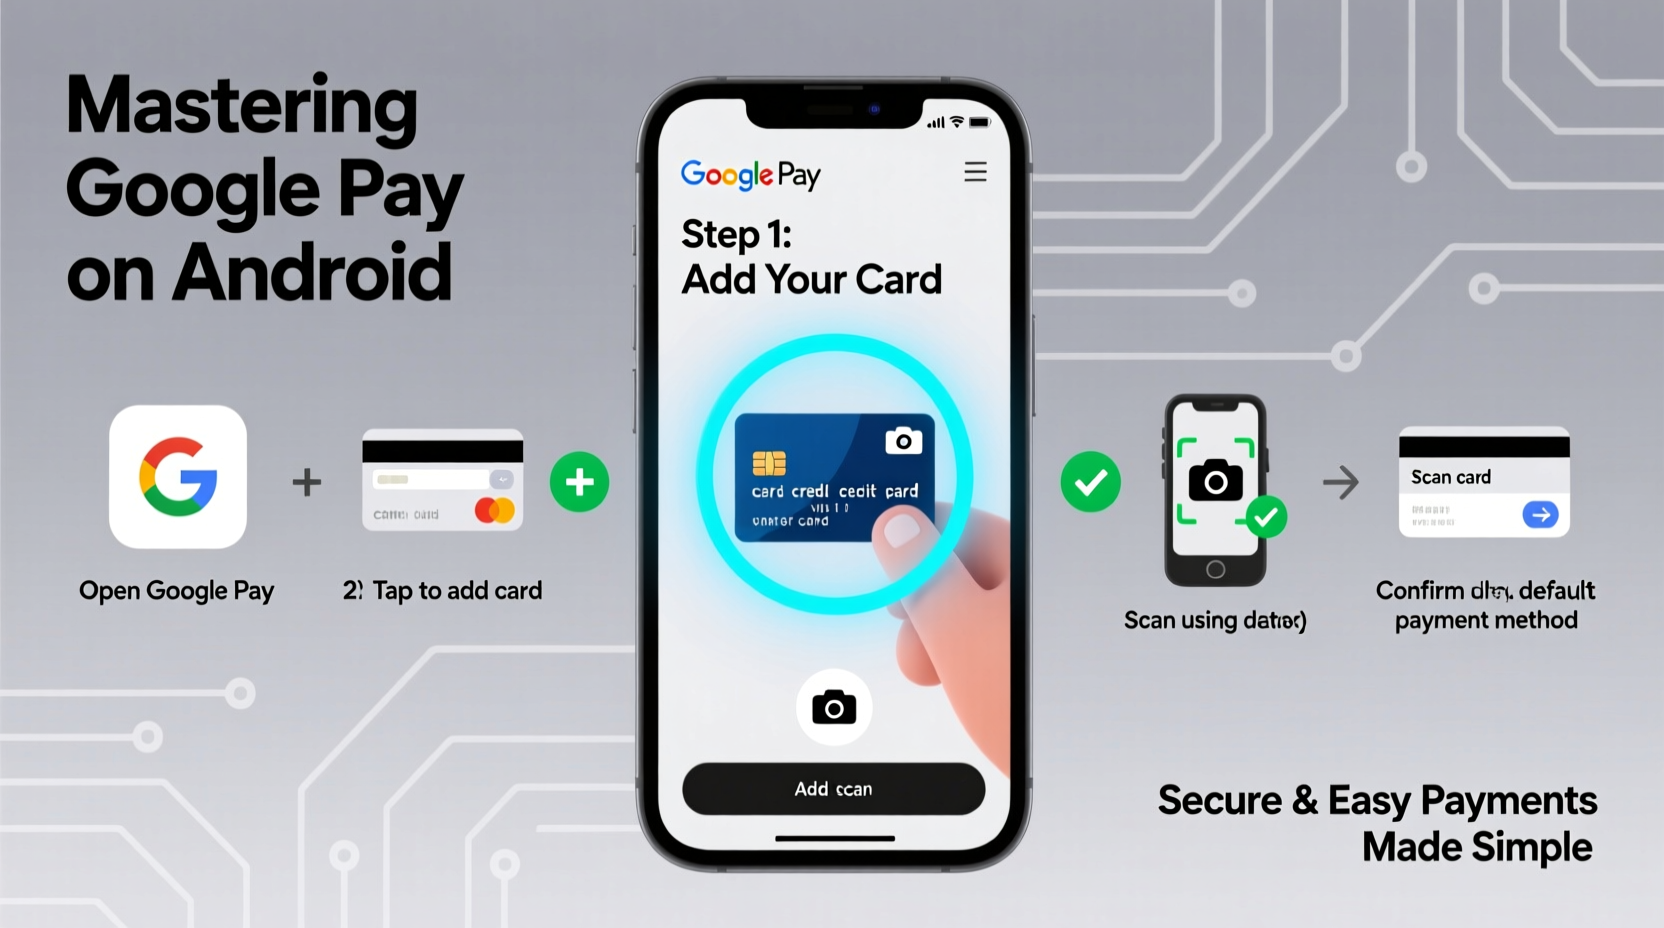
Step-by-Step Setup: Adding Your First Payment Method
Getting started with Google Pay takes just minutes. Follow this clear sequence to activate your digital wallet:
- Download & Open Google Pay – Available pre-installed on most newer Android devices or downloadable from the Google Play Store.
- Sign In to Your Google Account – The app syncs with your existing Google profile for continuity across devices.
- Tap “Add Payment Method” – Choose between credit, debit, or prepaid card options.
- Scan or Enter Card Details – Use your camera to scan the card or input manually. Google encrypts this data immediately.
- Verify Your Card – Your bank may send a verification code via SMS or email. Some issuers approve instantly.
- Set as Default (Optional) – Designate your preferred card for quick checkout.
Once added, your card appears in your wallet with a preview image. You’re now ready to pay—anywhere contactless terminals are accepted.
Using Google Pay in Different Scenarios
Google Pay isn’t limited to in-store tap-to-pay. It adapts to multiple transaction environments, each with its own workflow.
In-Store Payments
To pay at physical locations:
- Wake your phone (no need to unlock if Smart Lock is active).
- Hold the back of your device near the contactless reader.
- A vibration or beep confirms success. Some terminals display “Approved.”
Within Mobile Apps
When shopping in apps like Uber, DoorDash, or Amazon:
- Select “Google Pay” at checkout.
- Review payment and shipping details.
- Authenticate using fingerprint, face recognition, or PIN.
- Transaction completes instantly.
Online Purchases on Websites
On Chrome or Android browsers:
- Click “Buy with Google Pay” during checkout.
- Select your saved card and delivery address.
- Confirm with biometrics or screen lock.
Security Features That Keep Your Data Safe
One of the biggest misconceptions about mobile wallets is that they’re less secure than physical cards. In reality, Google Pay offers several layers of protection that surpass traditional payment methods.
| Security Feature | How It Works | Benefit |
|---|---|---|
| Tokenization | Replaces card numbers with dynamic virtual tokens | Merchants never see your real card info |
| Biometric Authentication | Fingerprint, face unlock, or PIN required for each transaction | Prevents unauthorized use if phone is lost |
| Remote Lock & Wipe | Use Find My Device to suspend payments or erase data | Full control even when phone is missing |
| Real-Time Alerts | Instant notifications for every transaction | Immediate detection of suspicious activity |
“Mobile wallets like Google Pay are inherently more secure than swiping a physical card. Tokenization reduces exposure to data breaches significantly.” — David Lin, Cybersecurity Analyst at TechShield Labs
Best Practices: A Pro Checklist
Maximize convenience and safety with these expert-recommended habits:
- ✅ Enable two-factor authentication on your Google account
- ✅ Set up biometric locks (fingerprint or face unlock)
- ✅ Regularly review recent transactions in the app
- ✅ Remove unused cards to reduce clutter and risk
- ✅ Update your phone’s OS and Google Play Services regularly
- ✅ Use a screen lock (PIN, pattern, or password) as a fallback
Real-World Example: Sarah’s Commute Made Easier
Sarah, a graphic designer in Chicago, used to carry her wallet, keys, and transit pass every morning. She’d often fumble at turnstiles while juggling coffee and her bag. After setting up Google Pay, she added her Ventra transit card and primary debit card. Now, she taps her Pixel phone to enter the train, pays for breakfast at a café with one hand, and buys a last-minute gift online during her commute—all without opening an app.
When her phone was briefly misplaced last month, she used Find My Device to suspend all payment capabilities remotely. Within hours, she located it—and resumed payments instantly once recovered. “I don’t know how I managed before,” she says. “It’s not just convenient—it feels safer.”
Common Questions About Google Pay
Is Google Pay free to use?
Yes. There are no fees from Google to add cards, make purchases, or send money to friends. However, your bank may impose limits on peer-to-peer transfers or foreign transaction fees if applicable.
Can I use Google Pay without internet access?
You can make in-store contactless payments offline since the token is stored locally on your device. However, adding new cards or completing app/online purchases requires an active connection.
What happens if my phone battery dies?
If your phone shuts down, Google Pay won’t work. Some newer devices support “Battery Saver Mode” payments for up to 24 hours after shutdown, but this must be enabled in settings. Always carry a backup payment method for emergencies.
Conclusion: Take Control of Your Digital Wallet Today
Mastering Google Pay transforms how you interact with money—making transactions faster, cleaner, and more secure. From daily errands to online shopping, the ability to pay with a simple tap gives you freedom and peace of mind. By understanding setup steps, leveraging built-in security, and adopting best practices, you’re not just keeping up with technology—you’re staying ahead of it.


 浙公网安备
33010002000092号
浙公网安备
33010002000092号 浙B2-20120091-4
Comments
No comments yet. Why don't you start the discussion?