
Drawing Disney characters is a dream for many aspiring artists, and few are as iconic or beloved as Ariel, the adventurous mermaid from \"The Little Mermaid.\" Her flowing red hair, expressive eyes, and graceful tail make her a favorite subject for sketching. While capturing her likeness may seem challenging at first, breaking down the process into manageable steps transforms it into an achievable and rewarding experience—even for total beginners. This guide walks you through every stage of drawing Ariel with confidence, precision, and artistic flair.
Understanding Ariel’s Character Design
Ariel isn’t just a cartoon character—she’s a carefully crafted blend of human emotion and fantastical elements. Her design reflects both her curiosity and her dual life between sea and shore. When drawing her, it's essential to capture not only her physical traits but also her personality: playful, determined, and full of wonder.
Key design elements include:
- Vibrant red hair that flows dynamically, often appearing wet or underwater.
- Large, expressive blue eyes that convey emotion clearly.
- Delicate facial structure with soft jawlines and high cheekbones typical of Disney princesses.
- Fish-like tail in turquoise and green gradients, complete with a shimmering fin.
- Seashell top, usually white or pink, adding to her oceanic theme.
Studying official concept art or paused scenes from the original 1989 film can help internalize these features before putting pencil to paper.
Essential Tools and Materials
You don’t need a professional studio to start drawing Ariel. A few basic supplies are enough to produce clean, detailed sketches:
| Tool | Purpose | Recommended Option |
|---|---|---|
| Pencil (HB, 2B) | Light sketching and detailing | Mechanical pencil for precision |
| Eraser | Correct mistakes without smudging | Kneaded eraser + vinyl eraser |
| Paper | Surface for drawing | Sketchbook with smooth finish (90+ gsm) |
| Ruler | Guidelines and symmetry checks | Transparent ruler for tracing |
| Colored pencils or markers | Coloring final artwork | Prismacolor or Copic markers |
Begin with light pencil strokes. Heavy lines early on can damage the paper and make corrections difficult. Save bold outlines for the final pass.
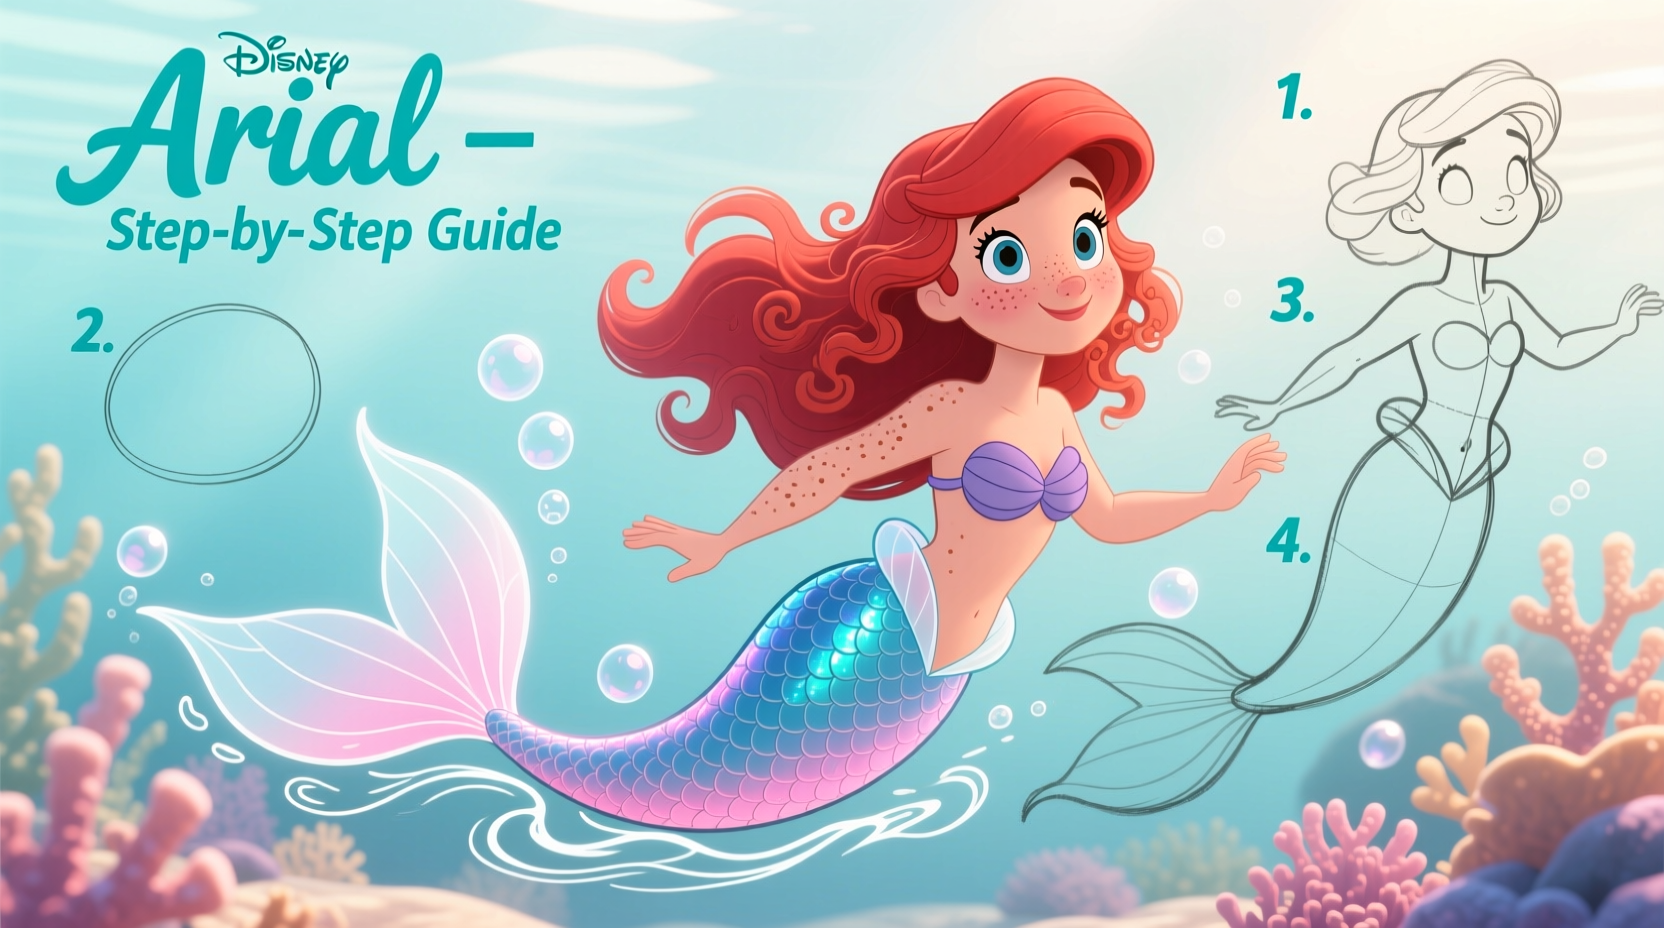
Step-by-Step Guide to Drawing Ariel
Follow this structured approach to build Ariel’s image gradually. Each step focuses on one aspect, ensuring accuracy and proportion.
- Draw the head shape. Start with a simple circle for the cranium, then add a chin guideline below—slightly pointed to reflect her youthful face.
- Add facial guidelines. Draw a vertical center line and a horizontal eye line about halfway down the circle. These ensure symmetry.
- Sketch the eyes. Place large ovals along the eye line. Ariel’s eyes are wide-set and slightly upturned at the outer corners. Add pupils and highlights to create depth.
- Define the nose and mouth. Keep them small and subtle—a tiny curve for the nose, a soft “W” shape for the upper lip.
- Outline the hair. Begin with the bangs sweeping across the forehead, then draw long, wavy strands flowing behind her. Think of water movement—hair should look fluid, not stiff.
- Draw the torso and shoulders. Below the head, sketch a narrow neck and rounded shoulders. Include the seashell top with gentle curves. <7> Shape the tail. From the lower torso, extend two smooth curves forming the tail base. Widen toward the fin, which should resemble a stylized leaf with scalloped edges.
- Refine facial features. Darken key lines, erase guidelines, and enhance expression. Adjust eyebrows slightly arched for curiosity.
- Add details. Include gills on the neck, texture on the tail (subtle scales), and shine lines in the hair to suggest wetness.
- Ink and color. Once satisfied, go over final lines with a fine liner pen. Let dry, then erase pencil marks. Color using reference hues: crimson red for hair, sky blue for eyes, and gradient greens for the tail.
Common Mistakes and How to Avoid Them
Even careful artists make missteps. Recognizing common errors helps you correct them before they ruin your drawing.
| Mistake | Why It Happens | Solution |
|---|---|---|
| Uneven eyes | Poor use of guidelines | Always use horizontal and vertical center lines |
| Flat-looking hair | Lack of flow and volume | Sketch motion arrows first; vary strand thickness |
| Tail looks stiff | Straight lines instead of curves | Use S-shaped curves for natural movement |
| Overcrowded features | Too much detail too soon | Build layers gradually; prioritize proportions |
“Capturing a character like Ariel is less about technical perfection and more about conveying spirit. If the eyes sparkle and the hair dances, you’ve succeeded.” — Lila Monroe, Animation Artist & Illustrator
Mini Case Study: From First Sketch to Gallery Submission
Jamie, a 15-year-old art student, had never drawn a Disney character before attempting Ariel. Her initial sketch was lopsided—eyes mismatched, hair clumped like ropes, tail resembling a triangle. Discouraged, she followed the step-by-step method outlined here, using reference grids and practicing facial proportions separately.
After three attempts, she nailed the balance between realism and stylization. She added bubbles around the tail and used colored pencils to create a shimmer effect. That final piece won second place in her school’s annual art show. Her secret? Patience and layering—she didn’t expect perfection on the first try.
Checklist: Your Ariel Drawing Success Plan
Keep this checklist handy each time you draw:
- ☐ Gather reference images of Ariel (front and side views)
- ☐ Prepare materials: pencil, eraser, paper, coloring tools
- ☐ Lightly sketch head circle and facial guidelines
- ☐ Position eyes, nose, and mouth using alignment lines
- ☐ Draw flowing hair with varied wave patterns
- ☐ Sketch torso and seashell top with soft curves
- ☐ Create a dynamic tail using curved, tapered lines
- ☐ Refine all features and erase construction lines
- ☐ Ink final lines and apply color in layers
- ☐ Sign your artwork and date it for progress tracking
Frequently Asked Questions
How do I make Ariel’s hair look realistic?
Focus on flow and volume. Draw strands in groups, not individual hairs. Use wavy lines that converge at the crown and spread outward. Add darker shading beneath layers and leave white gaps for highlights to simulate light reflecting off wet hair.
What if my proportions are off?
It’s normal during early attempts. Use the “rule of thirds” vertically: divide the face into three equal parts—forehead, eyes to nose, nose to chin. The eyes should sit at the middle horizontal line. For the body, the head height should be roughly 1/7th of the total figure length (including tail).
Can I draw Ariel without coloring her?
Absolutely. A well-drawn line art version can be striking. Focus on clean contours, expressive eyes, and dynamic composition. Many professional concept artists present characters in black and white to emphasize form and gesture.
Final Thoughts and Call to Action
Drawing Ariel is more than copying a character—it’s learning to observe, simplify, and recreate beauty with intention. Every line teaches you something new about anatomy, expression, and storytelling. Whether you’re sketching for fun or building a portfolio, mastering Ariel builds confidence and skill that transfers to other characters and styles.


 浙公网安备
33010002000092号
浙公网安备
33010002000092号 浙B2-20120091-4
Comments
No comments yet. Why don't you start the discussion?