
Drawing Sonic the Hedgehog and his friends isn’t just about copying a cartoon—it’s about understanding design language, motion, and character personality through line work and proportion. For beginners, the iconic blue blur and his vibrant cast offer an excellent entry point into dynamic character illustration. With consistent practice and structured technique, anyone can learn to draw these beloved figures with confidence and style.
The key lies in breaking down complex forms into simple shapes, mastering expressive features, and applying clean linework. Whether you're sketching Sonic mid-run or capturing Tails’ curious expression, this guide delivers practical steps, tools, and insights that mirror real-world artistic development.
Understanding Sonic Character Design Fundamentals
Sonic characters follow a stylized anime-meets-Western cartoon aesthetic. They feature exaggerated proportions—large heads, oversized gloves, long limbs, and minimal body detail—which emphasize speed and energy. Recognizing these design cues is essential before putting pencil to paper.
Each character has distinct traits:
- Sonic: Sleek build, sharp quills, confident smirk, red shoes with white cuffs.
- Tails: Two tails, large eyes, smaller stature, aviation goggles (optional).
- Knuckles: Broad shoulders, dreadlock-like spikes, no shoes, serious expression.
- Amy Rose: Pigtails, pink dress, hammer, wide-eyed enthusiasm.
These characteristics aren’t arbitrary—they communicate personality. Sonic’s streamlined silhouette suggests motion; Knuckles’ bulk implies strength. When drawing them, focus on conveying those traits through posture and shape language.
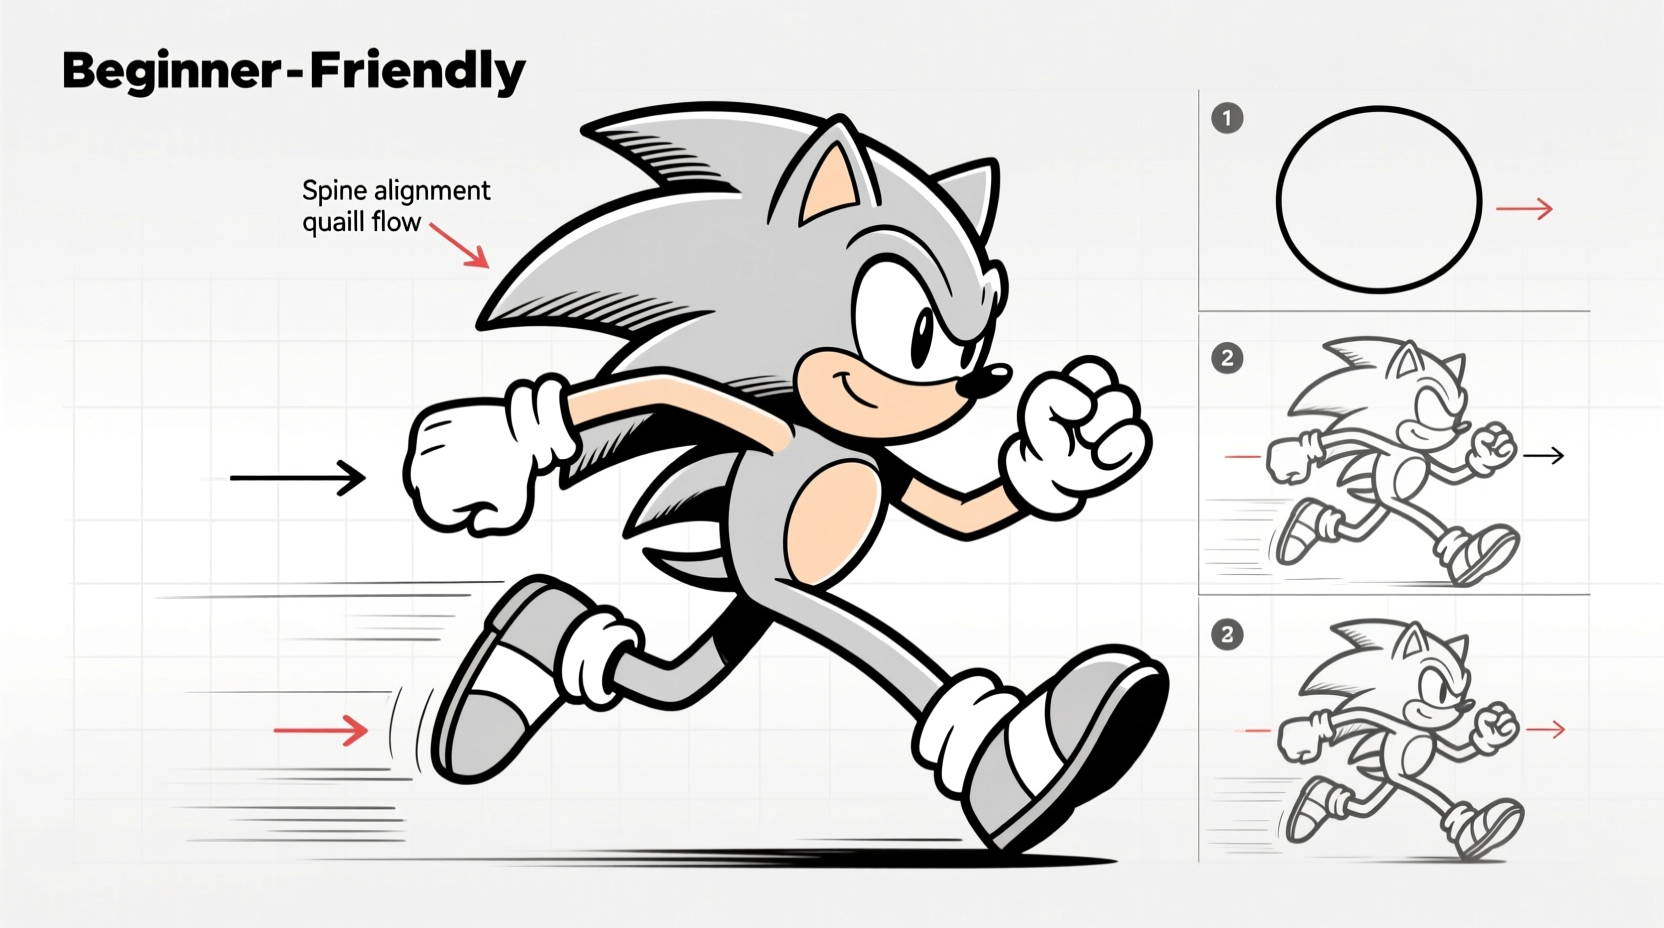
Step-by-Step Guide to Drawing Sonic the Hedgehog
Follow this sequence to create a classic front-facing Sonic illustration. Use a pencil with light pressure so you can erase easily.
- Head Base: Draw a medium-sized circle. Add a vertical centerline and a horizontal crossline halfway down to guide facial symmetry.
- Ears and Quills: Above the circle, sketch two tall ovals pointing outward for ears. From the back of the head, extend three sharp, curved spikes (quills) flowing backward.
- Body Structure: Below the head, draw a narrow oval tilted slightly forward for the torso. Connect it with a short neck line.
- Arms and Gloves: Sketch two elongated cylinders for arms. End each with a large mitten-shaped hand. Sonic’s gloves are white with red cuffs.
- Legs and Shoes: Draw long legs ending in large, blocky shoes. Sonic’s shoes are red with white toes and cuffs—think athletic sneakers amplified for animation.
- Face Features: On the face, place eyes along the horizontal line. Make them almond-shaped with small black pupils. Add a small triangle nose and a smirking mouth below it.
- Refine and Ink: Once satisfied with structure, darken final lines. Erase guidelines and add bold outlines. Use thicker lines for outer edges and thinner ones for inner details.
This method ensures anatomical accuracy while preserving the cartoon exaggeration central to the franchise’s visual identity.
Essential Tools and Materials for Clean Line Art
You don’t need expensive gear to start, but choosing the right tools improves results significantly. Here’s what works best for clean, professional-looking sketches.
| Tool Type | Recommended Options | Purpose |
|---|---|---|
| Pencil | HB (sketching), 2B (outlining) | HB allows light drafting; 2B gives darker, visible lines for inking prep. |
| Eraser | Kneaded eraser + plastic eraser | Kneaded lifts graphite gently; plastic removes stubborn marks without tearing paper. |
| Paper | Sketchbook (90–120 gsm) | Thicker paper resists smudging and handles multiple layers of drawing. |
| Inking Pen | Fine liner (0.3mm or 0.5mm) | Provides crisp, consistent lines. Brands like Micron or Staedtler work well. |
| Ruler | Transparent 12-inch ruler | Helps align facial features and maintain symmetry during layout. |
Once your drawing is complete and inked, let the ink dry fully before erasing any remaining pencil marks. This prevents smearing and keeps your artwork clean.
Common Beginner Mistakes and How to Avoid Them
New artists often struggle with consistency when drawing animated characters. The following pitfalls are common—but entirely avoidable.
- Misaligned facial features: Eyes placed at different heights break symmetry. Always use centerlines and crosshairs during setup.
- Over-detailing too early: Adding fur texture or shoe laces before establishing pose leads to messy revisions. Build form first, then detail.
- Ignoring gesture and motion: Sonic is never static. Even standing poses should suggest movement—tilt the body forward slightly, angle one foot ahead.
- Using only reference images without analysis: Copying doesn’t teach anatomy. Study why certain shapes are used and how they contribute to character identity.
“Drawing cartoons isn’t about replicating images—it’s about understanding design logic. Once you grasp how proportions express personality, you can draw any character from memory.” — Daniel Rivera, Animation Illustrator & Art Instructor
Practice Checklist: Building Confidence in Sonic Art
Consistency beats intensity when learning to draw. Use this checklist weekly to track progress and reinforce skills.
- ✅ Sketch Sonic’s head from five angles (front, side, 3/4 view, etc.)
- ✅ Draw full-body Sonic in three action poses (running, jumping, spinning)
- ✅ Attempt one other character (Tails, Knuckles, or Shadow) using the same step-by-step method
- ✅ Ink one finished piece cleanly and scan or photograph it for review
- ✅ Compare last week’s work to identify improvement areas
Repetition trains muscle memory. Over time, your hands will naturally recall the curve of Sonic’s ear or the length of his legs without constant reference checks.
Mini Case Study: From First Sketch to Finished Piece
Lena, a 16-year-old aspiring artist, began drawing Sonic after watching classic game cutscenes. Her first attempt was rough—Sonic’s head was too small, his arms uneven, and the quills looked like jagged triangles. Discouraged, she nearly quit.
She returned with a new strategy: each day, she practiced only the head using circles and guides. After a week, she added bodies. By the third week, she drew Sonic running across a page in six frames, mimicking animation poses. On day 30, she completed a full-color digital illustration shared online, receiving over 2,000 likes and messages from fans.
Her breakthrough wasn’t talent—it was systematic breakdown and daily micro-practice. She focused on one element at a time, celebrated small wins, and reviewed her work objectively.
Frequently Asked Questions
How long does it take to learn to draw Sonic well?
With regular practice (3–4 sessions per week), most beginners produce recognizable, well-proportioned Sonic sketches within 3–6 weeks. Mastery takes months of dedicated study, especially for dynamic poses and inking.
Can I draw Sonic digitally?
Absolutely. Digital platforms like Krita, Clip Studio Paint, or Procreate offer layers, undo functions, and zoom—ideal for refining sketches. However, mastering pencil-and-paper first strengthens foundational skills.
Why do my drawings look stiff compared to official art?
Official illustrations use strong “gesture lines”—invisible curves that flow through the body to imply motion. Try drawing a quick C-curve through Sonic’s spine before adding limbs. This instantly adds energy and fluidity.
Final Thoughts and Call to Action
Drawing Sonic characters is more than fan art—it’s an exercise in precision, expression, and creative discipline. Every line you sketch builds your ability to translate imagination into visual form. There’s no shortcut to skill, but there is a reliable path: break it down, practice deliberately, and keep going.
Grab your sketchbook today and draw Sonic using the seven-step process outlined here. Then, challenge yourself to invent a new character using the same principles—same head-to-body ratio, exaggerated features, bold silhouettes. See where your creativity takes you.


 浙公网安备
33010002000092号
浙公网安备
33010002000092号 浙B2-20120091-4
Comments
No comments yet. Why don't you start the discussion?