
Shoe laces are more than just functional—they’re a subtle blend of engineering, ergonomics, and personal expression. While most people tie their shoes without a second thought, the way you lace and secure your footwear can significantly impact foot comfort, support, and even injury prevention. Whether you're an athlete, someone on their feet all day, or simply looking to refine your daily routine, mastering different lacing techniques offers real benefits. From preventing heel slippage to relieving pressure on sensitive areas, the right method makes a tangible difference.
The Importance of Proper Lacing
Improperly laced shoes can lead to blisters, restricted circulation, instability, and discomfort during prolonged walking or running. The goal of effective lacing is to distribute pressure evenly across the foot while securing the heel and allowing natural movement. A well-laced shoe conforms to your foot’s shape, reduces friction, and enhances overall performance.
Different foot types—such as high arches, wide forefeet, or sensitive insteps—require tailored approaches. Standard crisscross lacing may work for some, but others need specialized techniques to achieve optimal fit and function.
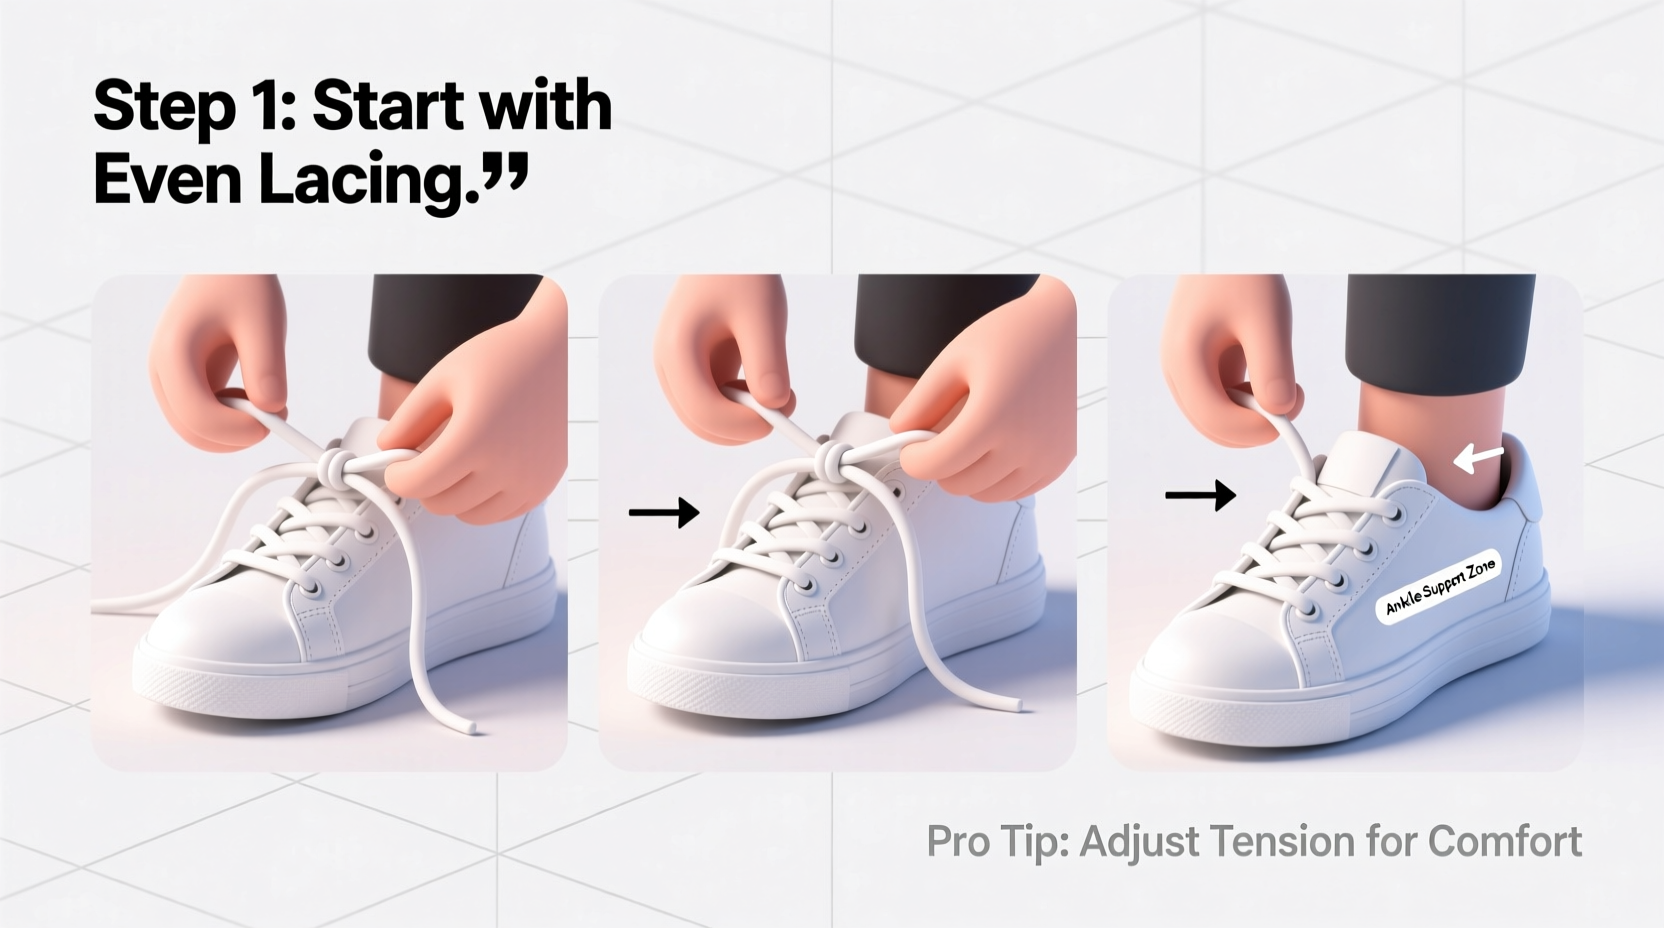
Step-by-Step Guide to Basic Crisscross Lacing
The classic crisscross method is the foundation of most lacing systems. When done correctly, it provides balanced tension and reliable hold.
- Insert each end of the lace into the bottom eyelets from the outside, so the ends emerge on the inside.
- Cross the left lace over the right and thread it up through the next higher eyelet on the opposite side.
- Repeat this crossing motion until you reach the top.
- Finish with a standard bow knot: make a loop with one lace, wrap the other around it, and pull the second loop through.
This technique works best for average-width feet and neutral arches. However, if you experience tightness over the top of your foot or heel slipping, alternative methods may be necessary.
Advanced Lacing Techniques for Specific Needs
Beyond the basics, several advanced lacing patterns address common fit issues. These are used by runners, hikers, healthcare workers, and anyone seeking enhanced comfort.
1. Straight Bar (Ladder) Lacing
Ideal for reducing pressure on the instep. Common in dress shoes and boots.
- Lace straight across from one bottom eyelet to the other.
- Bring the right lace up vertically through the next eyelet on the same side.
- Thread it horizontally across, then up vertically again.
- Repeat until complete.
2. Heel-Lock (Runner’s Loop)
Prevents heel slippage during running or hiking.
- After reaching the second-to-last eyelets, instead of crossing, bring each lace up vertically through the last eyelet on the same side.
- Create a small loop (runner’s loop) with each side.
- Pull the free end of the lace through the opposite loop.
- Tighten and tie normally.
3. Window Lacing
Relieves pressure on the top of the foot or bunions.
- Skip two middle eyelets in the area causing discomfort.
- Lace normally up to that point, then cross over the open section (the “window”) diagonally to the corresponding higher eyelets.
- Continue lacing upward.
4. Parallel (Skip) Lacing
Reduces friction and allows easier tightening.
- Start at the bottom, lacing straight across.
- Skip the next eyelet diagonally, going to the one after.
- Cross over and repeat, creating a ladder-like appearance.
| Technique | Best For | Key Benefit |
|---|---|---|
| Crisscross | General use | Balanced tension, easy to learn |
| Straight Bar | Dress shoes, sensitive instep | Reduced pressure on top of foot |
| Heel-Lock | Running, hiking | Secure heel fit, prevents slippage |
| Window Lacing | Bunions, swelling, high instep | Eliminates pressure on painful areas |
| Parallel Lacing | Wide feet, easy adjustment | Even distribution, minimal friction |
“Proper lacing isn’t just about looks—it’s biomechanical optimization. A few seconds adjusting your laces can prevent hours of foot pain.” — Dr. Lena Torres, Podiatrist & Sports Medicine Specialist
Real-World Example: Hiking with Sensitive Feet
Mark, a weekend hiker with a history of hot spots and blisters, struggled with standard lacing on long trails. After switching to the heel-lock method and incorporating window lacing over his bunion, he noticed immediate improvement. His heels stayed locked in place, and he completed a 10-mile trek without a single blister. By customizing his lacing pattern to his foot’s needs, Mark transformed a painful experience into a comfortable adventure.
Checklist: Optimize Your Lacing Routine
Follow this checklist before tying your shoes each day:
- ✅ Ensure laces are fully loosened before putting on shoes
- ✅ Identify any pressure points or fit issues
- ✅ Choose a lacing method suited to your activity and foot type
- ✅ Use symmetrical tension when pulling laces
- ✅ Secure with a double knot if engaging in high-motion activities
- ✅ Re-tie mid-activity if you feel loosening or discomfort
Frequently Asked Questions
How tight should my shoe laces be?
Your laces should hold your foot securely without cutting off circulation or pressing into nerves. You should be able to slide one finger between the laces and the top of your foot. If your toes feel compressed or numb, the laces are too tight.
Can lacing techniques help with flat feet or high arches?
Yes. People with high arches often benefit from skipping lower eyelets to reduce strain, while those with flat feet may use progressive tightening from heel to toe to improve midfoot support. Custom lacing helps compensate for structural imbalances.
What kind of laces are best for performance?
Flat polyester or nylon laces offer better grip and less stretch than round or elastic laces. For sports, consider waxed laces for added knot security. Replace frayed or overly worn laces promptly to maintain consistent tension.
Style Meets Function: Personalizing Your Look
While performance matters, lacing also offers creative expression. Hidden knots, colored laces, and zigzag patterns let you personalize your footwear. Some opt for loop-back lacing where the knot sits to the side, giving sneakers a clean front profile. Others use contrasting laces to highlight design lines in boots or athletic shoes.
Just remember: aesthetic choices shouldn’t compromise fit. A stylish knot that comes undone easily defeats the purpose. Combine creativity with reliability—choose durable laces in bold colors and apply secure tying methods like the surgeon’s knot (an extra twist before forming the loops) for lasting hold.
Conclusion: Elevate Your Footwear Experience
Tying your shoes is one of the most repeated actions in life, yet few take the time to do it well. With the right technique, you gain comfort, prevent injury, and express your personal style—all with a simple rethinking of how you lace up. These methods aren’t reserved for athletes or specialists; they’re accessible, practical, and immediately beneficial.


 浙公网安备
33010002000092号
浙公网安备
33010002000092号 浙B2-20120091-4
Comments
No comments yet. Why don't you start the discussion?