
For years, Instagram has been perceived as a mobile-first platform, and with good reason. The app’s interface, filters, and camera integration are optimized for smartphones. But what many users don’t realize is that you can now post content to Instagram directly from your desktop browser. Whether you're managing a brand account, scheduling visual campaigns, or simply prefer working on a larger screen, mastering Instagram web posting opens up new levels of efficiency and control.
This guide walks through the full process of uploading photos and videos via Instagram.com, including tips for formatting, troubleshooting access issues, and optimizing your workflow—all from the comfort of your browser.
Why Post to Instagram from Your Browser?
While the mobile app remains essential for real-time engagement and Stories, posting from a web browser offers several strategic advantages:
- Easier file access: Upload high-resolution images or edited videos stored on your computer without transferring them to your phone.
- Better caption editing: A physical keyboard makes writing detailed captions, hashtags, and alt text faster and more accurate.
- Workflow integration: Combine Instagram posting with other desktop tools like graphic editors, content calendars, or copywriting apps.
- Suitability for professionals: Content creators, marketers, and agencies benefit from streamlined batch uploads and consistent branding.
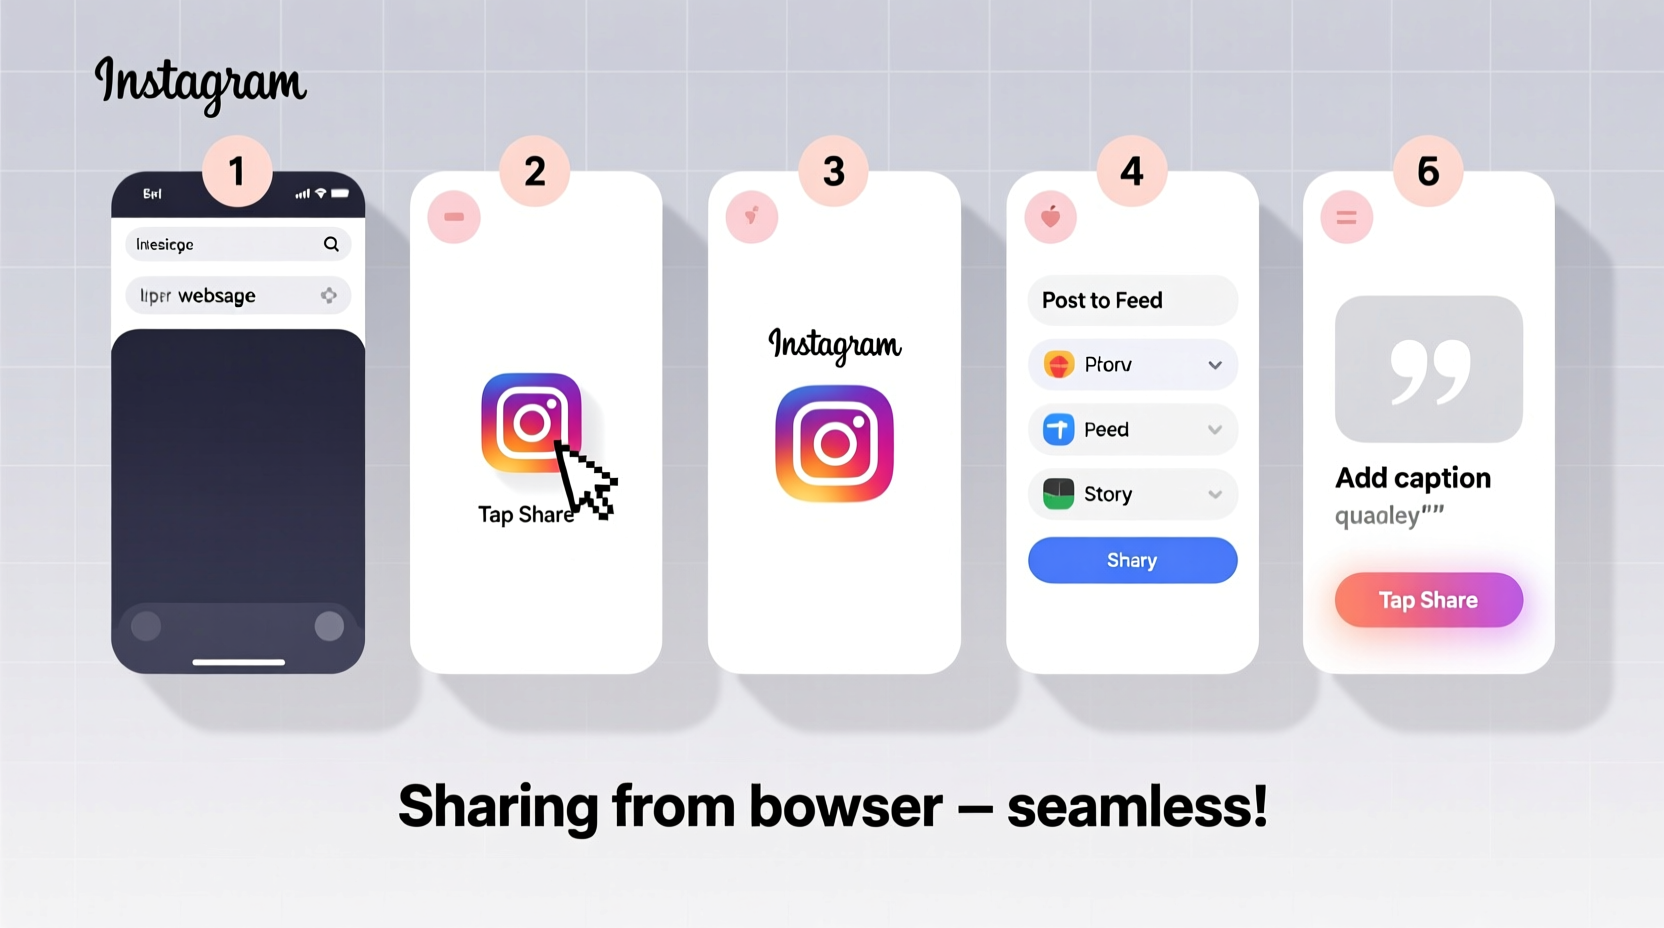
Step-by-Step Guide to Posting on Instagram via Web Browser
Instagram introduced web posting in 2021, and the feature has steadily improved. As of 2024, you can upload single images, carousels, and videos—including Reels—directly from Instagram.com. Follow these steps carefully to ensure success.
- Log in to Instagram.com using your credentials. Make sure you’re on the latest version of your browser and logged into the correct account.
- Click the \"+\" icon in the top-right corner of the desktop interface. This opens the upload window.
- Select the file(s) from your computer. You can choose multiple files to create a carousel post. Supported formats include JPG, PNG, MP4, and MOV (up to 650MB for video).
- Edit your image if needed. Use the built-in tools to adjust brightness, contrast, or apply filters. For carousels, drag to reorder slides.
- Add a caption, location, and alt text. Take time here—well-crafted captions increase engagement. Include relevant hashtags and @mentions.
- Configure sharing options: Choose whether to share to Feed, Story (if connected to Meta Business Suite), or both.
- Click “Share” to publish. The upload may take longer for large files, so avoid closing the tab.
Optimizing Media for Web Uploads
To maintain quality and consistency, follow best practices for image and video specifications. Instagram applies compression, but starting with well-formatted files minimizes degradation.
| Content Type | Aspect Ratio | Recommended Resolution | Max File Size |
|---|---|---|---|
| Single Photo | 1:1 (square), 4:5 (portrait), 1.91:1 (landscape) | 1080px x 1080px | 30MB |
| Carousel (Images) | All slides must use same ratio | 1080px x 1080px per image | 30MB per image |
| Video (Feed) | 4:5 or 1:1 | 1080px x 1350px (portrait) | 650MB, under 60 seconds |
| Reel (via Web) | 9:16 (full portrait) | 1080px x 1920px | 650MB, 15–90 seconds |
Always export media at 72 DPI and in sRGB color space. Avoid excessive sharpening or noise reduction during editing, as Instagram’s algorithm may amplify artifacts.
Common Issues and How to Fix Them
Despite improvements, some users encounter limitations when posting from the web. Here’s how to troubleshoot the most frequent problems.
- \"Create\" button missing: Instagram gradually rolls out features. If you don’t see the \"+\" icon, wait 24–48 hours or switch to a business account, which often receives priority access.
- Upload fails midway: Check your internet connection. Large files over unstable networks often fail. Compress videos using HandBrake or QuickTime before uploading.
- Videos not looping or cropped: Ensure the aspect ratio matches recommended dimensions. Videos uploaded in landscape format will be auto-cropped on mobile feeds.
- No Reels option: Only verified accounts or those with strong engagement history may see the Reels upload option on desktop. Try uploading via Meta Business Suite if available.
“Desktop posting is a game-changer for content teams. It reduces bottlenecks and improves consistency across branded campaigns.” — Lena Patel, Social Media Strategist at BrandFlow Labs
Mini Case Study: Streamlining a Lifestyle Brand’s Workflow
Jessica runs a sustainable fashion blog with daily posts. She used to transfer every photo from her DSLR to her phone using cloud storage—an inefficient process that took 20 minutes per post. After switching to Instagram web posting, she began uploading directly from her Lightroom exports.
She schedules themed content each Sunday, edits all images on her desktop, writes captions in Google Docs, and publishes five posts in under an hour using Instagram.com. Engagement rose by 34% within two months due to more consistent visuals and timely hashtag placement.
Her workflow now includes a pre-upload checklist to ensure every post meets quality standards before going live.
Checklist: Before You Hit “Share”
- ✅ Confirm file type and size meet Instagram’s requirements
- ✅ Crop to correct aspect ratio (use 1080x1080 for square, 1080x1350 for portrait)
- ✅ Write a compelling caption with line breaks and emojis (test readability)
- ✅ Add alt text for accessibility (describe key visual elements)
- ✅ Include 3–5 relevant hashtags (mix of niche and broad)
- ✅ Tag locations or collaborators if applicable
- ✅ Preview on mobile after posting to check formatting
FAQ: Instagram Web Posting
Can I post Reels from my computer?
Yes, but availability varies. Users with business accounts or high engagement are more likely to see the Reels upload option on Instagram.com. Alternatively, use Meta Business Suite for broader desktop functionality.
Why can’t I see the upload button?
The feature may not have rolled out to your account yet. Try logging in from Chrome in incognito mode, updating your app, or switching to a professional account. Some regions still receive staggered access.
Can I schedule posts using Instagram web?
Not natively. While you can upload and publish immediately, scheduling requires third-party tools like Buffer, Hootsuite, or Meta Business Suite. These platforms allow draft creation and timed publishing.
Conclusion: Take Control of Your Instagram Presence
Mastering Instagram web posting isn’t just about convenience—it’s about elevating your content strategy. With better file management, precise editing, and a distraction-free environment, your desktop browser becomes a powerful tool for consistent, high-quality posting.
You no longer need to rely solely on your phone to maintain your presence. By understanding the nuances of web uploads, optimizing your media, and troubleshooting common issues, you gain flexibility and professionalism in how you present yourself or your brand.


 浙公网安备
33010002000092号
浙公网安备
33010002000092号 浙B2-20120091-4
Comments
No comments yet. Why don't you start the discussion?