
As winter approaches, many homeowners look for creative ways to bring holiday cheer to their driveways. Snow scenes—whether animated reindeer, glowing sleighs, or falling snow effects—are a popular choice. But when it comes to displaying them, a key decision arises: should you use projectors or traditional physical lights? While both options can create magical displays, one often stands out in terms of ease of setup. Understanding the differences helps you choose not just based on aesthetics, but on practicality, especially if you're short on time or working alone.
Understanding the Two Options
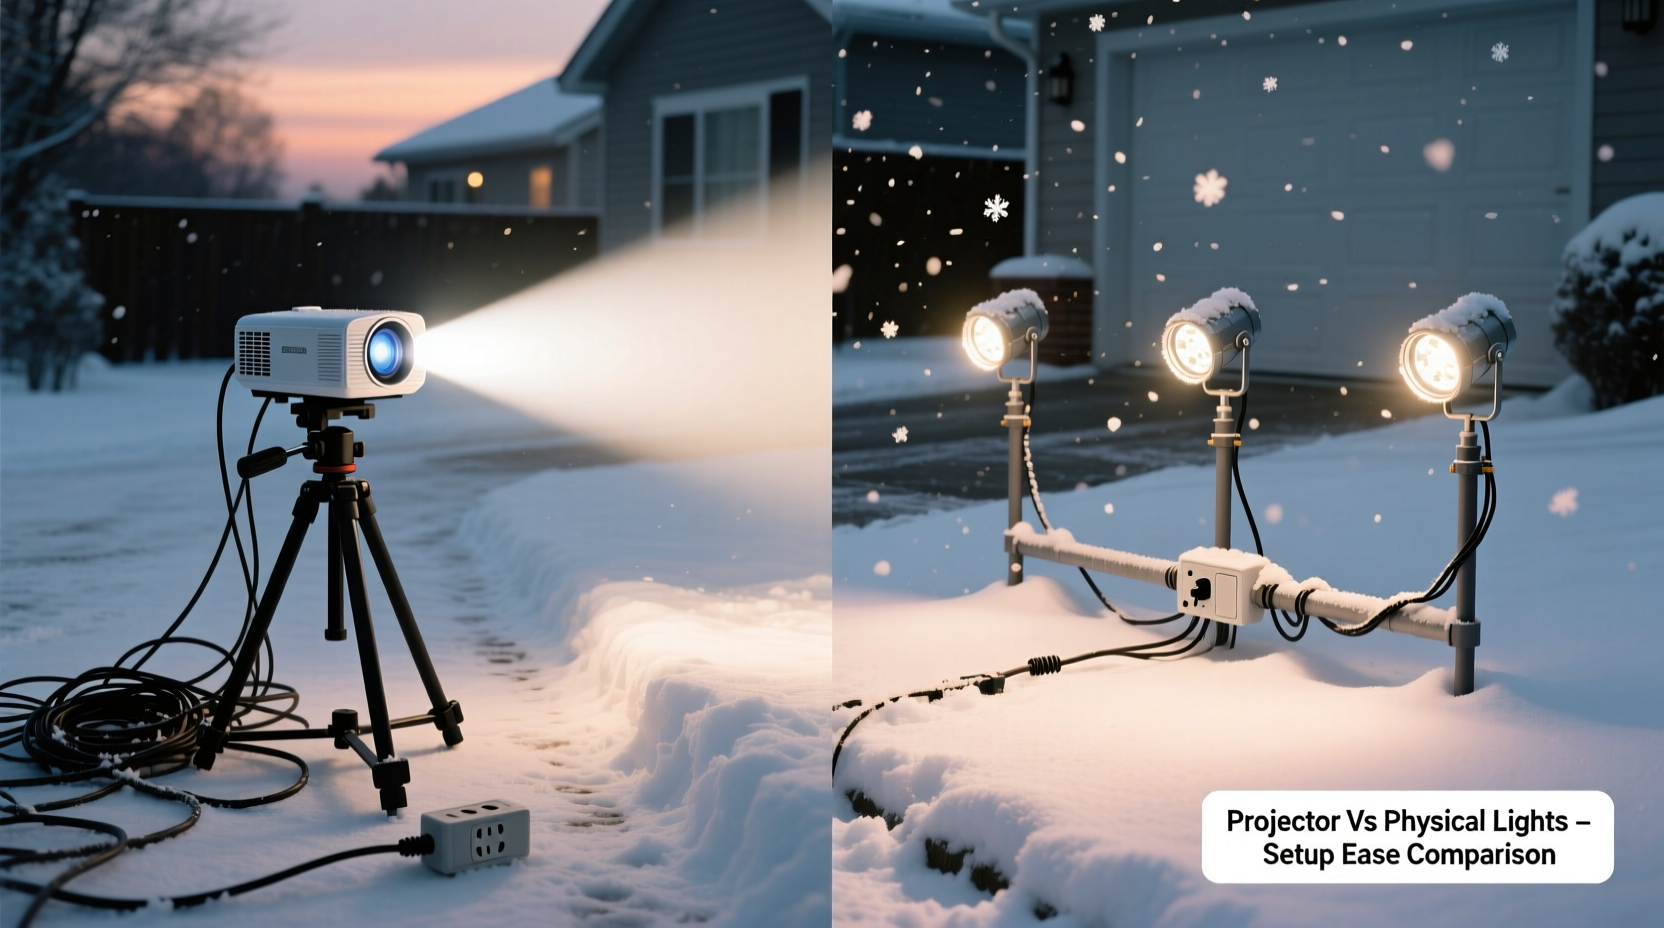
Before comparing ease of setup, it's important to clarify what each method involves.
Projection systems use outdoor-rated digital projectors to cast animated or static light patterns onto driveways, walls, or snow-covered surfaces. These are typically plug-and-play units with built-in media players, offering effects like snowfall, Santa’s sleigh ride, or twinkling stars—all without hanging or staking anything down.
Physical lighting displays involve placing actual LED strings, stakes, inflatables, or lighted figures across your driveway and yard. This includes net lights for bushes, path markers, and larger pieces like illuminated snowmen or nativity sets. These require extension cords, stakes, anchors, and often multiple power sources.
The core difference lies in installation complexity. Projectors rely on line-of-sight and positioning, while physical lights demand spatial planning, anchoring, and wiring logistics.
Setup Time and Labor Comparison
When evaluating “easier” setup, time and effort are the primary factors. Let’s break down typical installation steps for both.
Projector Setup (Typical Steps)
- Choose a stable mounting point (porch railing, window ledge, or weighted stand).
- Plug into an outdoor outlet or use a weatherproof extension cord.
- Turn on the unit and select desired animation or brightness level.
- Adjust angle and focus until image covers target area properly.
- Secure cable to prevent tripping hazards.
This process usually takes **10–25 minutes**, depending on projector model and placement. Most modern holiday projectors come preloaded with seasonal animations and include tilt-adjustable bases for quick alignment.
Physical Light Setup (Typical Steps)
- Plan layout (pathway markers, tree wraps, figure placements).
- Lay out extension cords along safe routes.
- Unpack and test each light strand or inflatable.
- Stake down lights or secure with lawn clips.
- Connect strands in series, ensuring not to exceed circuit load.
- Anchor larger items (e.g., inflatables) with ropes or sandbags.
- Test entire setup and make adjustments.
This can take anywhere from **1 to 4 hours**, especially for elaborate scenes. Physical setups grow exponentially more complex with size and number of components.
Comparison Table: Projector vs Physical Lights
| Factor | Projector | Physical Lights |
|---|---|---|
| Average Setup Time | 10–25 minutes | 1–4+ hours |
| Required Tools | None (plug-and-play) | Stakes, clips, ladders, testers |
| Storage Space | Compact (one box) | Large (multiple bins) |
| Weather Resistance | High (sealed housing) | Variable (depends on product) |
| Flexibility in Design | Low (fixed animations) | High (customizable layouts) |
| Ease of Relocation | Very easy | Difficult (rewiring needed) |
From this comparison, projectors clearly win in terms of speed and simplicity. However, physical lights offer greater creative control and tactile presence that some homeowners prefer.
Real-World Example: The Johnson Family’s Holiday Display
The Johnsons live in a snowy Michigan suburb and have hosted a neighborhood holiday tour for eight years. In 2022, they decided to simplify their display due to aging parents helping with setup. Previously, their driveway scene included 12 inflatables, 80 feet of path lights, and three lighted arches—a full Saturday commitment.
In 2023, they switched to two high-lumen outdoor projectors: one casting a falling snow effect across the driveway, another showing a rotating North Pole sign on their garage. Total setup time: 35 minutes. Their neighbors were surprised by how vivid the images appeared, especially after dark.
“We saved our backs and still got more compliments,” said Mark Johnson. “The kids loved that the ‘snow’ seemed to fall right on their heads.”
The family now stores both projectors in a single tote. They plan to add one more next year to animate their front trees—without adding any new cords.
Expert Insight: What Lighting Professionals Say
“Projectors have revolutionized seasonal decorating for time-constrained homeowners. You’re trading physical clutter for visual impact—with far less risk of tripping hazards or circuit overloads.” — Lisa Tran, Outdoor Lighting Designer & Seasonal Display Consultant
Tran notes that commercial clients increasingly use laser projectors for large-scale holiday events because they reduce labor costs by up to 70%. She advises residential users to consider surface texture: “Smooth concrete works best. Gravel or uneven snow may distort the image.”
When Physical Lights Still Make Sense
Despite the convenience of projectors, there are situations where physical lights remain the better—or only—option:
- 3D depth is desired: A glowing reindeer figurine has dimension that a flat projection can’t replicate.
- Surfaces aren’t projector-friendly: Heavily textured asphalt, tall grass under snow, or curved walls can warp projected images.
- Custom messaging: Want to spell “Welcome” in lights across your walkway? Only physical strings can do that precisely.
- Brightness in ambient light: In neighborhoods with streetlights or nearby homes, projections may appear washed out.
Additionally, some HOA communities regulate light brightness or prohibit bright beams near roads, which could limit projector use.
Step-by-Step Guide: Setting Up a Driveway Projection in Under 20 Minutes
Follow this efficient process for fast, reliable results:
- Choose location: Place the projector on a dry, elevated surface—like a covered porch step or garage shelf—facing the driveway.
- Check line of sight: Ensure no obstructions (cars, trees, mailboxes) block the beam path.
- Power access: Plug into a GFCI-protected outdoor outlet. Use a surge protector if possible.
- Turn on and select mode: Use the remote or control panel to pick your favorite animation (e.g., snowfall, Santa flyover).
- Adjust angle and zoom: Tilt the projector head until the image fills your target zone. Some models allow horizontal swivel.
- Secure cables: Tape cords to the ground or use cord covers to prevent tripping.
- Test at night: Wait until full dark to confirm visibility and adjust if needed.
Once done, the projector can run on a timer or smart plug for automatic daily activation.
Essential Checklist Before Installing Any Driveway Display
Whether you choose projector or physical lights, use this checklist to ensure success:
- ✅ Confirm all equipment is rated for outdoor use (IP44 or higher).
- ✅ Test every light strand or projector before installation.
- ✅ Map out power sources and ensure circuits won’t overload.
- ✅ Check local ordinances or HOA rules about holiday lighting.
- ✅ Plan storage solution for off-season.
- ✅ Install timers or smart controls for energy efficiency.
- ✅ Inspect cords for cracks or exposed wires annually.
Frequently Asked Questions
Can I combine projectors and physical lights?
Absolutely. Many homeowners use a projector for background effects (like snow or starfields) and supplement with physical lights for focal points such as a glowing tree or entryway arch. This hybrid approach balances ease and visual richness.
Do projectors work on snowy driveways?
Yes, fresh, even snow provides an excellent reflective surface—often improving image clarity. However, melting snow or slush may cause blurring or distortion. Avoid aiming directly at piled snowbanks, which can scatter the beam.
How long do holiday projectors last?
Most quality LED-based projectors last 5,000 to 10,000 hours. With seasonal use (60–90 days per year), expect 5–10 years of service. Keep lenses clean and store in a dry place to maximize lifespan.
Final Recommendation: Which Is Easier?
For sheer ease of setup, projectors are the clear winner. They eliminate the need for extensive wiring, anchoring, and physical handling of dozens of components. One device, one plug, one adjustment—and your driveway is transformed.
Physical lights still hold value for those seeking immersive, three-dimensional scenes or who enjoy the hands-on tradition of holiday decorating. But if your priorities are speed, safety, storage, and simplicity, a projector delivers unmatched convenience.
That said, the best choice depends on your goals. For a low-effort, high-impact display, start with a single projector. You can always expand later with complementary physical elements once the foundation is set.
Conclusion
Transforming your driveway into a winter wonderland doesn’t have to mean spending hours untangling lights or risking back strain. Modern projector technology offers a faster, cleaner, and equally festive alternative to traditional displays. While physical lights provide charm and dimension, they come with significant time and logistical costs.
If you're looking to simplify your holiday routine without sacrificing spectacle, a driveway projector is a smart investment. It’s easier to set up, safer to maintain, and simpler to store. And with today’s high-lumen, weather-resistant models, the visual payoff is impressive.


 浙公网安备
33010002000092号
浙公网安备
33010002000092号 浙B2-20120091-4
Comments
No comments yet. Why don't you start the discussion?