
Creating a winter wonderland on your rooftop doesn’t require actual snow—just the right lighting. Rope lights and net lights are two of the most popular choices for achieving that soft, glowing \"snow effect\" along rooflines, eaves, and gutters. But when it comes to installation ease, one clearly stands out. Understanding the differences in structure, layout, attachment method, and adaptability can save you hours on a cold ladder and prevent frustration during the holiday season.
While both options deliver visual appeal, their practicality varies significantly depending on your roof’s architecture, DIY experience, and long-term plans. This guide breaks down each type’s strengths and weaknesses, backed by real installation insights, expert input, and side-by-side comparisons to help you make a confident decision.
Understanding the Basics: What Are Rope Lights and Net Lights?
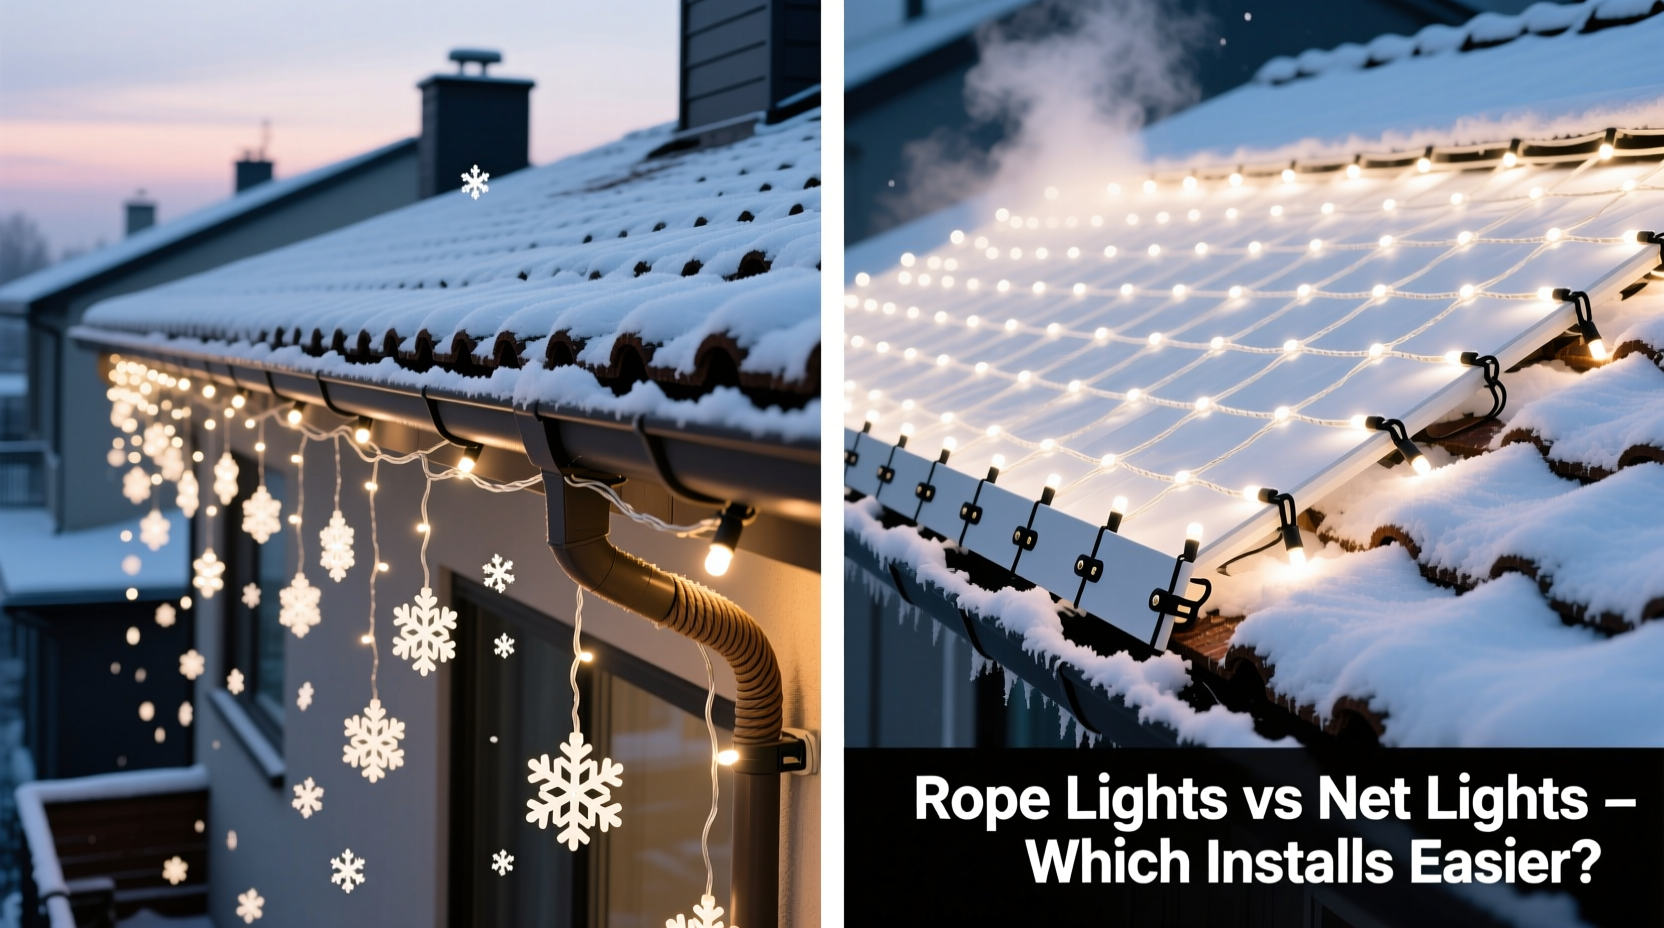
Rope lights consist of a continuous flexible tube—usually PVC—that encases a strand of evenly spaced LED bulbs. They come in long spools, typically 25 to 100 feet, and are often used for outlining architectural features like roof perimeters, windows, or railings. Their linear design makes them ideal for clean, defined lines.
Net lights, on the other hand, are grids of light strands woven into a mesh pattern, resembling fishing nets embedded with mini LEDs. They’re commonly sold in rectangular sheets (e.g., 6' x 12') and designed to drape over bushes, trees, or flat roof surfaces to simulate falling or accumulated snow. The dense, scattered glow mimics natural light diffusion better than rope lights.
The fundamental difference lies in application: rope lights emphasize borders; net lights cover areas. But when targeting a rooftop “snow” effect, especially across wide, flat planes like dormers or gables, coverage matters more than outline precision.
Installation Showdown: Time, Tools, and Technique
Let’s compare how each system performs during actual rooftop installation—the moment when theory meets ladders, wind, and frozen fingers.
Rope Light Installation Process
- Measure the roofline perimeter requiring illumination.
- Cut or connect rope light sections to fit (if modular).
- Secure clips or mounts every 6–12 inches along the edge.
- Attach the rope light into each clip, ensuring no kinks.
- Run extension cords or power feeds to an outlet, concealing wires where possible.
- Test and adjust alignment.
This process demands precision. Each clip must be individually placed and fastened, often with screws or adhesive mounts. On a typical two-story home with 150 linear feet of eaves, installing rope lights can take 4–6 hours—even for experienced installers. The need for consistent spacing and tension control increases complexity, especially on uneven surfaces.
Net Light Installation Process
- Determine the target area (e.g., front-facing roof section).
- Select a net size that covers the zone with slight overlap.
- Position corner grommets or tie points using zip ties or S-hooks.
- Drape and stretch the net to eliminate sagging.
- Connect adjacent nets if needed (some models link seamlessly).
- Plug in and test.
Because net lights come pre-assembled in large panels, setup is dramatically faster. A single 8' x 12' net can cover what would take three 25-foot rope light runs—and with only four to six anchor points instead of dozens. Installers report cutting installation time by up to 60% compared to rope lights for equivalent visual impact.
“Net lights are the go-to for contractors doing multiple holiday installations. One crew can do five houses in a day with nets; with rope lights, they’d be lucky to finish two.” — Mark Reynolds, Professional Holiday Lighting Installer, Denver, CO
Side-by-Side Comparison: Key Factors at a Glance
| Factor | Rope Lights | Net Lights |
|---|---|---|
| Installation Time (per 100 sq ft) | 4–6 hours | 1.5–2.5 hours |
| Attachment Points Needed | Every 6–12 inches | Corners and edges only (4–8 per panel) |
| Best Roof Type | Simple, straight eaves; angular designs | Flat or gently sloped surfaces; wide gables |
| Ease of Storage | Moderate (coil carefully to avoid kinks) | Easy (fold or roll flat) |
| Snow Effect Realism | Low (linear, artificial look) | High (diffused, even sparkle) |
| Wind Resistance | High (low profile, tight fit) | Moderate (can flutter in strong gusts) |
| Reusability | High (durable casing) | Moderate (wire fatigue at connection points) |
From this comparison, net lights clearly win on installation speed and visual authenticity. However, rope lights offer superior durability and performance on narrow, intricate rooflines where coverage isn’t the goal.
Real-World Example: A Homeowner’s Choice
Jessica M., a homeowner in Minneapolis, wanted to create a snowy rooftop effect for her family’s annual Christmas display. Her home has a broad front gable and two dormer windows. Initially, she purchased 200 feet of white rope lights, thinking they’d provide a crisp, professional border.
After spending nearly five hours mounting clips and threading the rope along the gable peak and dormer outlines, she realized the result looked more like a construction site than a winter scene. The light was too concentrated, and gaps between bulbs were visible from the street.
The following year, she switched to three 8' x 12' net light panels. With help from her son, she installed all three in under two hours using plastic zip ties through the grommets. The transformation was immediate: the roof appeared dusted with snow, and neighbors commented that it looked “like a postcard.”
She now stores the nets in labeled bins and reuses them annually with no degradation in performance. “I underestimated how much easier net lights would be,” she said. “It’s not just faster—it looks better, too.”
Step-by-Step Guide: Installing Net Lights for Maximum Snow Effect
If you're opting for net lights—which we recommend for most rooftop snow applications—follow this efficient installation sequence:
- Assess Your Roof Area: Measure the width and height of the section you want to illuminate (e.g., main gable, dormer). Choose net sizes that match or slightly exceed these dimensions.
- Clear Debris: Remove leaves, twigs, or ice buildup from gutters and roof edges to ensure safe access and proper placement.
- Gather Supplies: Zip ties (UV-resistant), ladder, gloves, extension cord rated for outdoor use, and optional S-hooks for gutter attachment.
- Position the Net: From the ground, unroll the net and hold it against the roof to visualize coverage. Note where grommets align with secure points.
- Secure Corners First: Starting at the top corners, attach grommets using zip ties looped through shingles or gutter brackets. Do not overtighten—allow slight give for wind movement.
- Stretch and Fasten Edges: Pull the net taut downward and secure side and bottom grommets. Avoid excessive tension, which can distort the grid or damage shingles.
- Connect Power: Plug into a GFCI-protected outlet. Use a timer to automate on/off cycles and reduce energy use.
- Inspect at Night: View the installation after dark. Adjust any sagging sections or reposition overlapping panels for seamless brightness.
This entire process should take under three hours for a medium-sized home, even for first-time users.
Frequently Asked Questions
Can I use rope lights to mimic a snow effect?
You can, but the result will be less realistic. Rope lights produce a linear glow that emphasizes edges rather than creating a soft, diffused blanket of light. For true snow simulation, density and dispersion matter—qualities net lights provide naturally.
Are net lights safe on shingle roofs?
Yes, when installed correctly. Use zip ties through existing nail holes or gutter supports instead of drilling new holes. Avoid metal wire ties, which can scratch or puncture shingles over time. UV-resistant plastic ties expand and contract safely with temperature changes.
Which option lasts longer?
Rope lights generally have a longer lifespan—often 50,000+ hours—due to their sealed casing protecting internal wiring. Net lights average 30,000–40,000 hours but are more prone to wear at connection points. However, many homeowners replace net lights every 3–5 years due to improved technology or storage damage, making longevity less of a deciding factor than ease of use.
Final Recommendation: Choose Based on Purpose
If your goal is **ease of installation** and a convincing **snow-covered rooftop illusion**, **net lights are the superior choice**. They cover more area with fewer attachment points, install faster, and deliver a visually authentic effect that rope lights simply can’t replicate.
Rope lights still have value—for outlining roof perimeters, framing chimneys, or adding accent lines beneath eaves. But as a primary tool for simulating snow accumulation, they fall short in efficiency and aesthetics.
For best results, consider combining both: use net lights to blanket the main roof surface and rope lights to outline the edges. This hybrid approach delivers dimension and realism while maintaining clean boundaries. Just remember—start with the nets. They’ll do 80% of the visual work with 40% of the effort.


 浙公网安备
33010002000092号
浙公网安备
33010002000092号 浙B2-20120091-4
Comments
No comments yet. Why don't you start the discussion?