
Replacing the band on your Samsung Galaxy Watch is one of the easiest ways to refresh its look or improve comfort for daily wear. Whether you're switching from silicone to leather, upgrading to a metal link bracelet, or replacing a worn-out strap, doing it correctly matters. A poorly executed change can scratch the watch body, damage the quick-release pins, or misalign the band connectors—potentially voiding warranties or reducing resale value.
The good news: with the right technique and attention to detail, replacing your Galaxy Watch band is a five-minute task that requires no tools in most cases. This guide walks through every essential step, common pitfalls, and expert-backed methods to ensure your smartwatch stays pristine while getting a stylish upgrade.
Understanding Your Galaxy Watch Band Mechanism
Samsung Galaxy Watches use a spring bar or quick-release pin system, depending on the model generation. Most newer models (Galaxy Watch 4, 5, 6, and Active series) feature a tool-free quick-release mechanism built into the band connectors. These small metal tabs slide into slots on the watch case and lock securely with a snap.
Older models may use traditional spring bars, which require a fine-tipped tool to depress the spring and release the band. Knowing your model’s specific connector type is crucial before beginning. Check your user manual or inspect the side of the current band attachment point: if you see small notches or sliding levers, you likely have a quick-release system.
“Over 70% of Galaxy Watch owners who damage their devices during band replacement do so by applying force in the wrong direction. Always follow the natural release path.” — David Kim, Senior Technician at WearableFix Labs
Step-by-Step Guide to Safely Remove and Replace the Band
- Power down your watch (optional but recommended): While not required, turning off the device reduces the risk of accidental screen activation or input during handling.
- Place the watch on a soft, clean surface: Use a microfiber cloth or padded mat, screen-side down, to avoid scratches.
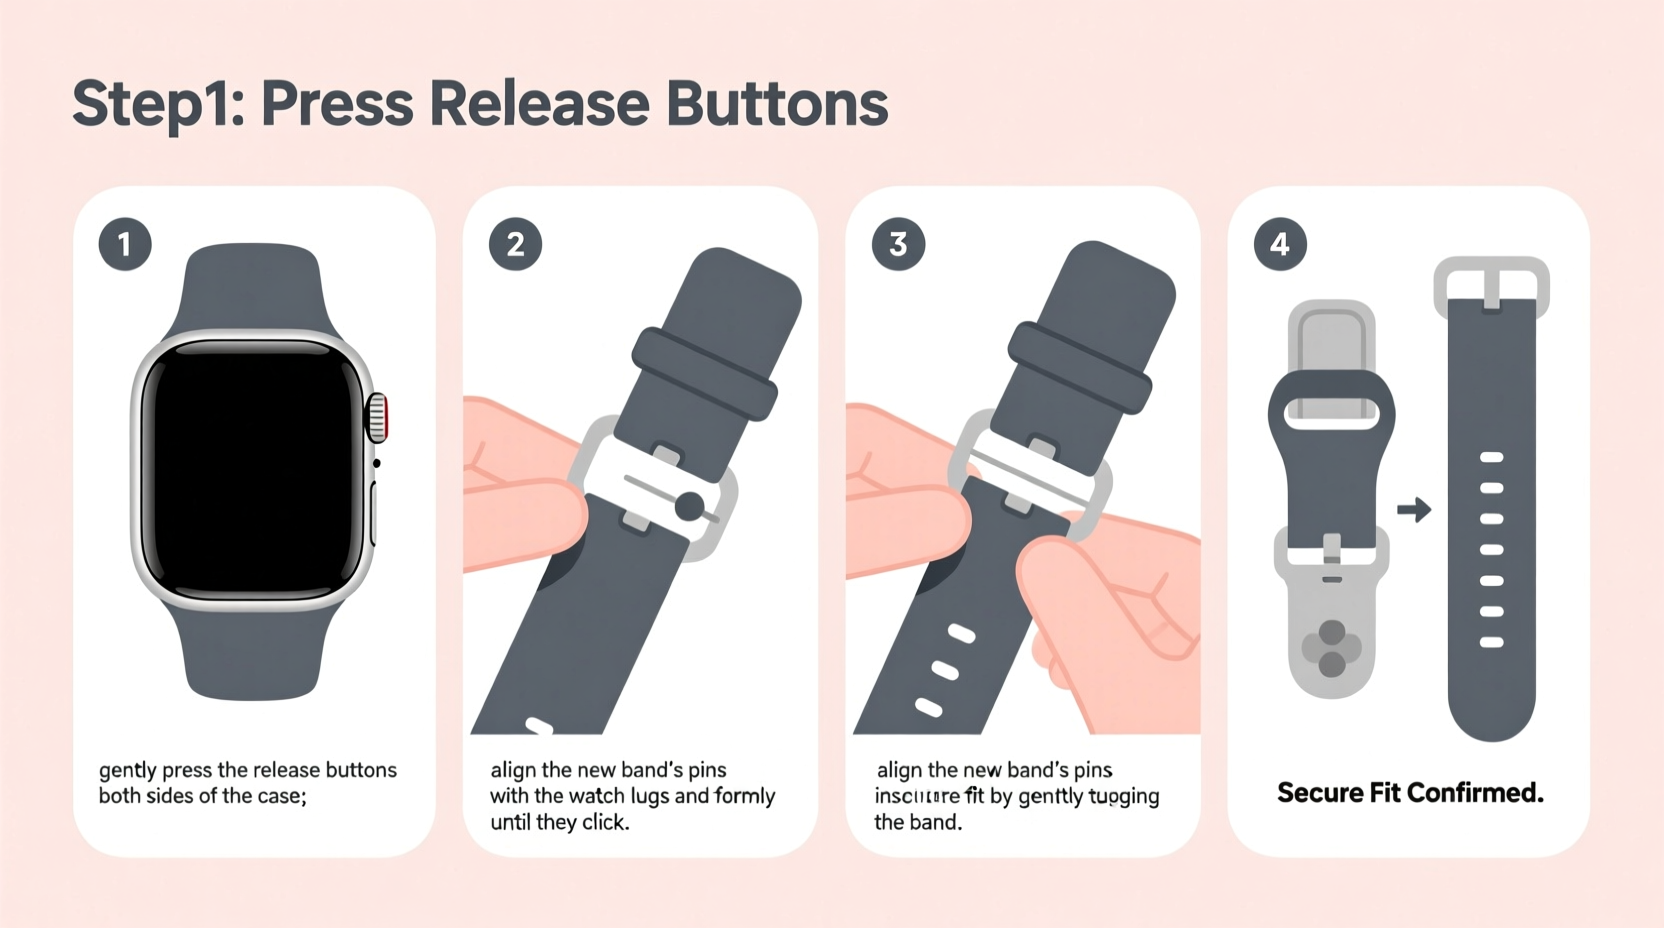
- Locate the release mechanism: On each side where the band meets the watch case, find the small lever or button. It's usually recessed and aligned with the band’s width.
- Press and hold the release: Use your fingernail or a plastic spudger to gently press the release tab inward. Do not use metal tools like tweezers or paperclips—they can gouge the housing.
- Slide the band outward: While holding the release, pull the band straight away from the watch. It should detach smoothly. Repeat on the opposite side.
- Align the new band: Take your replacement band and line up the connector pin with the slot on the watch. Ensure the text or logo on the band faces outward (away from the wrist).
- Insert and click into place: Push the band firmly until you hear or feel a soft click. Test by gently tugging—it should stay secured without wobbling.
- Repeat on the other side: Attach the second end using the same method.
Do’s and Don’ts When Changing Your Galaxy Watch Band
| Do’s | Don’ts |
|---|---|
| Use clean hands or gloves to prevent oil transfer | Use sharp or metallic objects near release pins |
| Clean the watch case and connectors before reattaching | Drop the watch on hard surfaces during disassembly |
| Verify compatibility (20mm, 22mm, etc.) before purchase | Leave bands loosely attached or unevenly seated |
| Store old bands in labeled pouches for future use | Expose connectors to water, dust, or sand during swap |
| Inspect pins regularly for wear or corrosion | Reuse damaged or bent connectors |
Real Example: How One User Avoided Costly Damage
Sophia, a fitness instructor from Austin, bought a premium stainless steel band for her Galaxy Watch 5. Excited to wear it for an early morning class, she rushed the installation. Without checking alignment, she forced the left connector into place. The pin didn’t seat properly, and when she raised her arm, the band snapped off mid-squat, hitting the gym floor.
She noticed a faint scratch on the watch casing and a slight wobble on the right side. After visiting a Samsung service center, she learned the internal bracket had been slightly deformed from improper insertion. The repair cost $45, and she was advised never to rush band changes again.
Now, Sophia keeps a small toolkit with a plastic opening tool and always performs swaps at home under good lighting. She also labels her bands by size and style, making rotation effortless. Her watch remains scratch-free after over a year of weekly changes.
Essential Tips for Long-Term Band and Watch Care
- Rotate bands regularly: Alternating between two or more bands reduces wear and sweat buildup on any single strap.
- Clean connectors monthly: Use a dry cotton swab to remove lint, dust, or dried sweat from the attachment slots.
- Avoid extreme temperatures: Heat can warp plastic connectors; cold makes metals brittle. Store watches at room temperature.
- Check third-party band quality: Not all aftermarket bands meet Samsung’s tolerances. Look for reinforced pins and precise fitment reviews.
- Keep original bands: They maintain resale value and are guaranteed compatible if issues arise with replacements.
Frequently Asked Questions
Can I use Apple Watch bands on my Galaxy Watch?
No. Despite similar appearance, Apple Watch and Galaxy Watch bands use different lug widths, connector mechanisms, and curvature designs. Attempting to force compatibility will likely damage both the band and watch.
How tight should the band feel once installed?
The band should be secure with no lateral movement or clicking when shaken. You should not be able to pull it out without pressing the release button. If it feels loose, reseat it fully or check for debris in the slot.
My band won’t release—what should I do?
First, ensure you’re pressing the correct tab. Some bands have subtle release points. Apply steady pressure with a plastic tool, never metal. If still stuck, power off the watch and try from a different angle. If unresponsive, consult Samsung support—do not pry aggressively.
Final Checklist Before Every Band Change
- Wash and dry your hands thoroughly
- Turn off the Galaxy Watch (recommended)
- Place the watch face-down on a soft surface
- Identify the release mechanism on both sides
- Use only non-metallic tools (or fingernails)
- Remove one band at a time, starting with the bottom
- Align new band correctly—text facing outward
- Push firmly until a click is felt on both ends
- Test stability with a gentle tug
- Power on and wear confidently
Conclusion: Upgrade Your Style, Not Your Risks
Swapping your Galaxy Watch band should be a seamless, satisfying experience—not a gamble with your device’s integrity. By understanding the mechanics, respecting the design, and following careful procedures, you protect your investment while enjoying endless customization options.
Your smartwatch is designed to adapt to your lifestyle, not the other way around. With these proven steps, you can confidently switch bands for workouts, formal events, or seasonal trends—all without a single scratch or malfunction.


 浙公网安备
33010002000092号
浙公网安备
33010002000092号 浙B2-20120091-4
Comments
No comments yet. Why don't you start the discussion?