
Furniture that moves with you is not just a luxury—it's smart design. The humble IKEA pouffe, while comfortable and stylish, was never built with movement in mind. Dragging it across the floor can damage both the fabric and your hardwood or laminate surfaces. But what if you could glide it effortlessly from your reading nook to beside the sofa? Attaching wheels transforms your pouffe into a mobile seating solution, perfect for small apartments, shared living spaces, or anyone who values flexible interior design.
This guide walks you through a reliable, beginner-friendly method to add durable casters to your IKEA pouffe using basic tools and affordable hardware. Whether you're upgrading a single pouffe or planning a full living room refresh, this modification enhances utility without compromising aesthetics.
Why Add Wheels to a Pouffe?
A pouffe is more than just a footrest. It doubles as extra seating, a side table, or even a makeshift bed for pets. However, its low weight and soft construction make it awkward to reposition frequently. Dragging causes friction wear, especially on woven or cotton-blend covers, leading to fraying and scuffing over time.
Adding wheels solves several problems:
- Reduces floor scratches and fabric wear
- Enables quick rearrangement of space
- Improves accessibility for users with limited mobility
- Adds a subtle modern, industrial touch to décor
The transformation is inexpensive and reversible, meaning you’re not permanently altering your furniture—just enhancing its functionality.
Tools and Materials You’ll Need
You don’t need a fully equipped workshop. Most items are available at local hardware stores or online retailers like Amazon or Home Depot. Here’s what to gather before starting:
| Item | Purpose | Recommended Specs |
|---|---|---|
| Casters (wheels) | Provide mobility | Swivel type, 1–1.5 inch diameter, load-rated above 50 lbs each |
| Threaded inserts or mounting plates | Secure attachment point | ¼”-20 threaded inserts or L-brackets |
| Screwdriver or drill | Installation | Power drill preferred for speed and precision |
| Spade bit or hole saw | Drilling pilot holes | Size matching insert diameter |
| Measuring tape & pencil | Marking placement | Ensure symmetry |
| Wood block (optional) | Reinforce soft base | 3” x 3” hardwood scrap |
Select casters with rubber or polyurethane treads if you have hardwood, tile, or laminate flooring. These protect floors better than metal or hard plastic wheels.
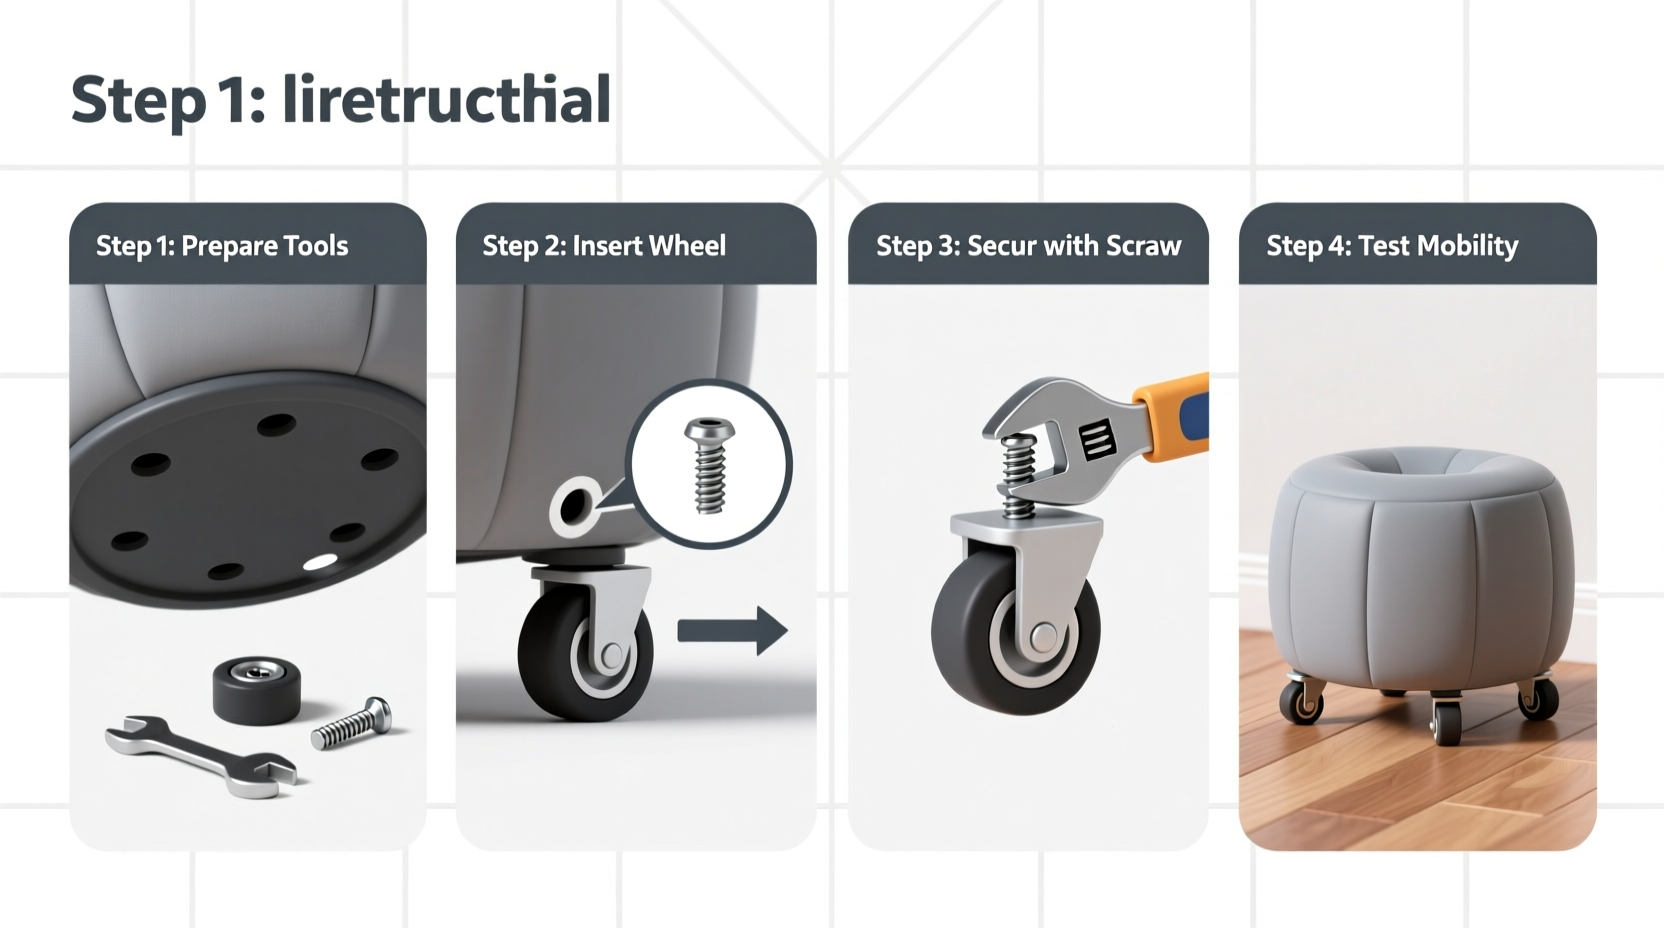
Step-by-Step Installation Guide
Follow these steps carefully to ensure stability and longevity. This process assumes your pouffe has a flat bottom—common in models like the EKTORP, SVÄRTA, or PS LOCK.
- Turn the pouffe upside down and clear the workspace. Make sure the surface is clean and dry.
- Determine wheel placement. Use a measuring tape to mark four points near each corner, about 1–2 inches from the edge. Avoid placing too close to the border, which could weaken the structure.
- Check internal support. Press gently on the marked spots. If the base feels spongy or compresses significantly, reinforce it. Cut a small hardwood block (approx. 3” square) and glue it beneath each mounting point using strong wood adhesive. Clamp and let dry overnight.
- Drill pilot holes. Using a spade bit slightly smaller than your threaded insert, drill straight through the fabric and inner foam layer into the reinforcement block (or directly into a firm base). Depth should match the length of the insert.
- Install threaded inserts. Tap them gently with a mallet or screw in using a wrench until flush. These create a durable anchor point that won’t strip when screws are removed later.
- Screw on the casters. Align the stem of each caster with the insert and tighten securely by hand, then use pliers if needed. Do not overtighten, as this may crack the insert.
- Test stability. Flip the pouffe right-side up and push gently from different angles. There should be no wobbling or uneven contact.
If your pouffe lacks a firm base and reinforcement isn't possible, consider using heavy-duty L-brackets screwed into wooden blocks placed inside the base. Attach the caster to the vertical arm of the bracket.
Real-World Example: A Small Apartment Transformation
In Stockholm, Maria, a freelance designer living in a 45m² apartment, struggled with limited space. Her favorite IKEA SVÄRTA pouffe served multiple roles but was always in the way during cleaning or guest visits. After reading about caster modifications, she invested €18 in soft-roll casters and spent one evening installing them.
“I was nervous about drilling through the fabric,” she said, “but once I added small pine blocks inside for support, everything held perfectly. Now I roll it under the coffee table when not in use, or pull it beside my desk as an extra seat. It’s changed how I use my space.”
Within weeks, she added a tray top to turn it into a mobile side table. The combination of modularity and motion made her compact home feel larger and more adaptable.
“Furniture shouldn’t dictate space—people should. Adding mobility elements empowers users to shape their environment dynamically.” — Lars Bengtsson, Interior Mobility Consultant, Nordic Living Lab
Common Mistakes to Avoid
Even simple projects can go wrong without attention to detail. Watch out for these pitfalls:
- Skipping reinforcement: Soft bases compress under weight, causing screws to loosen over time.
- Using cheap casters: Low-quality wheels break easily or scratch floors. Invest in load-rated, floor-safe options.
- Asymmetrical placement: Uneven spacing leads to tilting. Always measure twice.
- Over-tightening screws: Can crack plastic inserts or damage internal materials.
- Ignoring weight distribution: Ensure all four wheels make contact. Test with full body weight before regular use.
FAQ
Can I attach wheels without drilling?
Non-drilling options exist—such as adhesive-mounted caster pads—but they are unreliable for frequent use. Adhesives degrade under constant pressure and temperature changes. For lasting results, mechanical fastening is strongly recommended.
Will adding wheels damage my IKEA warranty?
Technically, any modification voids manufacturer warranties. However, since pouffes are sold as non-structural items, warranty claims are rare. Most consumers modify with confidence, knowing the improvement far outweighs any hypothetical coverage.
What if my pouffe has rounded edges or curved base?
For curved-bottom models like some ottomans, attach a flat wooden platform (½” plywood, cut to size) to the underside first. Secure it with strong Velcro straps or adhesive pads, then mount the casters to the platform. This creates a stable base for wheel installation.
Final Checklist Before You Begin
- ✅ Choose appropriate casters
- Rubber-treaded, swivel-type, rated for at least 50 lbs per wheel.
- ✅ Prepare tools
- Drill, spade bit, measuring tape, pencil, clamps, wood glue (if reinforcing).
- ✅ Reinforce soft bases
- Add internal wood blocks under each mounting point for durability.
- ✅ Mark and drill accurately
- Ensure symmetrical, evenly spaced holes.
- ✅ Install threaded inserts
- Do not skip this step—it ensures long-term usability.
- ✅ Attach and test
- Roll in all directions, apply light pressure, confirm smooth operation.
Conclusion: Turn Static Furniture Into Smart, Mobile Design
Your IKEA pouffe doesn’t have to stay stuck in one place. With less than $20 and under an hour of work, you can unlock new levels of flexibility in your home. Whether you're optimizing a studio layout, helping someone with mobility challenges, or simply tired of scraping floors, adding wheels is a small change with big impact.
Don’t wait for furniture to adapt to your life—adapt it yourself. Take action today: grab your tools, pick up a set of casters, and give your pouffe the freedom to move.


 浙公网安备
33010002000092号
浙公网安备
33010002000092号 浙B2-20120091-4
Comments
No comments yet. Why don't you start the discussion?