
Ice Watches are known for their vibrant colors, lightweight design, and water-resistant features. While they’re built to last, even the most durable watches eventually need a new battery. Instead of paying for professional service, you can save time and money by replacing the battery yourself—provided you do it correctly. Done improperly, however, this process can damage the case, compromise water resistance, or scratch the internal components.
This guide walks you through each stage of changing an Ice Watch battery with precision and care. Whether you’ve owned your watch for years or just received it as a gift, following these steps ensures a safe, successful replacement that maintains both function and appearance.
Why Replace the Battery Yourself?
Professional battery replacements can cost between $20 and $50, depending on location and service provider. For a simple task like swapping a small button cell, this fee often includes more labor than complexity. Since Ice Watches use standard CR2032 batteries—a common type found in many electronics—the actual component costs less than $5.
By doing it yourself, you retain full control over cleanliness, tools used, and reassembly quality. You also avoid potential delays from shipping or store wait times. However, success depends on patience, attention to detail, and using the right tools.
What You’ll Need: Tools and Materials
Gathering the correct supplies is essential. Using improper tools—like metal screwdrivers or pliers—can scratch the case or damage gaskets. Here’s what to prepare:
- Replacement Battery: CR2032 (3V lithium). Ensure it's fresh and sealed.
- Precision Screwdriver Set: With a fine Phillips head (#00 or #0).
- Case Back Opener Tool: Also called a watch back wrench or spanner tool.
- Plastic Tweezers: To handle the battery without transferring oils from fingers.
- Soft Lint-Free Cloth: For cleaning and placing parts.
- Magnifying Glass (optional): Helps inspect seals and tiny components.
- Rubber Mat or Soft Pad: Prevents slipping and protects the watch face.
“Home repairs only make sense when you have the right tools. One slip with a metal tool can ruin a waterproof seal permanently.” — Daniel Reeves, Watch Technician & Repair Instructor
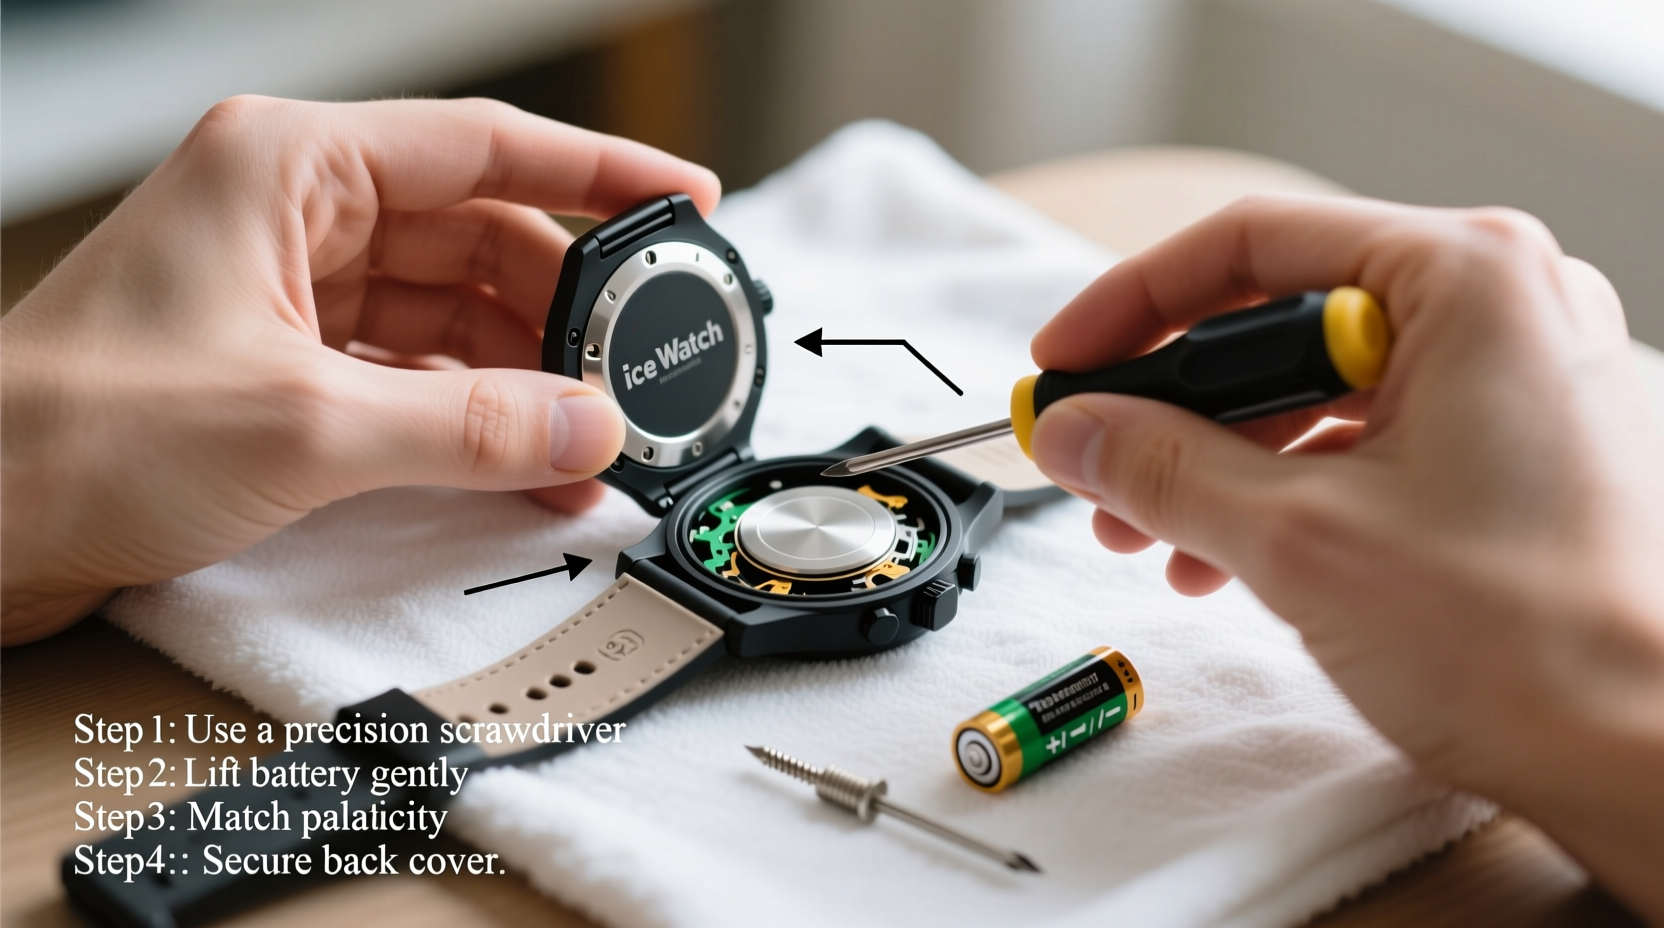
Step-by-Step Guide to Changing Your Ice Watch Battery
Follow these steps carefully. Rushing increases the risk of misalignment or damage. Allow 20–30 minutes for the entire process.
- Power Down the Watch
Remove the current battery briefly to ensure no electrical activity occurs during disassembly. If the watch is already dead, skip to step two. - Clean the Case Back
Wipe the edge of the case back with a soft cloth. Dust or debris can interfere with tool grip and lead to slippage. - Determine the Case Type
Most Ice Watches use either a snap-on or screw-down case back:- Snap-back: Has notches around the rim; opened with a case knife or pry tool.
- Screw-back: Features indentations requiring a spanner tool to turn counterclockwise.
- Open the Case Back
For screw-back models: Fit the spanner tool into the notches and turn gently counterclockwise. Apply even pressure to avoid rounding the edges.
For snap-back models: Insert a plastic case knife into the groove and twist slightly to pop the back off. Work slowly around the perimeter. - Inspect Internal Components
Lift the back away and place it aside. Look inside for moisture, corrosion, or damaged gaskets. A dry, clean interior means the seal was intact. - Remove the Old Battery
Use plastic tweezers to lift the battery from its holder. Some models have a retaining clip—release it first with the tip of a plastic tool. - Clean the Battery Compartment
With a cotton swab lightly dampened with isopropyl alcohol, wipe the contact points. Let dry completely before inserting the new battery. - Insert the New Battery
Place the CR2032 with the positive side (+) facing up unless otherwise marked. Press gently until seated. Do not force it. - Reassemble the Watch
Replace the case back. For screw-backs, turn clockwise until snug. For snap-backs, align the back and press evenly around the edge until it clicks. - Test Functionality
Wait 10–15 seconds for the watch to power on. Check if the time displays correctly and hands move smoothly.
Do’s and Don’ts When Replacing Your Ice Watch Battery
| Do’s | Don’ts |
|---|---|
| Use plastic or nylon tools to prevent scratches | Use metal screwdrivers near internal components |
| Work in a dust-free environment | Perform the task outdoors or in a windy area |
| Handle the battery with tweezers | Touch the battery terminals with bare fingers |
| Check the gasket for cracks or stiffness | Reassemble with a damaged or missing seal |
| Tighten screw-backs firmly but not excessively | Over-tighten, which may strip the threads |
Real Example: A Successful DIY Replacement
Sophie, a graphic designer from Portland, noticed her Ice Watch stopped keeping time after 18 months. She took it to a local jeweler who quoted $35 for a battery change. Unwilling to pay that much for a five-dollar part, she bought a $7 repair kit online. Following a tutorial, she replaced the battery in under 25 minutes. The watch resumed normal operation and retained its water resistance. Sophie now keeps spare batteries and tools for future changes.
Her key takeaway? “The hardest part wasn’t the repair—it was finding confidence to start. Once I saw how simple it was, I realized most people could do it.”
Frequently Asked Questions
Can changing the battery at home void my Ice Watch warranty?
Yes, in some cases. Opening the case yourself may void the manufacturer’s warranty, especially if damage occurs. Ice Watch typically offers a limited 2-year warranty, so consider this if your watch is still under coverage. However, many users opt for DIY after year one, when warranty protection has expired.
How long does a CR2032 battery last in an Ice Watch?
On average, 1.5 to 3 years, depending on usage and temperature exposure. Features like backlighting (if applicable) or frequent button presses can shorten lifespan.
Is my Ice Watch still water-resistant after I open it?
Only if the rubber gasket is intact and properly resealed. Over time, gaskets degrade. If yours feels cracked or brittle, replace it before closing the case. Without a good seal, water resistance is compromised.
Final Checklist Before You Begin
- ☐ Fresh CR2032 battery purchased
- Ensure it’s within expiration date and sealed.
- ☐ Correct tools assembled
- Spanner tool or case knife, plastic tweezers, precision screwdriver.
- ☐ Clean, stable workspace ready
- No drafts, pets, or distractions nearby.
- ☐ Gasket inspected and functional
- Look for cracks, dryness, or deformation.
- ☐ Watch powered down
- If still running, remove old battery first.
Conclusion
Changing your Ice Watch battery at home is a practical skill that saves money and builds confidence in handling delicate electronics. With the right tools, a steady hand, and careful attention to detail, you can complete the job safely and effectively. Remember: the goal isn’t just to get the watch running again—it’s to preserve its integrity, appearance, and functionality for years to come.


 浙公网安备
33010002000092号
浙公网安备
33010002000092号 浙B2-20120091-4
Comments
No comments yet. Why don't you start the discussion?