
Custom mechanical keyboards are no longer reserved for tech enthusiasts with soldering irons and years of experience. Thanks to plug-and-play components and hot-swap technology, anyone can build a personalized keyboard from scratch—without ever touching a soldering iron. Whether you're looking for better typing comfort, unique aesthetics, or simply the satisfaction of creating something with your hands, this guide walks you through every stage of assembling a solder-free custom keyboard.
The process is more accessible than most people think. With the right parts and a clear plan, you can go from unboxing components to typing on your dream keyboard in under a few hours. This guide breaks down each phase: selecting compatible parts, assembling the case, installing the plate and switches, adding keycaps, and programming your layout—all without requiring technical expertise.
Why Build a Solder-Free Custom Keyboard?
Traditional keyboard builds often require soldering switches directly onto a printed circuit board (PCB), which demands precision, tools, and some electrical knowledge. But modern advancements have made it possible to skip that step entirely. Hot-swap PCBs allow you to insert mechanical switches into sockets just like plugging in a USB device. This not only lowers the barrier to entry but also makes future upgrades and repairs effortless.
Building your own keyboard gives you full control over ergonomics, sound, feel, and appearance. You can choose soft dampening foam for a quieter type, pick tactile switches for feedback, or design a compact 60% layout to save desk space. Plus, there’s undeniable pride in using a device you built yourself—one that reflects your style and needs.
“Non-solder builds are revolutionizing how people interact with their peripherals. They make customization accessible to everyone.” — Jordan Lee, Mechanical Keyboard Designer at Keyforge Labs
Essential Components and What to Look For
Before assembly begins, you need to source the right parts. A solder-free build requires five core components, all designed to work together seamlessly:
- Case: Holds everything together; available in plastic, aluminum, or wood.
- PCB (Printed Circuit Board): The electronic brain of the keyboard. Must support hot-swap switch sockets.
- Plate: A metal or plastic sheet that stabilizes the switches. Should match your case and PCB size.
- Switches: Determine the typing feel. Choose from linear, tactile, or clicky types.
- Keycaps: The visible top layer. Available in various materials, colors, and profiles.
Compatibility is crucial. Most standard layouts—like 60%, 65%, 75%, or TKL—are modular, meaning parts are interchangeable as long as they follow the same footprint. Always verify dimensions and mounting style before purchasing.
Component Compatibility Checklist
| Component | What to Check | Common Pitfalls |
|---|---|---|
| Case | Layout compatibility (e.g., 60%), material, screw spacing | Incompatible with certain PCB thicknesses or plate types |
| PCB | Hot-swap support, layout alignment, firmware options (QMK/VIA) | Missing USB-C port or incorrect orientation |
| Plate | Material (aluminum, polycarbonate), fit with case and PCB | Too tight or too loose; may cause switch wobble |
| Switches | MX-style stem compatibility, actuation force, noise level | Purchasing non-hot-swap rated switches by mistake |
| Keycaps | Profile (OEM, SA, DSA), material (PBT vs ABS), legend printing | Wrong stem type (Cherry MX vs others) |
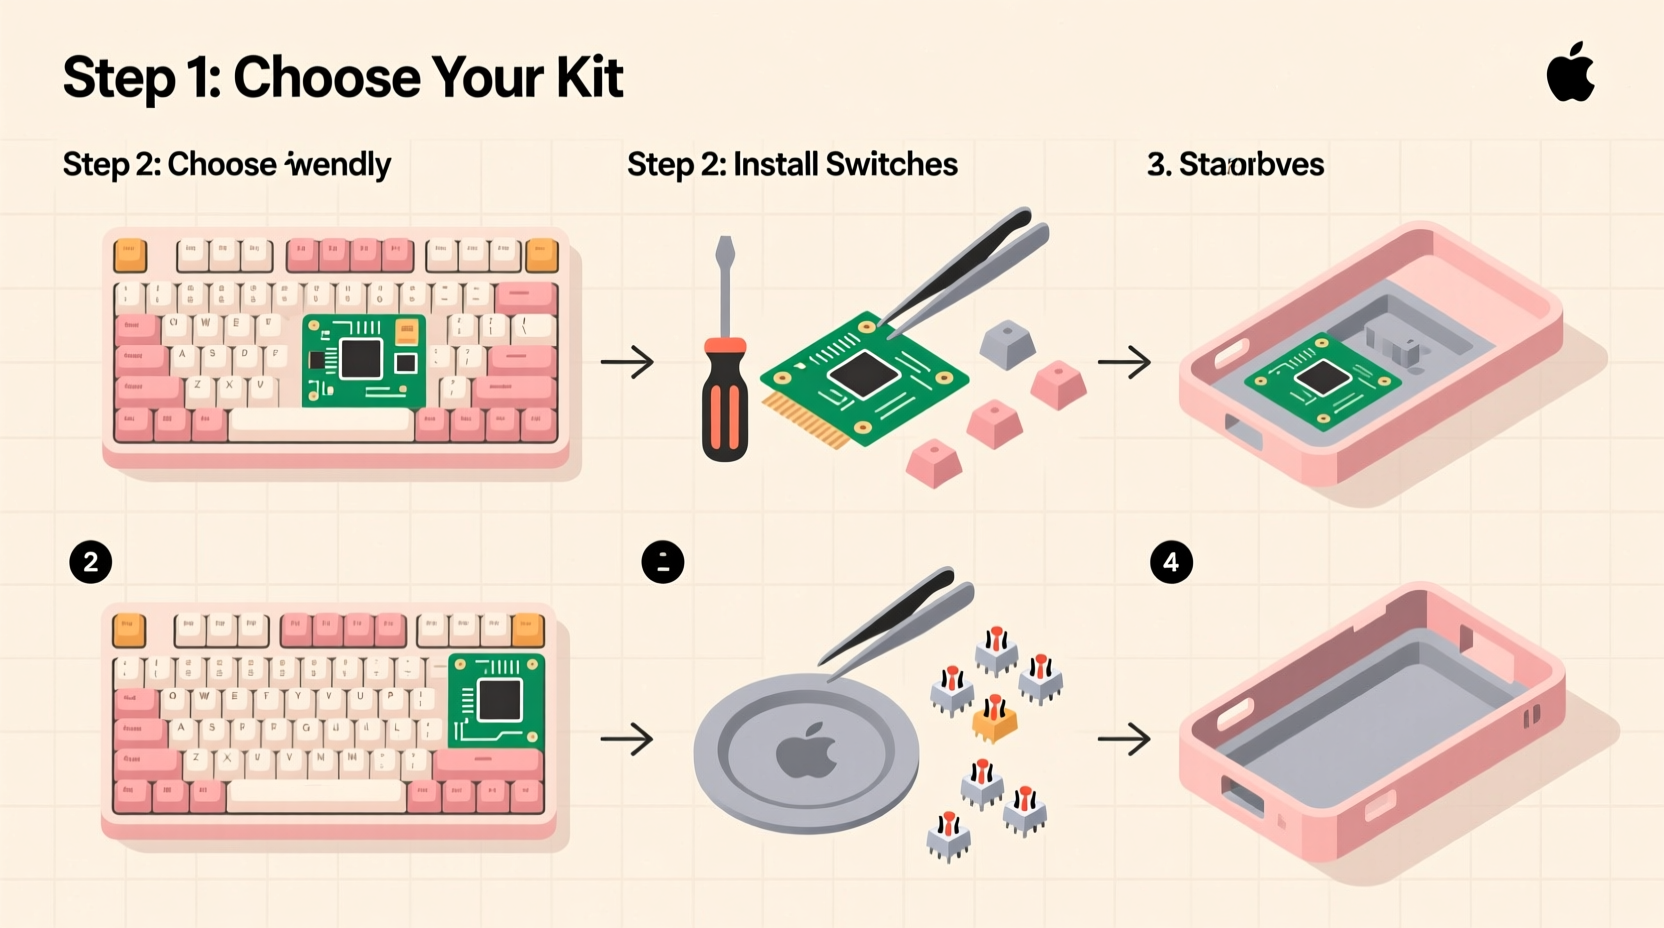
Step-by-Step Assembly Process
With all components in hand, follow this detailed sequence to assemble your keyboard safely and correctly. No special tools are required beyond tweezers, a small screwdriver, and patience.
- Prepare Your Workspace
Clear a clean, well-lit area free of static. Lay out all parts and organize them by category. Ground yourself if working on carpet to avoid damaging electronics with static discharge. - Install Dampening Foam (Optional but Recommended)
Many cases include space for foam padding beneath the PCB to reduce ping and echo. Cut the foam to size if necessary and place it flat at the bottom of the case. This step significantly improves sound quality. - Insert the PCB into the Case
Align the PCB with the mounting holes or rails in the case. If your case uses standoffs, ensure screws are loosely attached first. Do not fully tighten yet—alignment comes later. - Mount the Plate
Place the plate over the PCB, aligning the switch holes. Some plates sit on top (top mount), others are sandwiched (gasket mount). Secure it gently with screws, starting from the center and moving outward to prevent warping. - Insert Mechanical Switches
Press each switch straight down into the hot-swap sockets on the PCB. Use even pressure until it clicks into place. Work row by row to avoid confusion. Tweezers help position switches precisely. - Attach Keycaps
Snap keycaps onto the switch stems one by one. Start with the corners to check alignment. If using a custom layout, double-check keycap labels match intended positions. - Connect the Cable and Test
Plug in the USB cable—usually USB-C—and connect to your computer. All keys should register immediately. Use an online keyboard tester (like keyboardtester.com) to verify each key functions. - Final Screw Tightening
Once tested, go back and fully secure all screws. Avoid over-tightening, especially on plastic cases, to prevent cracking.
Real Example: Sarah’s First Build
Sarah, a graphic designer from Portland, had never touched a keyboard kit before but wanted a quiet, ergonomic typing experience for long work sessions. She chose a 65% aluminum case with gasket mounting, a VIA-compatible PCB, and silent red linear switches. After watching one tutorial, she followed the steps above and completed her build in about two hours.
At first, she missed inserting one switch fully, causing a dead key. But because the board was hot-swap, she removed the keycap, reseated the switch with tweezers, and fixed it in seconds. Now, she types on a sleek, personalized keyboard that matches her desk setup perfectly—and she’s already planning her next build with glow-in-the-dark keycaps.
Programming and Customization Without Code
One of the biggest advantages of modern PCBs is user-friendly firmware. Many boards now support QMK or VIA, allowing you to remap keys, create layers, and adjust lighting—without writing a single line of code.
VIA (Variable Input Assigner) is especially beginner-friendly. Download the app, connect your keyboard, and drag-and-drop functions to any key. Want to turn the caps lock into a control key? Done. Need a dedicated emoji button? Assign it in seconds. Some PCBs even support wireless connectivity and battery integration for portable builds.
If your board doesn’t support VIA, check if it uses QMK with a configurator tool. These web-based interfaces let you generate custom firmware files by clicking options, then flash them via a simple reset process.
Frequently Asked Questions
Can I change switches later on a hot-swap board?
Absolutely. That’s the main benefit of hot-swap sockets. Simply remove the keycap, use a switch puller or tweezers to lift the switch out, and press in a new one. No tools or soldering required.
Are solder-free keyboards less durable than soldered ones?
No. Modern hot-swap sockets are rated for thousands of insertions and provide stable electrical contact. As long as you use quality components, durability is comparable to soldered builds.
What if a key stops working?
First, try reseating the switch. If that doesn’t help, test another switch in the same socket to determine if it’s the switch or the PCB. Most issues are resolved by replacing the switch, which takes less than a minute.
Conclusion: Your Custom Keyboard Awaits
Building a custom keyboard without soldering is not only possible—it’s enjoyable and surprisingly simple. From selecting parts that reflect your taste to assembling them with care and programming your ideal layout, the entire process empowers you to create a tool that enhances both productivity and pleasure.
You don’t need prior experience, expensive tools, or technical training. With a hot-swap PCB and a bit of attention to detail, you can craft a keyboard that fits your hands, your workflow, and your aesthetic. And once you’ve built one, you’ll likely find yourself drawn to the next project—maybe a split ergonomic design, or a minimalist number pad for gaming.


 浙公网安备
33010002000092号
浙公网安备
33010002000092号 浙B2-20120091-4
Comments
No comments yet. Why don't you start the discussion?